Category Archives: Slicing

Resuming a Print (After Turning Off and Moving the Machine)

axieses

As the Nova Mini Maker Faire came to a close, my demonstration print was far from done. I stopped the print, turned off and unplugged the machine, loaded the machine up into the trunk of my car, drove the 26 miles home (with a strategic stop by Burger King for some yummy yummy Chicken Fries), and set the machine back up at home. A week later, I was ready to start printing again and I wanted to start where I left off. I was able to do so with my trusy MakerGear M2 and Simplify3D. Here’s how!

Homing the Axes
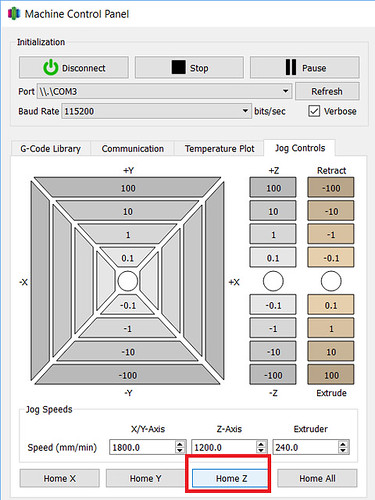
Before I could resume printing, I needed to rehome all my axes so my nozzle had all its bearings, particularly the tricky Z axis. In this case, my print was not very high, so under the Machine Control Panel in Simplify3D, I was able to move the bed around to a good spot for me to hit Home Z without my print hitting the nozzle or the X axis support bar.

Restarting a Print - HomeZ

Homing the Z axis can be trickier with taller prints. Since the MakerGear M2 set its Z-Endstop with a bolt on the side of the bed and it has a removable glass bed, I do have a little “hack”. When resuming taller prints, I remove the glass bed, home all the axes and then replace the bed. Sometimes there is a slight variation with the positioning of the print, but so far it has not been very noticeable in my final prints.

Where to Restart
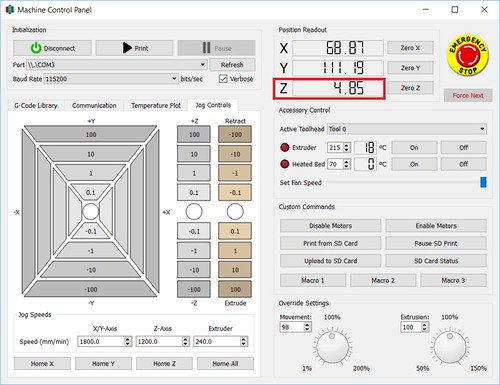
I know, I know. There are downsides to printing via the USB cable. An upside though– in Simplify3D, you have a continuous update of exactly where the nozzle is, most notably how high it is in the Z axis. In the case of my Maker Faire print, I was the one that stopped the print, so I was able to note and record the exact Z position I stopped off at. That meant I knew exactly what height I wanted to restart the print at.

Restarting a Print - Noting Stopping Point

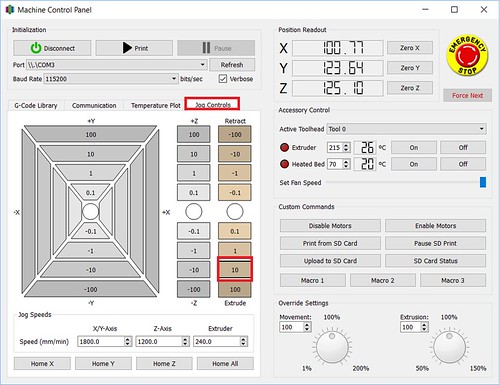
Sometimes I don’t have that kind of information at my disposal. The other week, I had a filament tangle. I returned to my print to find the printer had been printing nothing for who knows how long. In those cases, I use the Jog Controls tab in the Machine Control Panel to do some sleuthing:

I start with my nozzle way above the print and I lower the Z position until I get close. The closer I get, the smaller the increments I move down, until I am using the -0.1 Z button. When I feel I am pretty much there, I pick an inconspicuous spot on the print and move the nozzle on top of it to make sure the nozzle is just barely above my print. I have found that sometimes touch is easier than sight, so I use a handy dandy business card to gauge the distance. Once I’m satisfied, I only have to refer to the positioning information in Simplify3D to get my Z startng point.

Resuming the Print
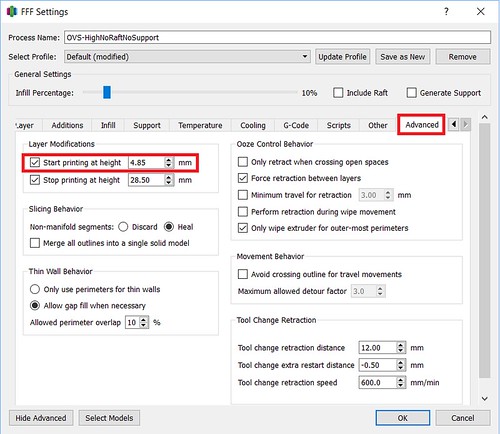
Next I tell Simplify3D where it needs to start printing. I do that under the Advanced tab and setting the Start Printing At Height setting.

Restarting a Print - Advanced Tab - Start Printing Height

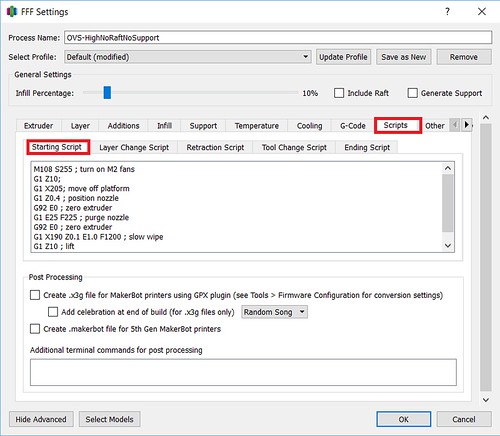
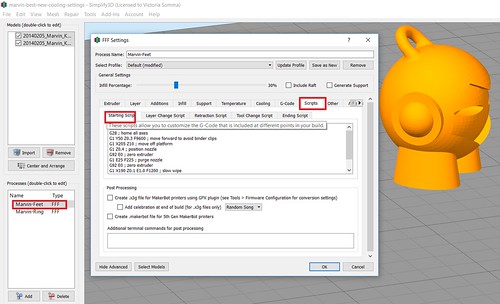
Finally, I need to give attention to my Starting Script in the Scripts tab. There are steps in the normal start up script I do not want to run. For example, I don’t want to home my axes (G28;)– I already did that manually.  And depending on the object and its positioning on the bed, I may opt to alter other steps that may cause the nozzle to collide with my print. In the case of my Maker Faire print, I made some slight adjustments to the script that has the nozzle go off to the side of the bed to ooze some filament before beginning. I still wanted to do that, but I wanted to make sure the nozzle lifted up high enough (G1 Z10;) to safely cross over my object.

Restarting a Print - Advanced Tab - Custom Scripts

My normal Starting Script went from:

M108 S255 ; turn on M2 fans
G28 ; home all axes
G1 Y50 Z0.3 F9600 ; move forward to avoid binder clips
G1 X205 Z10 ; move off platform
G1 Z0.4 ; position nozzle
G92 E0 ; zero extruder
G1 E25 F225 ; purge nozzle
G92 E0 ; zero extruder
G1 X190 Z0.1 E1.0 F1200 ; slow wipe
G1 X180 Z0.25 ; lift

To

M108 S255 ; turn on M2 fans
G1 Z10;
G1 X205; move off platform
G1 Z0.4 ; position nozzle
G92 E0 ; zero extruder
G1 E25 F225 ; purge nozzle
G92 E0 ; zero extruder
G1 X190 Z0.1 E1.0 F1200 ; slow wipe
G1 Z10 ; lift


Of course, your mileage may vary, but hopefully some of this information translates or inspires a technique that works with your printer and slicer. Happy Printing!
Embedding Mirrors Into Prints with Simplify3D

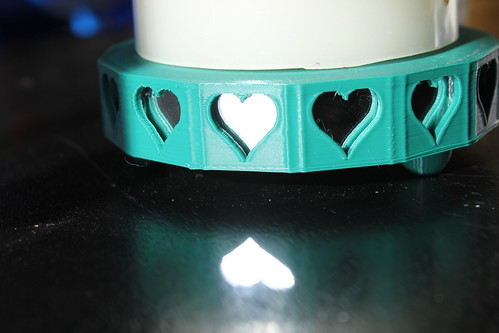
My sister turned 40 this month and get this– I have never, ever, ever printed her anything. I printed something for her husband, but not her. Bad Vicky! That definitely needed to change. Her house is a very visually stimulating house. They have a variety of lighting and effects– think blacklights, giant flatscreens with screensavers dancing to the music, lasers making patterns on the walls, lava lamps. I wanted my design to fit in and interact with the lighting in her house. I wanted something with mirrors.

Designing
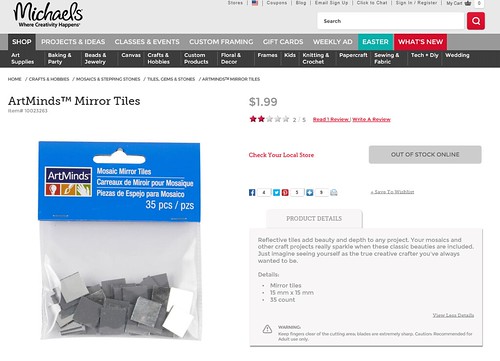
At Michael’s I bought little mosaic mirrors– 35 of them for $1.99.

3D Printing Mosiac Mirror Tiles

Then I got out the trusty calipers. There was some variance in the measurements, but the mirrors were pretty much 15 millimeters by 15 millimeters and 1.75 thick. I designed in cavities into my model for the placement of the mirrors. I used 0.5 millimeter clearance– which meant my “hole” came out to 16 x 16 millimeters and 2.25 thick.

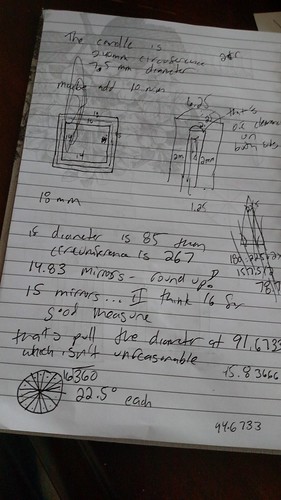
All my design work was in Blender. I decided my design was going to built out of a series of 18 x 18 millimeters squares– each ready to hold a mirror. I used some simple math to figure out how many mirrors I would need to be a good stand for a 3″ pillar LED candle and the ultimate radius of my final product.

3D Printing - MATH!

I made one template square and put in the proper placement of where it would be in the final holder. Another simple math equation told me how many degrees I would have to angle each piece.

360 degrees / # of Mirrors

So for example, in a design with 15 mirrors, each piece would be angled 24 degrees from the previous one. If I did 14 mirrors, each piece would be angled 25.714 from each other.

In Blender, when you rotate items, you are rotating around the Point of Origin of that object (where the little yellow dot appears when you select the Object).

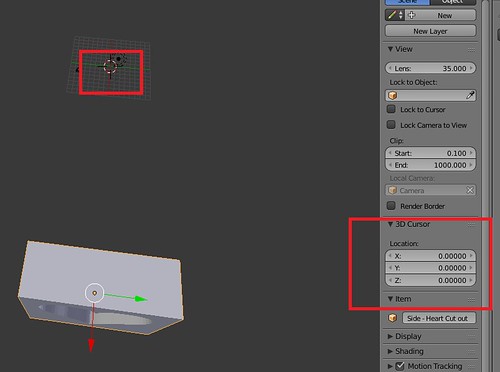
Usually this is the Center of Mass of the object, but guess what! You can control it and the origin doesn’t have to be in the object itself. Once I had my template square in its proper position in the final candle holder, I placed my 3D Cursor at 0,0,0.

Blender - Setting 3D Cursor

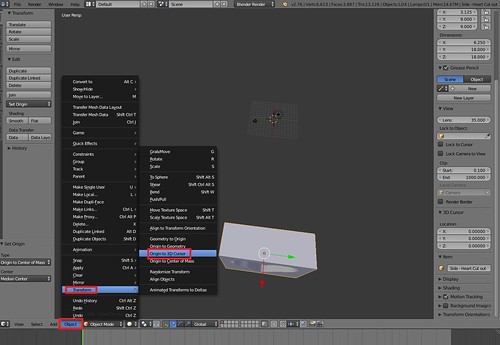
I went to Object->Transform->Origin to 3D Cursor.

Blender - Origin to 3D Cursor

This meant the origin was right smack in the middle of my candle holder. It also meant, when I rotate, I rotate around that point.

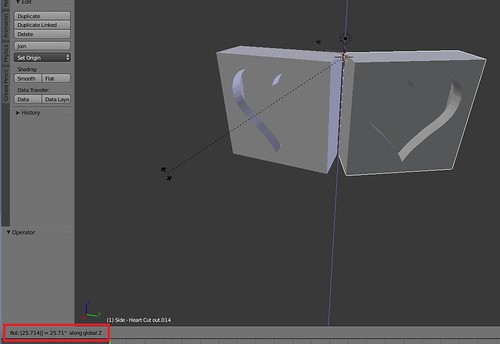
So I proceeded to Duplicate the square, hit R (for Rotate), hit Z (for around the Z axis) and then type in my angle (25.714).

Blender - Rotate 25.714 along Z Axis

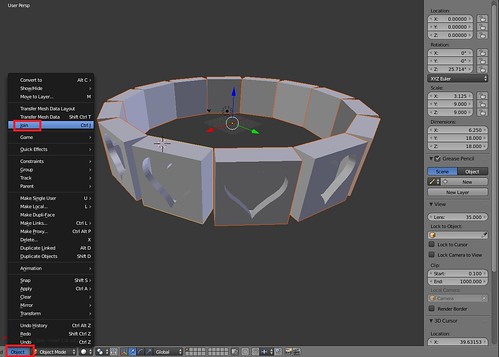
I would then Duplicate that square and Rotate it and so on until I had my entire ring. I did Object->Join to merge all my panel pieces into a single object.

Blender - Object Join

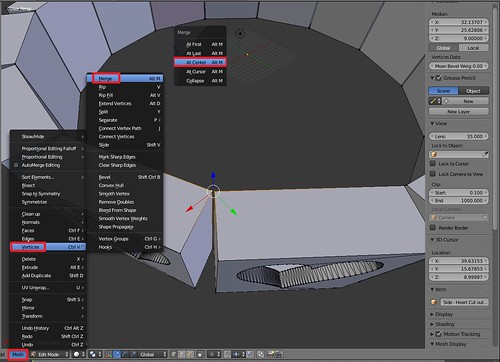
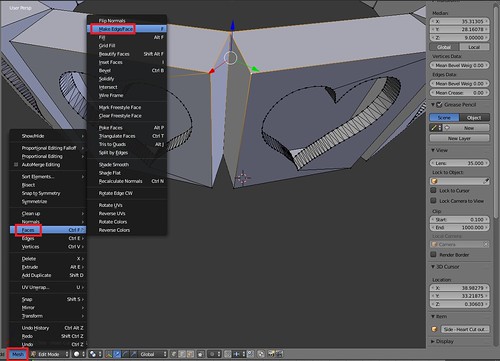
I switched to Edit mode and did some cleanup. I Merged Vertices that were close together and then added in new Faces to fill in the gap.

Blender - Vertices Cleanup

Blender - Filler Faces

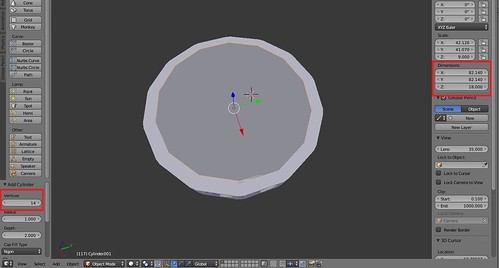
The inside of the candle holder is a 14-sided Cylinder. When you add a new Cylinder, you can specify the Number of Sides. I made it match the number of mirrors.

Blender - Inside Cylinder - 14 Sides

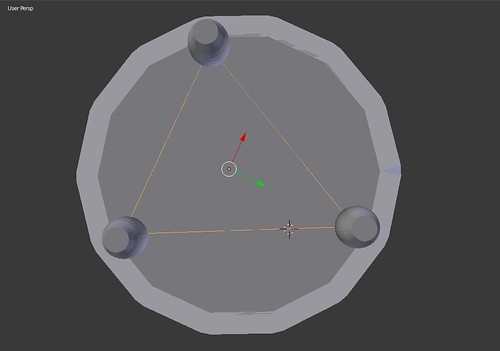
I cheated with the placement of the three feet. I added a 3-sided Circle and used that to help me determine where the place my feet.

Blender - 3D Sided Circle To Help with Foot Placement

Under Modifiers I did a Boolean Union on my panel piece, my inside cylinder and my feet and voila– I had a model!

Slicing – Simplify3D
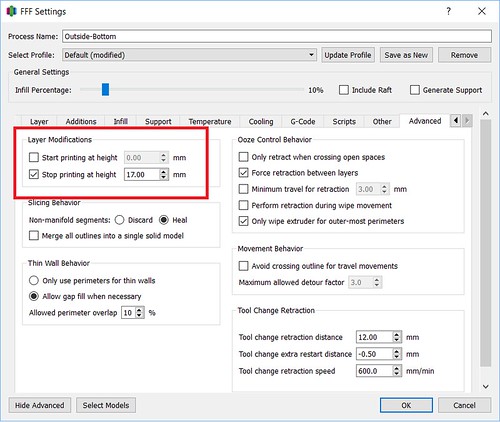
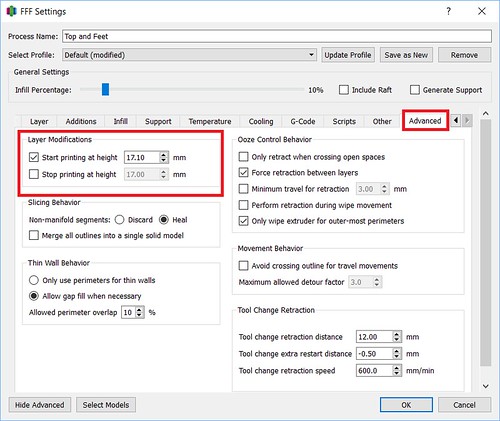
In Simplify3D, I set up two separate processes. The first process ran from the 0.00mm – 17.00mm (You can set that up in the Advanced tab under Layer Modifications). That is the point right before my mirror cavities would get sealed up.

3D Printing with Mirrors - Simplify 3D - Layer Modification Settings for the Bottom

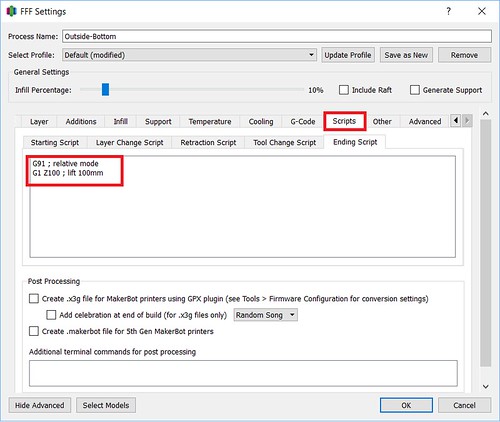
Usually when a process finishes, it’ll run a default ending process– turning off the extruder and disabling the motors, completely dropping the bed. I didn’t want that to happen. In this case, I just wanted the bed to drop down enough for me to put those mirrors in without burning myself and more importantly, get that hot nozzle off my print so it isn’t melting and deforming it and making it hard for me to slide my mirrors in. I went under Scripts and customized my Ending Script. Instead of the usual process, I did two simple steps:

1) I changed it to Relative mode, so my next instruction would use the nozzle’s current position as it’s starting point
2) I told it to move the nozzle up 100mm.

G91 ; relative mode
G1 Z100 ; lift 100mm

3D Printing with Mirrors - Simplify 3D - Ending Script for Bottom

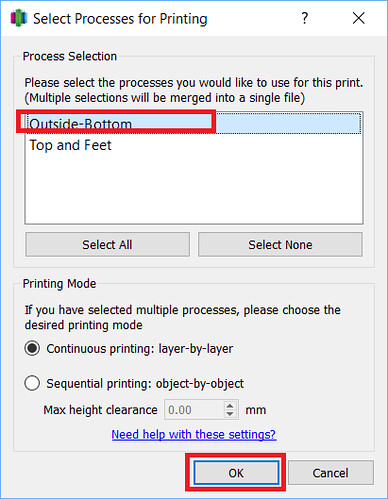
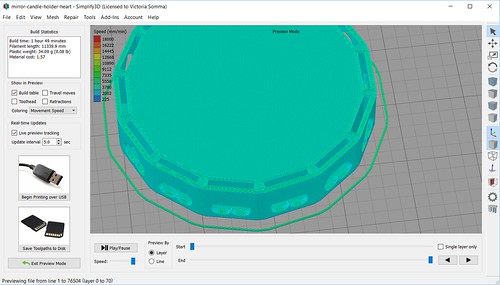
When I prepared just that process for printing, you could see how it was going to stop while I still had openings for my mirrors.

3D Printing with Mirrors - Simplify 3D - Selecting the First Process

3D Printing with Mirrors - Simplify 3D - Preview of First Process

My second process was set up to run from 17.10mm on (again under the Advanced tab)
3D Printing with Mirrors - Simplify 3D - Layer Modification Settings for the Second Process

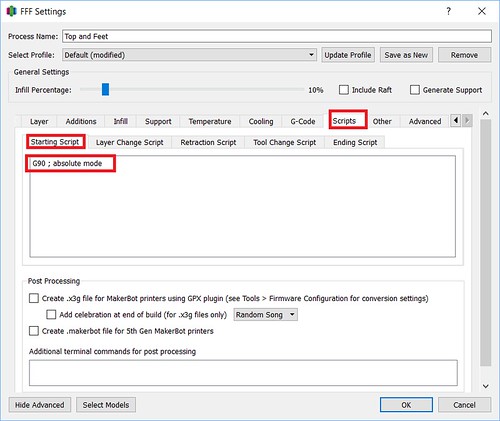
When a process begins, there are a number of things the printer typically does at the beginning such as turning on the extruder, turning on the fans, homing the axis’s, running off the side of the bed and oozing some filament. I didn’t want to do this for my second process. My axis’s are already homed, my extruder is already heated up, my filament is already flowing. All I had to do was set my printer back to Absolute mode and go. So for this second process, I went under Scripts and customized the Starting Script.

G90 ; absolute mode

3D Printing with Mirrors - Simplify 3D - Starting Script for Second Process

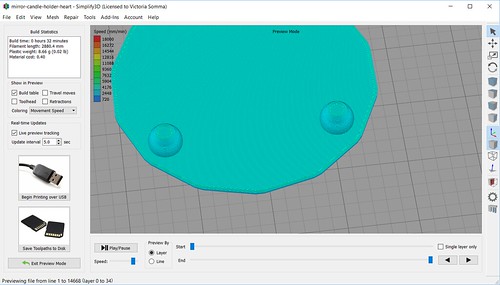
A preview of the second process, illustrates how the mirrors will get sealed in by the print.

3D Printing with Mirrors - Simplify 3D - Preview of Second Process

The process worked out fantastically (Watch it in Action in the YouTube video above– starting at about 7 minutes in).

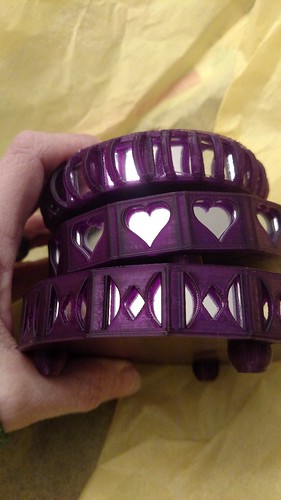
All in all I did three different designs for my sister.

3D Printing - Embedding Mirrors in Prints

I loved the final product so much I had to make another for myself.

3D Printing with Embedded Mirrors - Heart and Reflection

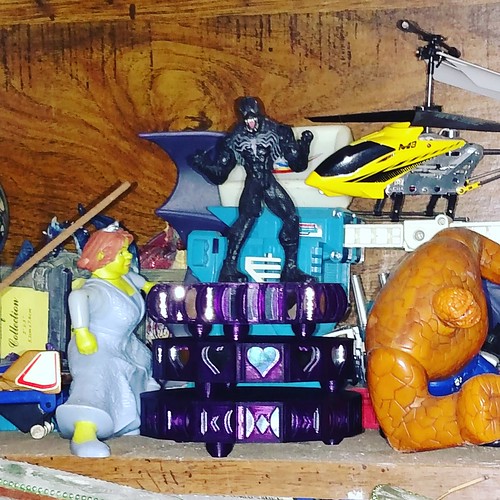
They ended up looking fantastic stacked. My sister used them as a platform for her Venom action figure. : )

3D Printing - Venon is Victorious on the Mirrored Candle Holders

How To: Avoiding Supports By Using Simplify3D to Cut The Model in Half

After a recent trip the Air and Space Museum’s Udvar-Hazy Center, my husband had a 3D Printing request for me. He wanted a 1934 Buck Rogers Disintegrator Gun.

The Model
Thanks to the great community up on Thingiverse, I didn’t have to do any modeling. I had THREE Buck Rogers Guns to choose from. The one that caught my eye and seemed to most resemble what my husband wanted was “Disintegrator 1934 Buck Rogers Gun” by user bluesroq.

The designer recommended printing the model with supports and there is indeed a lot of overhangs with how the gun is positioning now.

Avoiding Supports
Even though Simplify3D has top notch supports that are easy to remove and easy to control, I wanted to try to avoid supports in this case for a few reasons:

  1. As great as Simplify3D supports are, they would still leave some scarring or souvenirs on the faces– in this case– an entire side of my gun would be subject to that and not look as pretty and finished as the other side.
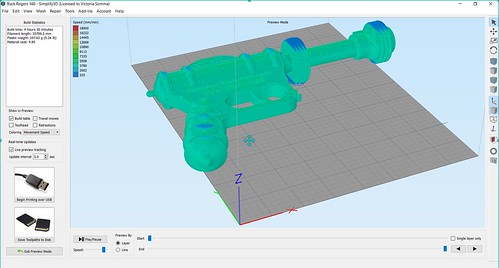
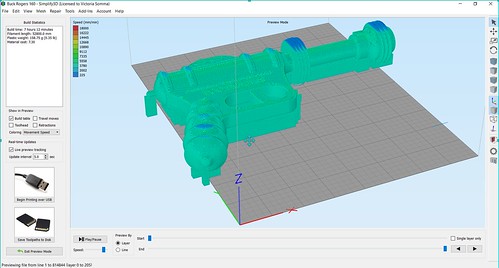
  2. Supports increase your printing time AND your material usage. In the case of an adult-sized Buck Rogers gun, the print time would have gone from 4 hours 30 minutes to 7 hours 12 minutes!

    Without Supports

    With Supprots

  3. If it were in half, this particular model would be an easy, straight forward print without any troubling overhangs.

Looking over the Buck Rogers Gun, the model itself was very symmetrical. It would be a great model to print in two halves and glue together. As a 3D Modeler, I could easily pull this model into something like Blender and break in half that way. But, I could also save time and just do it through my slicer! : )

Cutting in Half – Simplify3D
In Simplify3D, anything that is below your build plate will get ignored by the printer. So in the case of this gun, I would want to lower it down so half of it is above the build plate and half is below. The steps would be:

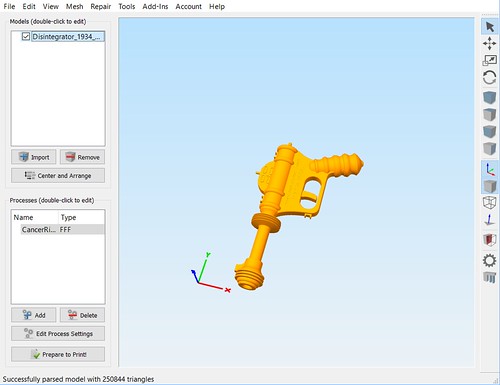
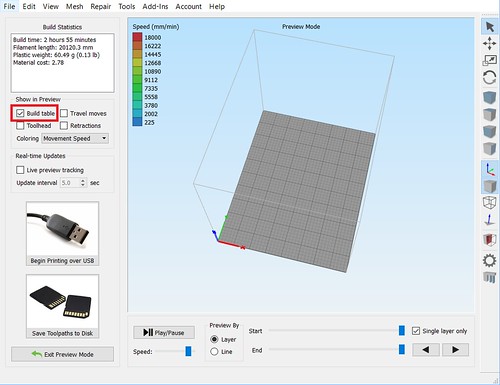
  1. First off, it is helpful to see the build plate while you are working. If yours is not displaying in your Simplify3D, click on Prepare to Print and check the Build Table under Show In Preview.
    Simplify3D - Build Plate Not Displayed

    Simplify3D - Show Build Plate

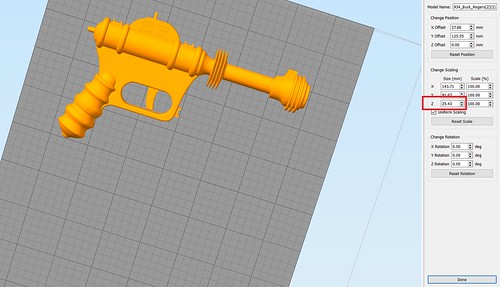
  2. Next we need to figure out how far we want to lower our model. Simplify3D makes that easy for us as well. Double click on your model and in the information panel under the Change Scaling section, we will get a reference of the exact measurements. In this case, we are interested in the height of the model, the Z value.
    Noting the Size
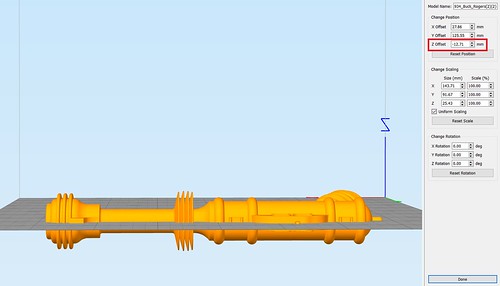
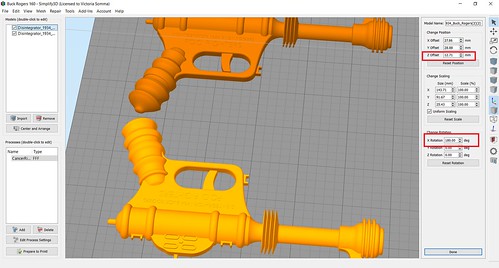
  3. Now we have some simple math. We want to lower the model so only half of it is above the print bed. That means we want to divide the height by 2. In this example– 25.43 divided by 2 is 12.71. In our Change Position section, we want to change the Z offset to -12.71 (aka Lower the model 12.71 mm).
    Positioned Half Under Build Bed
  4. At this point, half of our model is under the print bed! If we click on Prepare to Print, you’ll see that only half of the model is going to be printed.
    Everything Under Build Bed Ignored

Getting the Second Half – Simplify3D
To make a whole gun, we obviously want to print two halves of the gun.

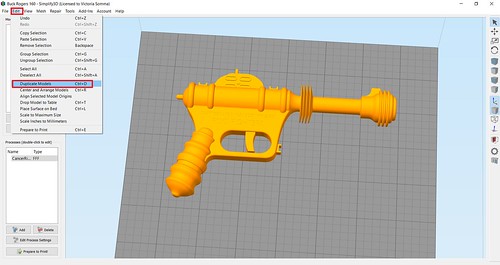
  1. Click on your model to select it and then go to Edit->Duplicate Models and make one more copy. You may have to move it around to a better spot on the build plate. (You can also click on the Center and Arrange— but you’ll have to reset your Z Offset again for the original model).
    Duplicate Models
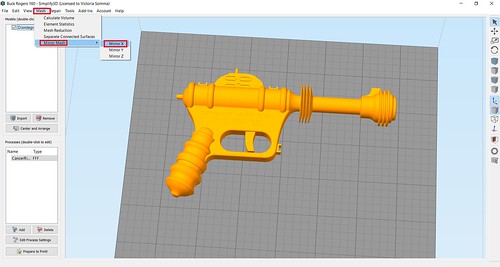
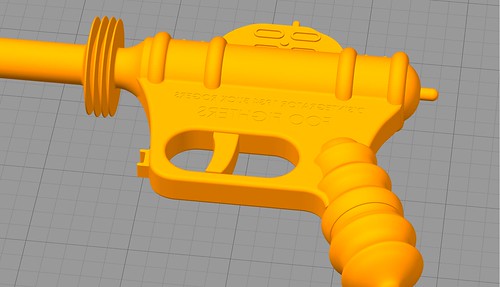
  2. Now we have to flip our new part. Gotcha– Watch Out for Mirroring! My first inclination was to go Mesh->Mirror Mesh and mirror my second half over the X or the Y axis. That could work for some models, but in the case where there is text on your model (like this), then that also mirrors your text and it too would be backwards. Mirroring should also be avoided if your model isn’t exactly symmetrical and has different detailings on each side.
    Mirror Menus

    Text Backward Mirrored
    D’oh – Backwards Text

    In lieu of mirroring, you can rotate it! Double click the object and then in the Change Rotation section, rotate the model 180 over the X or Y axis. Don’t be alarmed if your object suddenly “disappears”. It’s actually underneath your print bed. You just have to adjust the Z Offset now to move the new one 12.71 above the print bed.

    Rotated 180

Slic3r
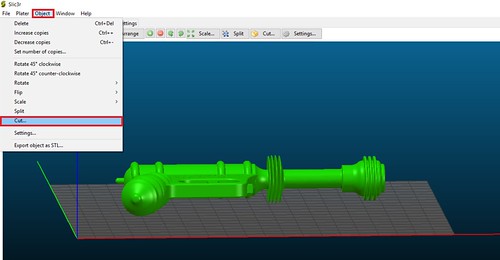
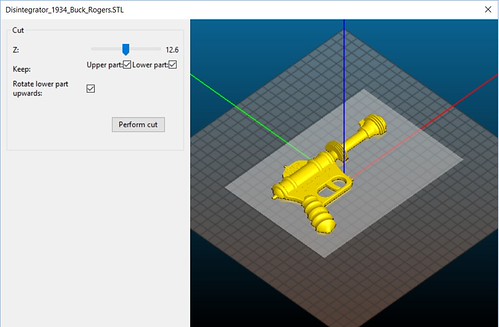
I have found Simplify3D to be absolutely 100% worth my money, but if it is not for you or your budget, you are not out of luck. You may be able to do the same thing in your slicer. As an example in open-sourced (and free) Slic3r, once you had your object on your plater, you would go to Object->Cut…

Slic3r - Object CUt

And you can pick the cutting height (and you have options to get both sides and rotate one)
Slic3r Cut in Action

And there you go, you can break your model up without modeling software like Blender. This technique’s applications are not limited to merely cutting objects in half. You can use it anytime you want to isolate out a particular section of a model to print. Say you got a 3D Hubs order and you are worried about a tricky section near the top. You don’t have to waste the time and material to run the whole print to find out that section is going to fail. Instead, you can lower your object down and do a quick print on just the troublesome section to see how it performs.

Personalized Glowing Valentines for Kids

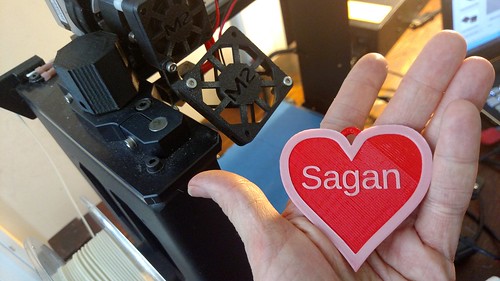
My son is named Sagan, after Carl Sagan.  Over here in the U.S., that’s a unique name.  As a result, he won’t be going into gas stations or souvenir shops and finding mass produced keychains and trinkets with his name on it.

Luckily, I have the MakerGear M2. I am not bound to get what someone else has decided to design and make.  I can make it myself!

3D Printing Valentines - Sagan

In my son’s pre-K class, a vast majority of the students are in the same boat– most of them have unique names. This seemed like a great use for the flexibility of a 3D Printer.

The Design
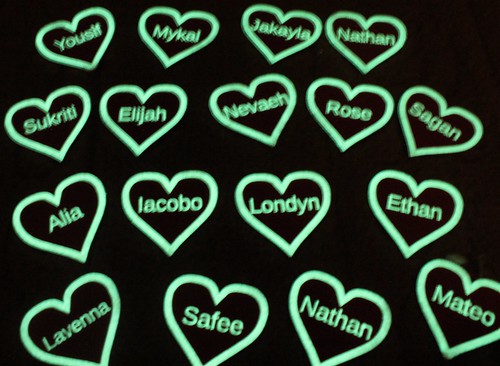
The design is not especially ground breaking. Hey, it’s a little heart pendant/medallion with a name on it. I printed most of it in ColorFabb Traffic Red PLA/PHA (duh) and then the detailing and the name are in GlowFill. One thing I have noticed with my kids is they LOVE glowing things. They love taking it into the bathroom and turning off the lights to see it glow.

Glowing Valentines

Modeling – Blender
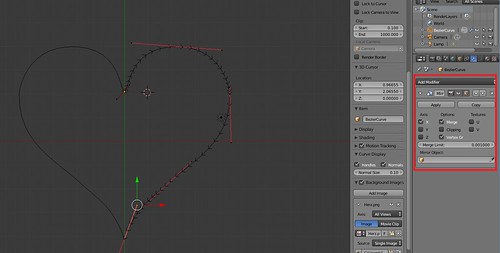
The base model I did in Blender. I started with a Bezier Curve. I used the Mirror modifier to make it symmetrical.

Modeling a Heart - Bezier Curve - Mirror

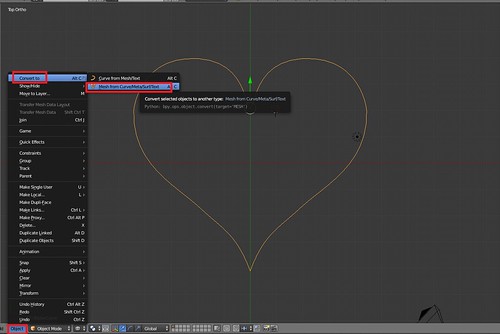
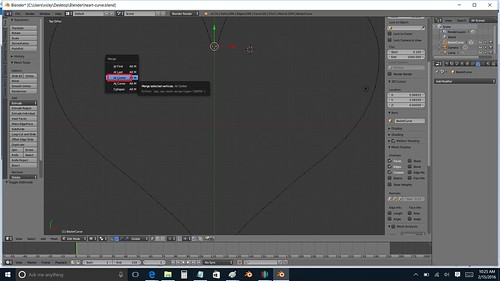
I converted the curve to a Mesh. Modeling a Heart - Convert to Object

I did a little cleanup of the Vertices, by Merging a couple of oddly mirrored vertices to the center.
Modeling a Heart - Merge Vertices at Center

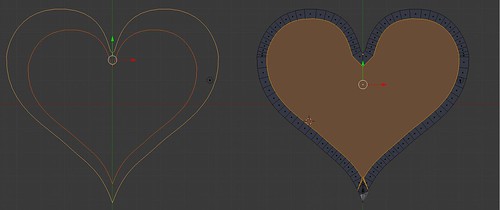
The detailing of my design, I wanted an outline of a heart in GlowFill. I’ve worked with hearts in the past and I knew that just scaling another heart down wasn’t going to do the trick. Inset is key to that!
MOdeling a Heart - Scale VersusInset
Scaling Versus Inset – Inset Will Give You Consistent Widths

I did an Inset of my face and did some manual cleanup of the vertices.

After that, it was just straight Extrusion to the heights I wanted.

The hook was just a cylinder subtracted from another cylinder (courtesy of the Boolean Modifier). I decided to keep the hook separate in case anyone wanted to print just straight up hearts.

At the end of my Blender session– I had two .STL files — my heart and my hook to make it a medallion.

Modeling – OpenSCAD
Although I had experimented with Python scripting for Blender roughly a year ago, OpenSCAD seemed easier and quicker for me. There is an Import command in OpenSCAD where you can pull in STL files. I went ahead and brought my Blender STL files into my OpenSCAD project and set a variable name for the “Child’s Name”. I was then able to rapidly run through and create 17 models for all my son’s classmates.

child_name = "Adela";
font_size=10;
y_offset=-4;

union()
{
 translate([30,10,0])
   import("heart.stl", convexity=10);

  
 translate([30,10,0])
  import("hook.stl", convexity=10);  


translate([30,y_offset,2])
linear_extrude(height=0.7)
    text(child_name, halign="center", size=font_size);
}


Slicing and Printing – Simplify3D and MakerGear M2
I printed on my trusty MakerGear M2. Since I have a single extruder machine, I used Simplify3D to set up two processes to print my heart:

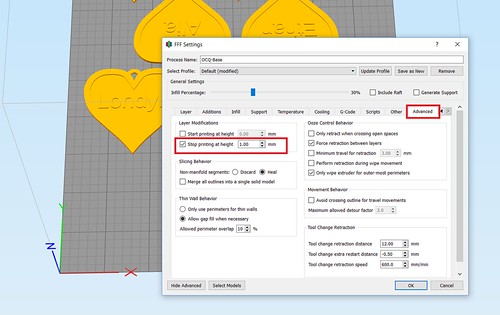
Red
From 0.0 – 1.0mm, I printed in ColorFabb Traffic Red PLA/PHA. I printed in 0.25mm layer heights.
Slicing a Heart - First Process in Simplify3D

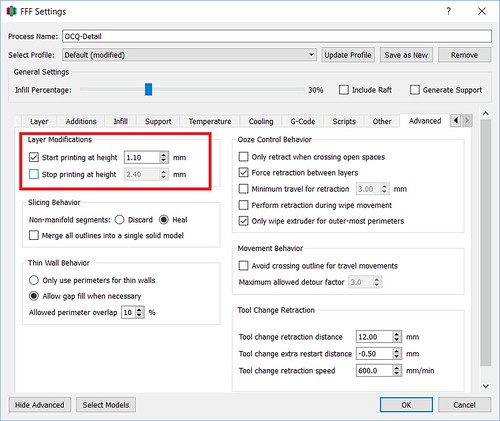
GlowFill
From 1.1 – 1.7mm, I printed in ColorFabb GlowFill. I printed those in 0.10mm heights. Usually I have found with detailing 3 or 4 layers were sufficient. In this case, because the GlowFill was a little translucent, going up to 6 and 7 layers made sure the text appeared more crisp and white. (It also gave me a little more leeway to recover if an edge came unstuck from the build plate).
Slicing a Heart - Second Process in Simplify3D

Quick Tip
And a quick tip. Sometimes parenting is harder than 3D Printing. When I printed my first batch of hearts, I was quite pleased. I showed my son and was ready for a positive response. It did not go well. I..uh… I kinda didn’t include his name in the first batch of hearts. He can read and he was quite miffed when he did not see his name. Luckily, I started an emergency print and was able to get back on his good side. But you can avoid such drama. Make sure to print your kids’ in the first batch. : )

Forgiven

On Thingiverse!
If you covet a heart for Valentine’s Day or a special occasion, I was able to make a Customizer on Thingiverse. Feel free to make your own.

Quickie Tutorial – Getting the Extruder To Run Some Filament Before a Print

I butted into a conversation in Twitter today (That’s socially acceptable right?  I hear it’s the cocktail party of the Internet) and the question came up how to get the Maker Gear M2 to run some filament before the print.

Well, since I do a lot of material changes within  prints, that is something I do know how to do.

Simplify3D – Jog Controls
You can tell your printer to do all sorts of things in the Machine Control Panel section of Simplify3D.  For that, you would:

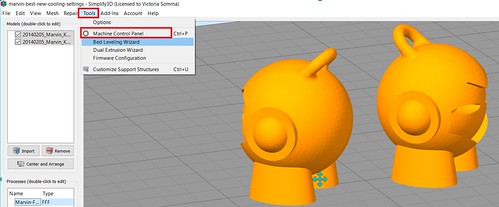
  1. Click on Tools->Machine Control Panel.Extruding Filament Before a Print
  2. And then you can go to the Jog Controls Tab.
  3. There is an Extrude section, where you can tell the printer to extrude out 0.1mm (tiny, tiny!), 1mm, 10mm, 100mm. I am typically using the 10 or the 100 button.

Extruding a Filament Before a Print - Jog Controls

Tip: If you already have a print on the bed, I put a piece of paper over it so it doesn’t get messed up with the extruded filament.

Gotcha: The printer has some built in safeguards– it won’t do a “Cold Extrude”.  It won’t extrude unless the nozzle is heated up.  If you are hitting those Extrude buttons and the printer is not listening to you, it may be that it isn’t heated up yet. (The G-Code command M302 supposedly turns off the Cold Extrude safeguard, but I have never tried it)

Simplify3D – Custom Starting Script G-Code

Simplify3D allows you to set up custom code for various stages of your print, including the start up.   To edit those, you would:

  1. Double click on your setting profile in the bottom left hand corner
  2. Click on the Scripts tab
  3. Click on the Starting Script tab

Extruding Filament Before a Print - gCode

For all my simple prints, I use the stock Starting Scripts that came with the Simplify3D Default Profile for the MakerGear M2 (24V vb3 Hot End) (I do customizations for my multistep prints)

M108 S255 ; turn on M2 fans
G28 ; home all axes
G1 Y50 Z0.3 F9600 ; move forward to avoid binder clips
G1 X205 Z10 ; move off platform
G1 Z0.4 ; position nozzle
G92 E0 ; zero extruder
G1 E25 F225 ; purge nozzle
G92 E0 ; zero extruder
G1 X190 Z0.1 E1.0 F1200 ; slow wipe
G1 X180 Z0.25 ; lift

Simplify3D -G-Code Via Communication Tab
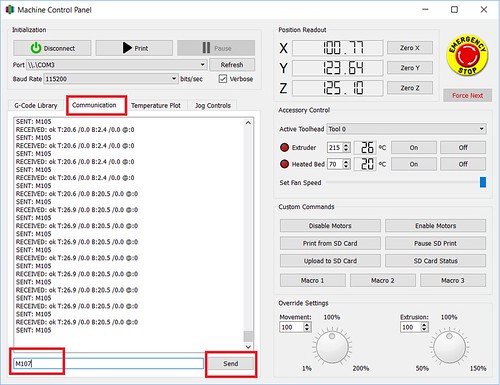
Want to be a little more hard code than the Machine Control Panel tab, but don’t want to commit to a change to your Starting Script?  You can also send direct G-Code commands to your printer by:

  1. Going to Tools->Machine Control Panel
  2. Clicking on the Communication tab
  3. Typing stuff in the text box in the bottom and hit Send.

Sending Commands Through the Communication Window

Tip: A good reference for G-Code syntax is at: http://reprap.org/wiki/G-code

Gotcha: The commands are CASE sensitive.  m107, for example will not turn off my cooling fan, but M107 will.  : )


Print Diary – Fun Police Sheriff’s Badge

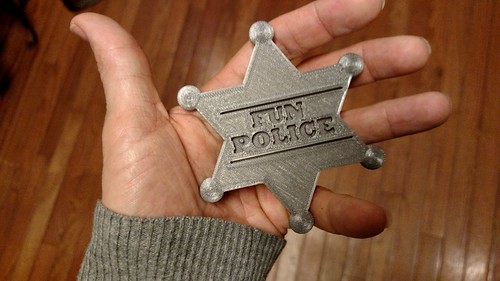
A friend of my brother’s passed away last week. He was in his thirties, so it was an unexpected death. Last night, my sister-in-law texted to see how soon I could 3D Print something for the funeral. She wanted a Sheriff’s Badge with one request– that it simply read “Fun Police”.

Thanks to Thingiverse, OpenSCAD, and Simplify3D, I was able to turn around her request fast.

Thingiverse and OpenSCAD
Thingiverse had a lot of Sheriff Badges to choose from. I went with the design by Bichiatari. I liked the standard six star approach and bonus– it was in OpenSCAD, which I taught a class on last June! I used his base code to make some slight alterations:

  • I made the points of the stars spheres to give it a more three dimensional look.
  • I changed the font to “Rockwell Extra Bold”. I liked the look of the text and I liked how thick the letters were
  • And finally, I changed “Sheriff” to “Fun Police”.

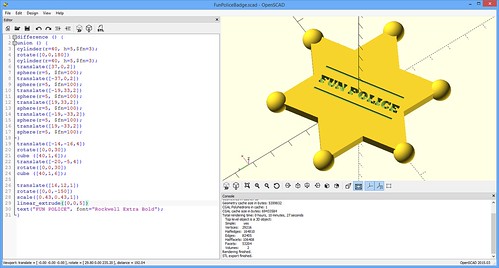
Fun Police - Test Run
Original Model

Simplify3D
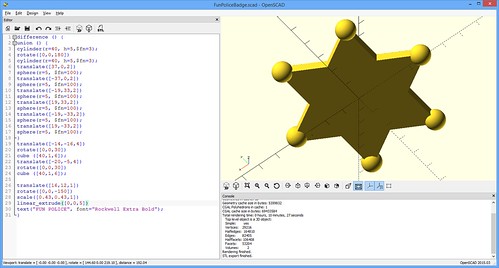
Now, when I was done, the points of my stars did extend below the base of the star thanks to the spheres.

Fun Police - Test Run - Untruncated Spheres
I didn’t want to print those sphere bottoms

For my first trial run, I didn’t go to the trouble of making that flat in OpenSCAD. I just flattened the bottom when I sliced in Simplify3D. I simply changed the Z offset, so the bottom part of those spheres were below my build plate, so those parts wouldn’t print. A nice handy trick.

I also felt the proportions were a little off, so I scaled just the height of the object down so it was only 6mm high.

Simplify3D - Fun Police - Quick Hack with Offset and Scaling
Hack with Simplify3D – Changed my Offset To Lower the Object Down

Rev 2
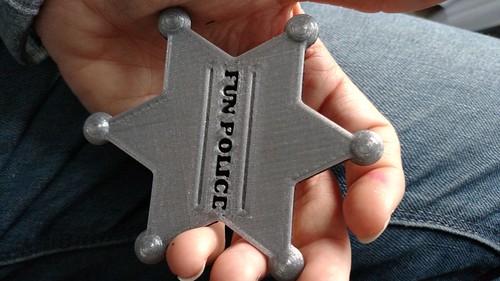
The first print was okay— and I bet they would have been satisfied with it. I didn’t like how the “E” at the end of “POLICE” printed out and I thought it would be a better use of real estate to make the letters bigger.

3D Printing - Fun Police - First Print
The First Print Had a Messed Up E

So I went back into OpenSCAD and made some changes:

  • I put “FUN” on one line of text and “POLICE” on another
  • I made the text bigger.
  • I resized my object down to 4mm high
  • Finally, I went ahead and chopped off the bottom of those spheres so it would all lay flat

For those interested in the code, the full OpenSCAD code is below.

As far as the second print— I liked it much better. I used the MakerGear Silver PLA filament.

3D Printing - Fun Police Second Revision
Second Print

OpenSCAD Code
[js]
//I thought the current height was too chunky,
//so scale it down to 4mm high after everything
//else is done
resize([0,0,4])
difference () {

//Rotate the star 30 Degrees, so it is easier to visualize
//and place the text
rotate([0,0,30])
union () {
//The first two cylinders are our star
//3 sided cylinder is a triangle
cylinder(r=40, h=5,$fn=3);
rotate([0,0,180])
cylinder(r=40, h=5,$fn=3);
translate([37,0,2])

//Spheres at each star’s point
sphere(r=5, $fn=32);
translate([-37,0,2])
sphere(r=5, $fn=32);
translate([-19,33,2])
sphere(r=5, $fn=32);
translate([19,33,2])
sphere(r=5, $fn=32);
translate([-19,-33,2])
sphere(r=5, $fn=32);
translate([19,-33,2])
sphere(r=5, $fn=32);
}

//These cubes are our engraved lines
translate([-23,10,1])
cube ([50,1,4]);
translate([-23,-10,1])
cube ([50,1,4]);

//This is our text for engraving
scale([0.7,0.7,1])
translate([-30,3,1])
linear_extrude([0,0,5])
text(” FUN “, font=”Rockwell Extra Bold”);

scale([0.7,0.7,1])
translate([-30,-9,1])
linear_extrude([0,0,5])
text(“POLICE”, font=”Rockwell Extra Bold”);

//Finally this cube is to cut everything off at the bottom to make it flat
translate([-50,-50,-5])
cube([100,100,5]);
}
[/js]

My Duh Moment of the Day – Build Table in Simplify3D

A few weeks ago, I prepped a bunch of birds in Simplify3D and when it started, I noticed one of my birds was only half on the bed. It struck me as odd, because I thought I saw your bed size in the settings.

“You’d think it warn me,” I thought.

Since then I’ve been very conservative with my plating so as to make sure to stay well within my print bed.

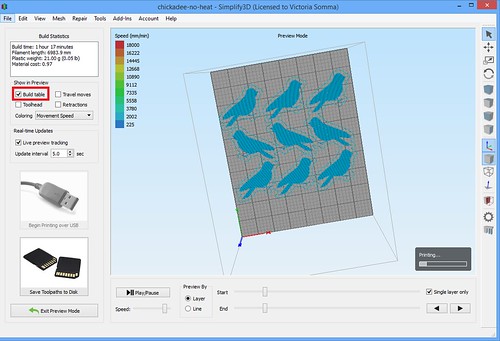
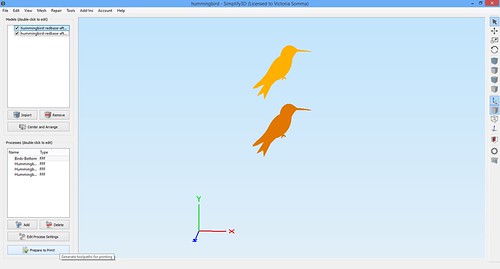
Yesterday, all of a sudden I had a breakthrough moment. In my preview screen, if I check Build table under Show In Preview, there I have a lovely visual of my actual bed.

Simplify3D - Build Table Checkbox

And now that that’s on, when I got back to plating, that visual is still there.

Duh Moment of the Day - I can see my Build Plate in Simplify 3d

This is proving to be super handy. Now I’m able to fill my bed up to its full capacity.

In preparation of the craft fair, I have a goal of printing 10 items each weekday. If I’m printing birds, particular small birds like a chickadee or finch, BAM. I can meet my craft fair goal in a single run!

Print Diary – August 11 – Archilochus colubris

Ruby-throated Hummingbird
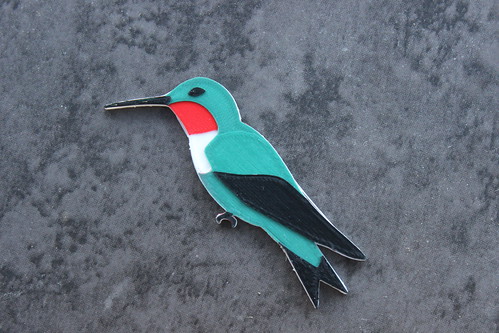
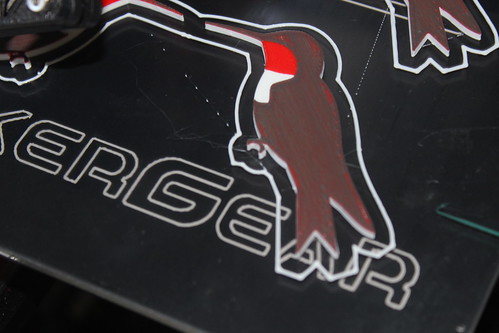
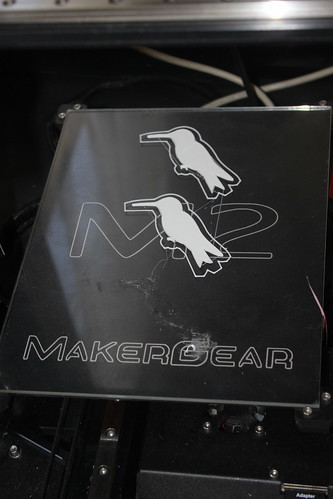
On Tuesday, I welcomed Archilochus colubris (Ruby-throated Hummingbird) to my 3D printed aviary. He was designed in Blender (based off a Creative Commons photo by my husband) and printed in the MakerGear M2. I used four different Simplify3D processes to print four colors– White, Traffic Red, Mint Turquoise, and Black.

3D Printing - Birds - Ruby-Throated Hummingbird

Overthinking the Color Order
Originally, I was printing Red, White, Green and then Black. My thought process was I wanted that White directly underneath the green, so it could be as bright as possible. I was worried if I printed green right on top of the red, it would appear brown.

So I did Red, White, Green and Black…. and I found myself very distracted by the Red outlines to the whole bird.

I switched them up. I printed White, Red, Green and then Black. With the first layer, it does look like my worse fears are realized– the bird is a pretty icky brown.

3D Printing - Birds - Green on Red Doesn't Look So Good...At First

But I have four layers of green (at 0.10mm each) and by the time it finishes all those layers, the green layer looks just as green as it does over the white. It made no difference whatsoever… for my ColorFabb Mint Turquoise. It is possible my translucent filaments from MakerGear (Grey and Orange) may be a different story.

Multi-processes to the Rescue!
I discovered that running Simplify3D’s multiprocesses one at a time are good for more than changing colors. It does give you an opportunity to recover should a mishap occur. In this case, one of my hummingbirds came unstuck to my bed. My attempts to glue stick him back on failed, so every time my extruder hit that blank spot it was making a nice spaghetti mess of filament (Side note– it is impressive to see how little filament actually goes on a layer– no wonder why my filament spools last forever).

3D Printing - Birds - Lost Hummingbird

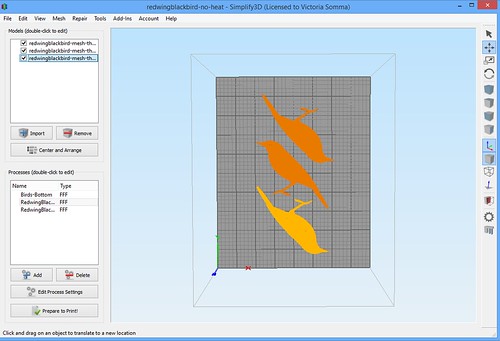
Luckily, since I was running multi-processes, once my base layer of White finished, I had the opportunity to go into Simplify3D and remove the troublesome hummingbird (being VERY careful not to hit that Center and Arrange button). I exported my new processes to my SD card and that allowed me to not have to waste any more time on the MIA hummingbird.

Simplify3D - Saving Filament

Occoquan Craft Fair Preparation
I also got my application in for the Fall Occoquan Arts and Crafts Show on September 26th and 27th! I’m hoping to be their inaugural 3D Printing booth. Although I have no reason to worry about my acceptance into the show, meh, I still do worry a little bit, so I’ll be happy to hear back from the show director.

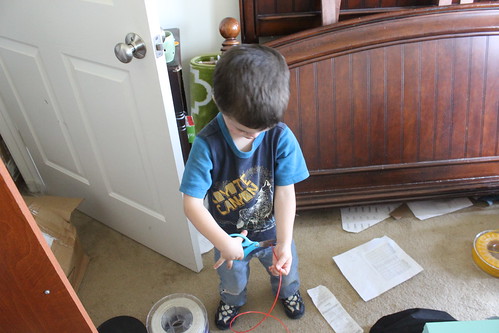
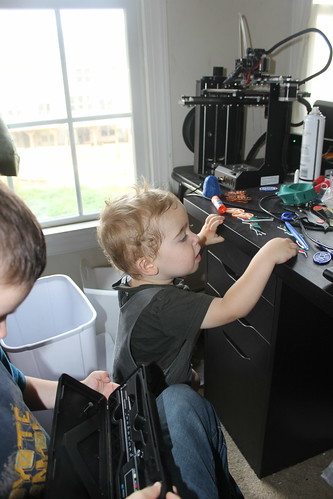
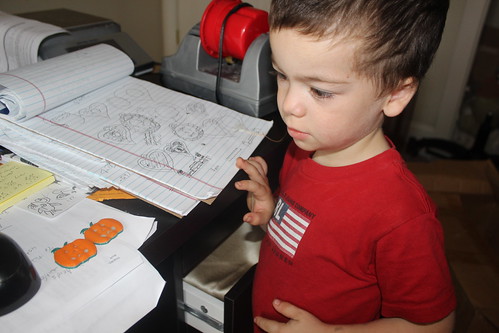
In the meantime, we are still preparing. My entire family is pitching in. Ryan is locating a tent and table and getting us a credit card processing solution. My brother, a small business owner, has been helpful in the business side of things. My Mom, as always, is a huge asset. Even my children are helping! They help with “Market Research” and young Sagan has mastered preparing my filament for color switches. : )
3D Printing - Sagan Preps Filament

3D Printing - Birds - Dyson Plays with Birds

3D Printing - Glowing Pumpkin Pendant - Sagan Helping Me Decide

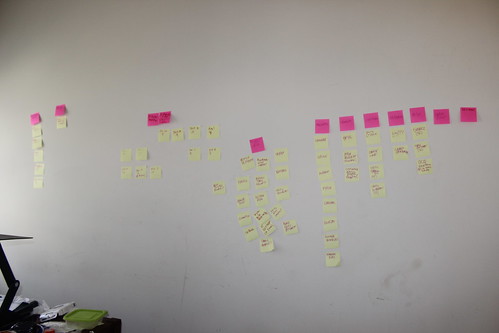
On my end, an entire wall of my office is covered in Post In Notes of ideas and action items. My evenings are spent modeling and slicing, so I can make sure the MakerGear M2 has stuff to do while I work during the day.

3D Printing - Craft Show Planning Wall

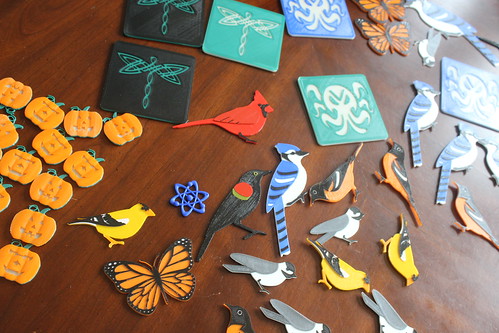
And our dining room table is currently a staging area of potential products.

3D Printing - Craft Fair Inventory

It’s going to be a busy fall. 🙂

Print Diary – July 31st – Process Improvement and Cyanocitta cristata

Tethered by Filament Change
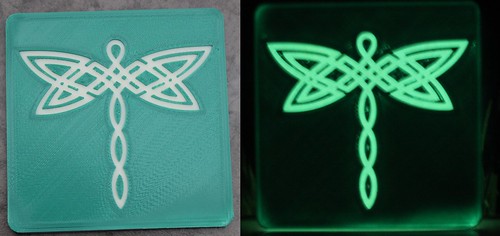
First thing in the morning, I started a print run of some coasters. This time I was etching in this lovely Creative Commons Celtic Dragonfly by blah_59. After the first 2 millimeters, I was going to change colors for the top. It was after the print I realized……

Starbucks Day

On Fridays, I usually take my kids out to breakfast at Starbucks. The timing of my filament change was totally going to muck up Starbucks Day. I wanted to be around to pause my print and switch colors.

Compromise. My oldest son and I ran to Dunkin Donuts and picked up a special breakfast and brought it home. I was deprived of my weekly Flat White, but boy, the kids didn’t care one bit. They loved eating Dunkin Donuts on the deck.

All was well and I ended up with my glowing Celtic Dragonfly Coaster.

3D Printing - Glowing Celtic Dragonfly Coaster (Green) - Before After

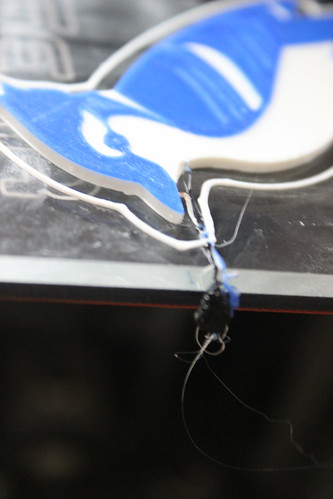
But it was a sign that I needed a better process. I’m a working mother. It isn’t going to be sustainable for me to be tethered to the printer waiting for the exact moment to change my filament.

3D Printing Nerd to the Rescue
I thought my solution was going to lie in adding custom G-code, but it turns out I don’t even need to do that! I just so happened to watch the latest video from the 3D Printing Nerd that very same morning. He also does a lot of creations by switching filament colors and he also uses Simplify3D. I mentioned yesterday and we saw it before with some experiments with the cardinal wing that I do use multiprocesses to change my settings for different sections of the print. Well, I never thought about the implications of running those multiple processes one at a time. I had always let them run as a single print run, meaning I still would have to monitor and pause my print when I wanted to switch colors.
The 3D Printing Nerd’s video showed me to run them one at a time. So when the printer finishes one color it stops and then waits for you to take the next steps…on your time.

I gave it a test run on my new Blue Jay (Cyanocitta cristata). It worked splendidly. I ran the white. I ran the blue. I ran the black. Wonderful! This is just what I needed to keep my sanity and prepare for the Occoquan Arts and Craft Fair.

The latest bird from the MakerGear M2- Cyanocitta cristata (American Bluejay). #3DPrinting

A photo posted by Vicky Somma (@vickytgaw) on

I did notice one tiny best practice for the future. When I start a new color, the print runs through it usually start up process (which I can change if I want). It squirts out some plastic off the side of the bed and then it swipes the nozzle clean on the bed. When I ran a bed full of bluejays, I did notice I put one a little too close to that swiping action. He was just barely getting knicked by the nozzle as it passed by. So either I not place things that close to that section… or I change my start up G-Code.

3D Printing - Swipe Collides with Bird

I’m really excited. A HUGE thanks to the 3D Printing Nerd for helping me improve my process. It’s really going to help as my collection of birds continues to grow!

3D Printing - Blue Jay, Monarch, Goldfinch, Cardinal, Chickadee, Baltmore Oriole

Print Diary – July 24, 2015 – Fun with Sharkz!

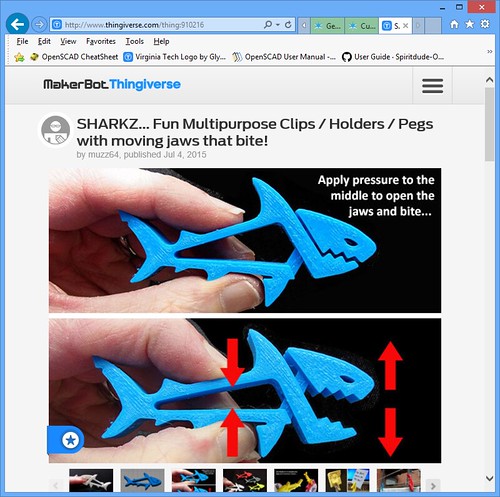
My intent when I woke up in the morning was to do my reprint of the Mobius Strip USB Holder. As I perused reddit over my morning coffee, however, I found a delightful little tangent– Sharkz from Thingiverse user Murray Clark. It’s a small object, so it is a fast print. It prints without supports and it moves. It can function as a little bag clip…or clothes hangers…or I even saw one maker using them as clip on earrings.

Sharkz - Thingiverse Screenshot

I have a four year old and a two year old and imaging their faces playing with the Sharkz was just too tempting to resist. The four year old in particular. He’s a Sharknado fan. : )

Simplify3D Settings
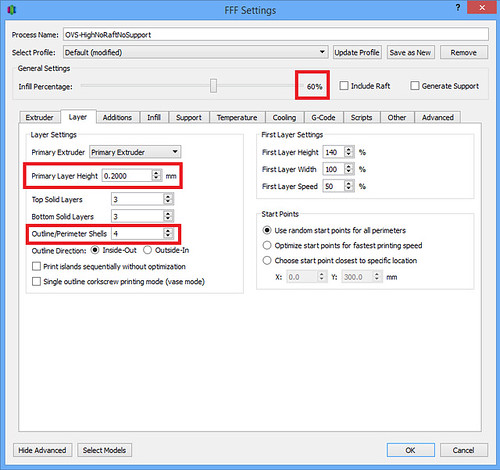
My print settings were really straight forward. Nothing fancy at all. In fact, I pretty much stole everything from the Thingiverse Instructions tab. They recommended 4 perimeters and an Infill of 60% to give the Sharkz a sturdy bite. They also recommended a layer height of 0.2 mm. Easy peasy.

  • Under the Layer tab:
    • Layer Height: 0.20
    • Infill: 60%
    • Outline/Perimeter Shells: 4

    Sharkz - Simplify3D Layer Settings

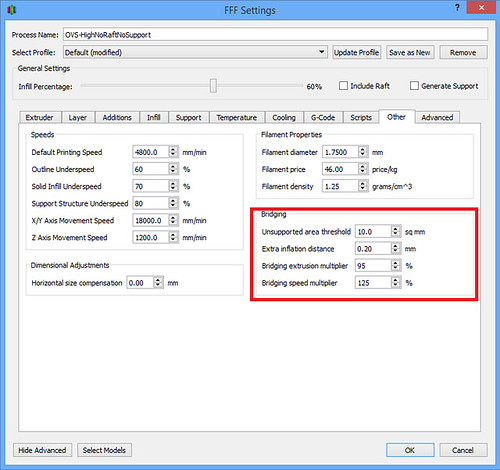
  • Under the Other tab:
    For my bridge speed, I used some tried and true settings I originally got from Ed Nisley’s blog when he printed the Bridge Calibration test.

    • Bridging Speed Multiplier – 125% (This should come out to 6000 mm/min which is 100mm/second)

    Sharkz - Simplify3D Bridge Settings

Confirming Bridging Settings
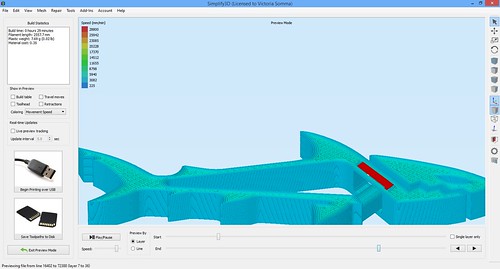
Since bridging was going to be key to the Sharkz’s jaw movement, I used my little hack to make sure my bridge settings were going to take effect. I temporary set my Bridging Speed Multiplier to 600%. I did a preview. The preview color codes by the print speed, so that made my bridge areas bright red. I changed it back to 125% and printed away.

Simplify3D - Bridge Hack on Sharkz

Sharkz = Fun
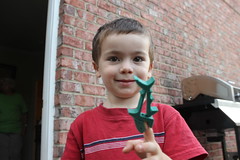
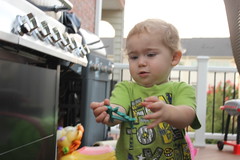
The bridges worked well and our little sharks do have quite a bite. They proved to be fun for the whole family, including my 69-year old mother.

3D Printing - Sagan and Sharkz 3D Printing - Dyson and Sharkz


3D Printing - Anne and Sharkz

A fun, quick little tangent.