Tag Archives: slic3r

How To: Avoiding Supports By Using Simplify3D to Cut The Model in Half

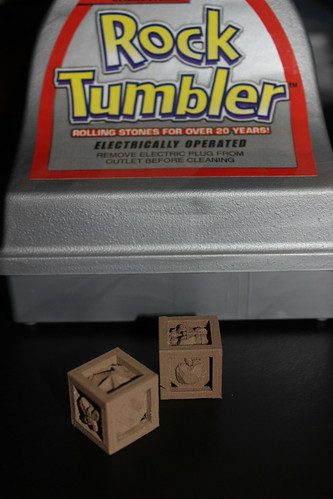
After a recent trip the Air and Space Museum’s Udvar-Hazy Center, my husband had a 3D Printing request for me. He wanted a 1934 Buck Rogers Disintegrator Gun.

The Model
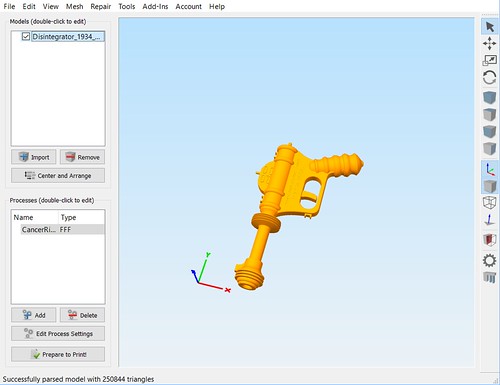
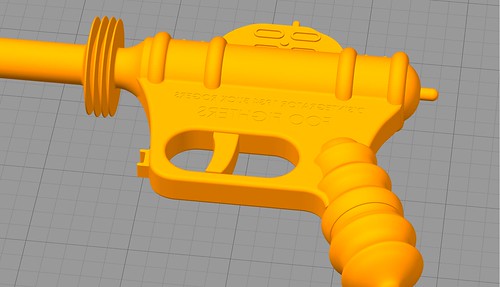
Thanks to the great community up on Thingiverse, I didn’t have to do any modeling. I had THREE Buck Rogers Guns to choose from. The one that caught my eye and seemed to most resemble what my husband wanted was “Disintegrator 1934 Buck Rogers Gun” by user bluesroq.

The designer recommended printing the model with supports and there is indeed a lot of overhangs with how the gun is positioning now.

Avoiding Supports
Even though Simplify3D has top notch supports that are easy to remove and easy to control, I wanted to try to avoid supports in this case for a few reasons:

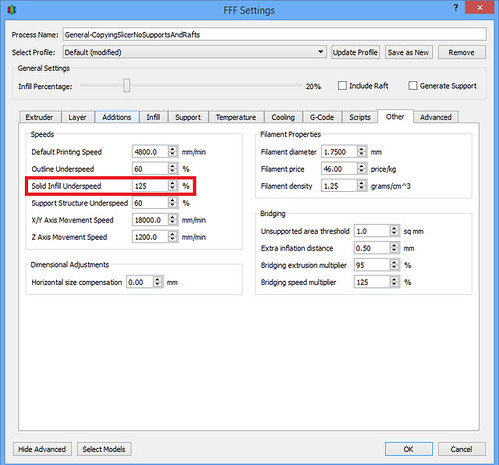
  1. As great as Simplify3D supports are, they would still leave some scarring or souvenirs on the faces– in this case– an entire side of my gun would be subject to that and not look as pretty and finished as the other side.
  2. Supports increase your printing time AND your material usage. In the case of an adult-sized Buck Rogers gun, the print time would have gone from 4 hours 30 minutes to 7 hours 12 minutes!

    Without Supports

    With Supprots

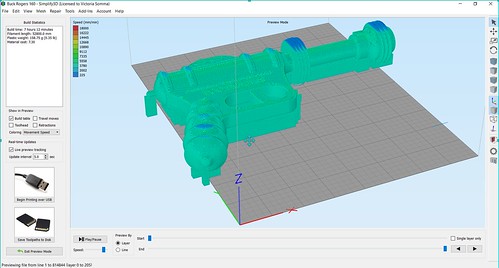
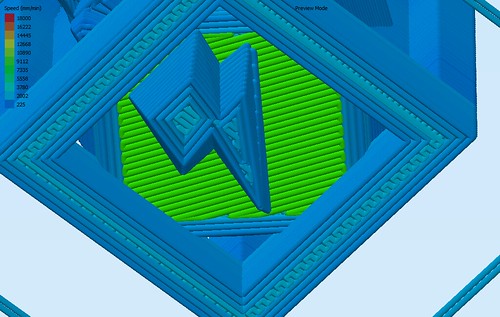
  3. If it were in half, this particular model would be an easy, straight forward print without any troubling overhangs.

Looking over the Buck Rogers Gun, the model itself was very symmetrical. It would be a great model to print in two halves and glue together. As a 3D Modeler, I could easily pull this model into something like Blender and break in half that way. But, I could also save time and just do it through my slicer! : )

Cutting in Half – Simplify3D
In Simplify3D, anything that is below your build plate will get ignored by the printer. So in the case of this gun, I would want to lower it down so half of it is above the build plate and half is below. The steps would be:

  1. First off, it is helpful to see the build plate while you are working. If yours is not displaying in your Simplify3D, click on Prepare to Print and check the Build Table under Show In Preview.
    Simplify3D - Build Plate Not Displayed

    Simplify3D - Show Build Plate

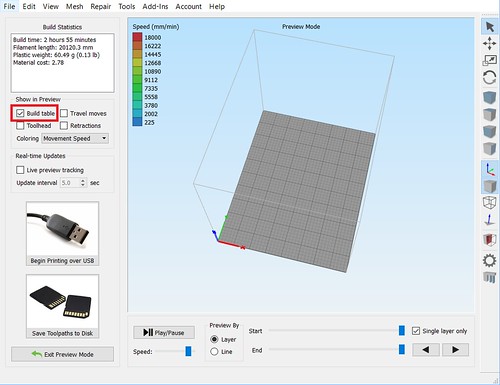
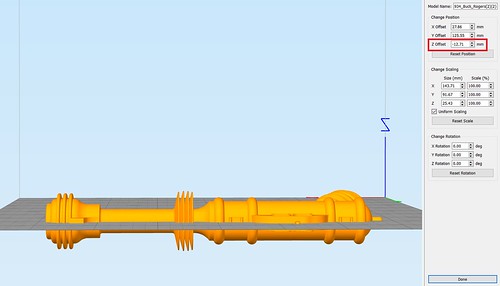
  2. Next we need to figure out how far we want to lower our model. Simplify3D makes that easy for us as well. Double click on your model and in the information panel under the Change Scaling section, we will get a reference of the exact measurements. In this case, we are interested in the height of the model, the Z value.
    Noting the Size
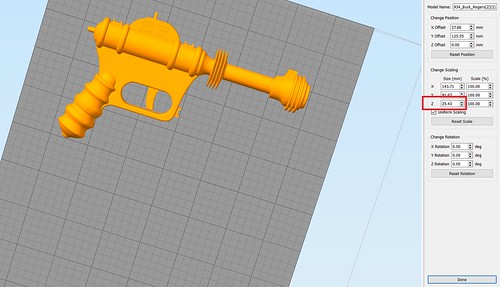
  3. Now we have some simple math. We want to lower the model so only half of it is above the print bed. That means we want to divide the height by 2. In this example– 25.43 divided by 2 is 12.71. In our Change Position section, we want to change the Z offset to -12.71 (aka Lower the model 12.71 mm).
    Positioned Half Under Build Bed
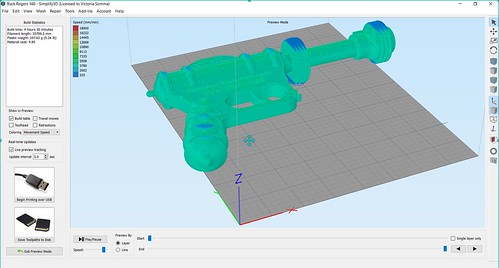
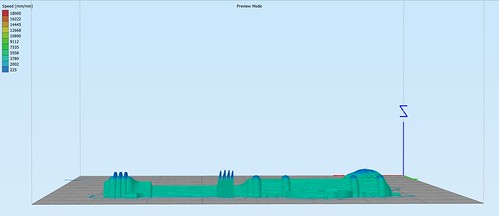
  4. At this point, half of our model is under the print bed! If we click on Prepare to Print, you’ll see that only half of the model is going to be printed.
    Everything Under Build Bed Ignored

Getting the Second Half – Simplify3D
To make a whole gun, we obviously want to print two halves of the gun.

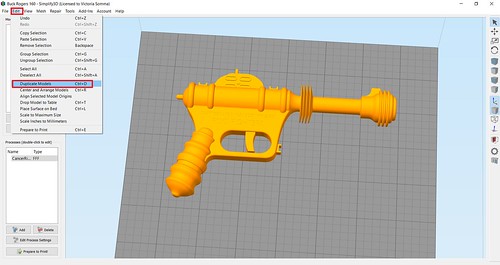
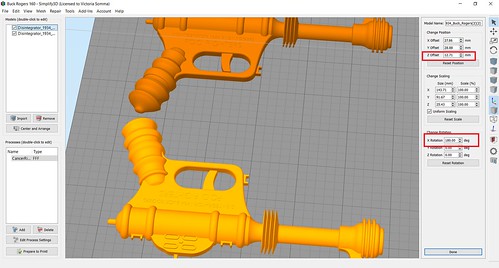
  1. Click on your model to select it and then go to Edit->Duplicate Models and make one more copy. You may have to move it around to a better spot on the build plate. (You can also click on the Center and Arrange— but you’ll have to reset your Z Offset again for the original model).
    Duplicate Models
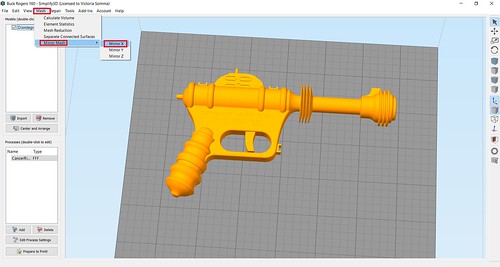
  2. Now we have to flip our new part. Gotcha– Watch Out for Mirroring! My first inclination was to go Mesh->Mirror Mesh and mirror my second half over the X or the Y axis. That could work for some models, but in the case where there is text on your model (like this), then that also mirrors your text and it too would be backwards. Mirroring should also be avoided if your model isn’t exactly symmetrical and has different detailings on each side.
    Mirror Menus

    Text Backward Mirrored
    D’oh – Backwards Text

    In lieu of mirroring, you can rotate it! Double click the object and then in the Change Rotation section, rotate the model 180 over the X or Y axis. Don’t be alarmed if your object suddenly “disappears”. It’s actually underneath your print bed. You just have to adjust the Z Offset now to move the new one 12.71 above the print bed.

    Rotated 180

Slic3r
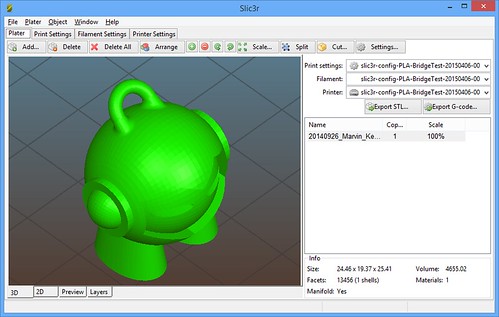
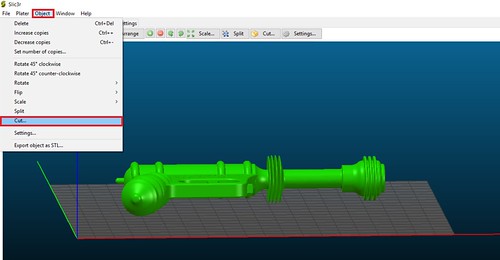
I have found Simplify3D to be absolutely 100% worth my money, but if it is not for you or your budget, you are not out of luck. You may be able to do the same thing in your slicer. As an example in open-sourced (and free) Slic3r, once you had your object on your plater, you would go to Object->Cut…

Slic3r - Object CUt

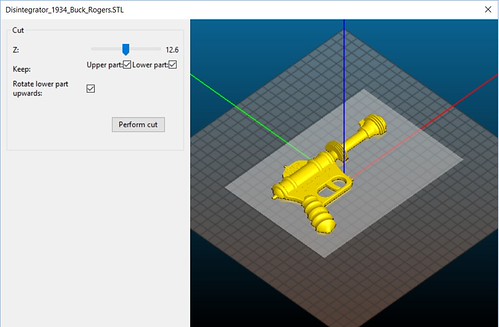
And you can pick the cutting height (and you have options to get both sides and rotate one)
Slic3r Cut in Action

And there you go, you can break your model up without modeling software like Blender. This technique’s applications are not limited to merely cutting objects in half. You can use it anytime you want to isolate out a particular section of a model to print. Say you got a 3D Hubs order and you are worried about a tricky section near the top. You don’t have to waste the time and material to run the whole print to find out that section is going to fail. Instead, you can lower your object down and do a quick print on just the troublesome section to see how it performs.

Print Diary – July 19th – July 22nd

Quick order of business– in my print diary posts, settings and strategies are not necessary solid conclusions, just a documentation of what I tried and my observed results.

My programming day job was going to be exceptional busy, so I needed some more hands-off experiments. One of the things I covet with my new hoarding tendencies is a rock tumbler to polish my bronzeFill.

“But we have a rock tumbler,” my husband said. He pointed to a free one we got from our neighbor a few years ago. The one sitting on a book shelf in behind a commemorative Star Trek plate collecting dust. The thing is– it’s for kids and not at all like the fancy rock tumbler in the Barnacules Nerdgasm video. And the barrel is tiny!

But I did just splurge on a whole lot of filament. There was no harm in experimenting with this free, tiny rock tumbler. I did have a project that would fit in the barrel. The Elements of Harmony Di.

I designed it for my favorite Brony‘s birthday this past January. It looks amazing in Shapeways’ Stainless Steel.

Elements of Harmony Die - All Faces

Back in April when I first got the MakerGear M2 I had run through several runs and iterations perfecting the Di in Black PLA. I did end with something I was satisfied with. But I wanted to resurrect the experiments with a couple of changes:

  1. Back then I was concerned with the shininess of the bottom layer and how it looked so different from the rest of the die. I ended up using a raft to give it a similiar texture and feel. Don’t need that anymore. If I’m printing in bronzeFill, it’s all going to shine up. This was also back in the day before I discovered how amazing hairspray and the gluestick is. Another reason I can ditch the raft.
  2. Back then I was using Slic3r. I tend to user Simplify3d nowadays. In my experience, I’ve had better results with bridging with Slic3r than with Simplify3d. So my experiments were an ongoing effort to try to improve my bridging in Simplify3d.

Some odds and ends of the past couple of days.

New Slic3r is Beautiful!
I went ahead and used this as an excuse to download and use the new 1.2.9 version. My impression is positive. The new 3D View is lovely, but I’m most pleased to see the new “Layer” and “Preview” views. The Preview view is of particular interest to me as I like to scrutinize print lines and patterns.

New Slic3r

New Slic3r - Preview

Now, I did end up crashing new Slic3r three or four times. My hypothesis is that I was changing multiple settings in a row while it was trying to regenerate it’s previews. That’s not a conclusion– just a hunch.

Cooling, You Idiot!
I mentioned I have had better luck bridging (and sometimes overhangs) in Slic3r than Simplify3d. A few months ago, I opened both and started scrutinized settings and trying to get my Simplify3d to match my Slic3r results. Because I’m anal, I took screenshots and made notes of the changes and why I tried them. Well, I pulled up Cooling and I made NO changes and I wrote down that I had made no changes.

SlicerSimplify3D-8

Back then, I hadn’t realized the extent cooling played a role, specifically in overhangs. I would learn that when I mastered the 3D Hubs Marvin.

I went ahead and made some changes in the Cooling tab:

  • Under Speed Overrides changed Adjust printing speed for layers below from 15 seconds to 30 seconds
  • Under Fan Overrides, I checked Increase fan speed for layers below and changed the seconds from 45 to 60
  • Under Fan Overrides, I checked Bridging fan speed override.

Note– Since my Fan Speed is already 100 for everything after the first layer, I do not expect any change from my Fan Overrides section. (But the settings are in place should I tweak fan settings at a later date).

I have a feeling the Speed Override alone would have made my 3D Hubs Marvin endeavor a whole lot easier. The jury is still out on that, however, as I haven’t tested him out. : )

Simplify3D Bridging Hack
I also have a new version of Simplify3d which I had been hoping would fix a perimeter bridging issue I had noted. Quick tip, if you ever want to see where the Bridging Settings are taking effect set your Bridging Speed SUPER high– like 600%.

Simplify3D - Setting the Bridging Speed Multiplier Super High to See Where It's Taking Effect

Then when you preview your layers, those items are color coded in red and orange. Unfortunately, that revealed that my bridging settings were still not taking effect where I wanted them.

In the case of my dice, I had a lucky workaround. My perimeters of the bottom face were doing okay. It was the infill that was drooping and sagging. There were only two places on the dice considered “Solid Infill”. So I changed my Solid Infill speed to match what I wanted for the Bridging Speed.
Simplify3D - Setting Solid Infill to What I Want the Bridging Speed to Be

And I could see that bottom layer was going to print at a faster “bridge” speed.

Simplify3D - Tricking the Infill Into Bridge Speeds

This doesn’t help with things like the Bridging Extrusion Multiplier, but guess what– in the case of my dice, it was enough! I got my satisfactory results.

P.S. I could have always gone with supports. I was just being stubborn.

So at the end of these experiments– I have a handful of dice to run through our el cheapo rock tumbler. Wish me luck!

Elements of Harmony Dice - BronzeFill Dice and Rock Tumbler