Tag Archives: occoquan

Tour of my 3D Printed Houses

Greetings! I am starting to build up quite a collection of 3D Printed buildings! Today I thought I would give you a little tour of them and my design process and share some of my design guidelines and tips.

I’m from Prince WIlliam County Virginia which is outside of Washington, DC. With the exception one gazebo from New York, all my buildings hail from Prince William County, Virginia and most of those right smack from my town, Occoquan. So far, I have

  • Mamie Davis Gazebo in Occoquan, Virginia
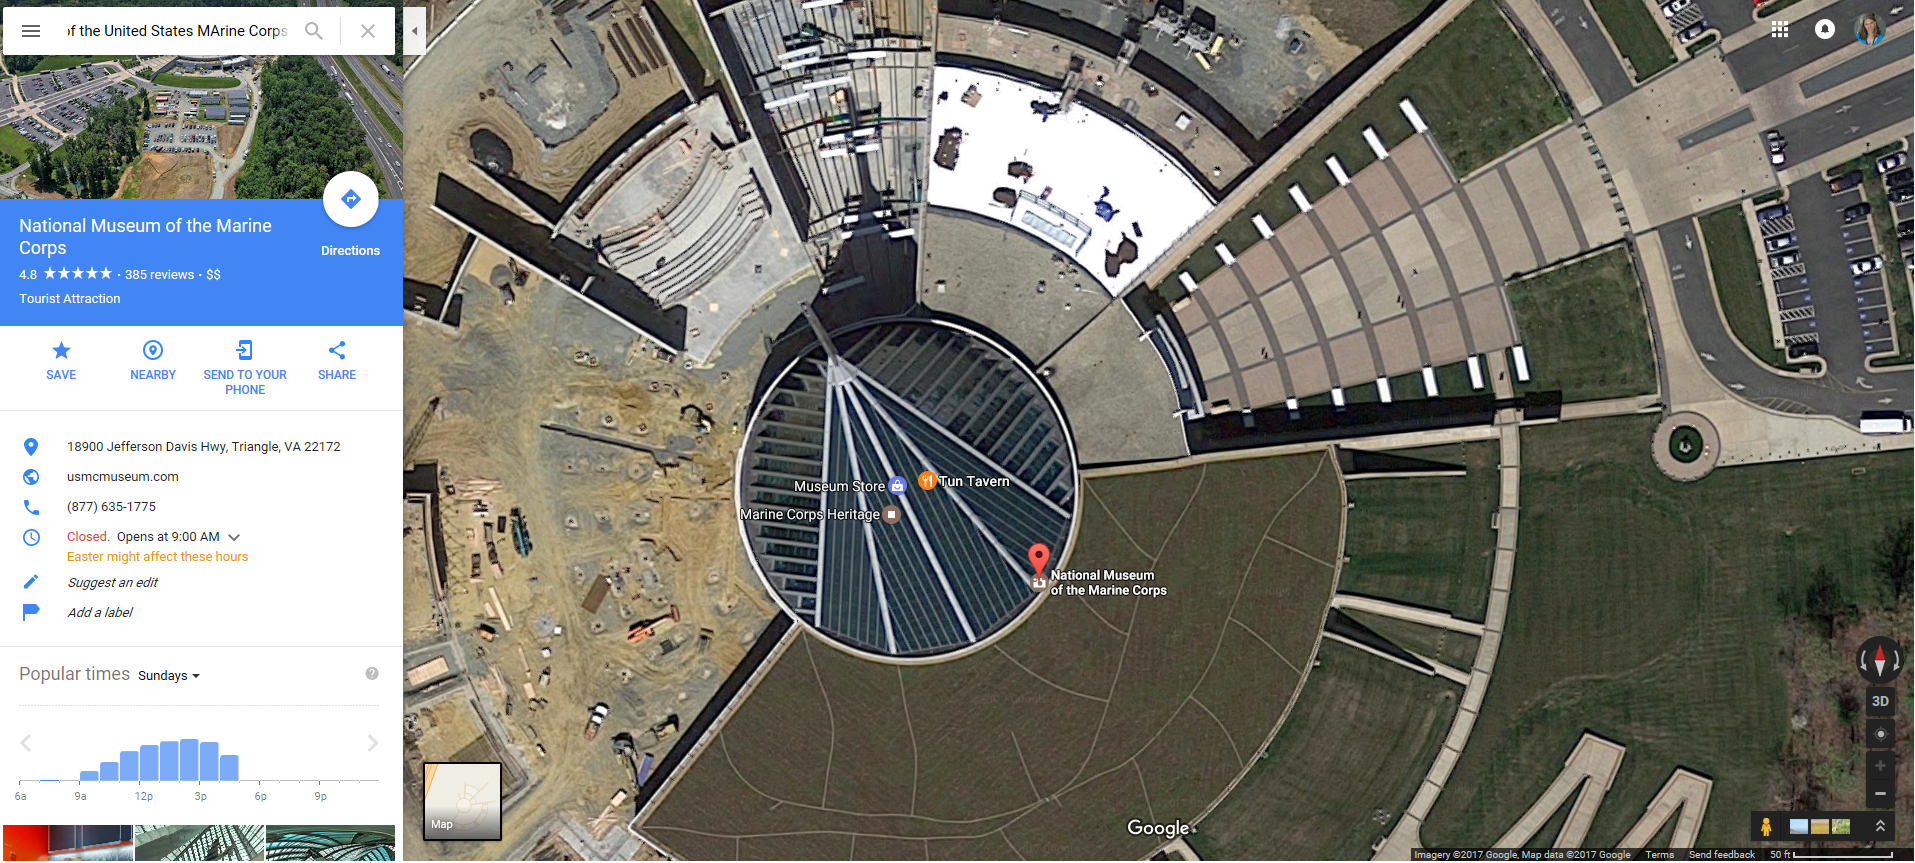
  • The National Museum of the United States Marine Corps from Quantico
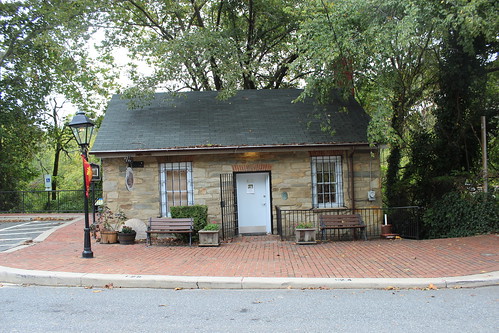
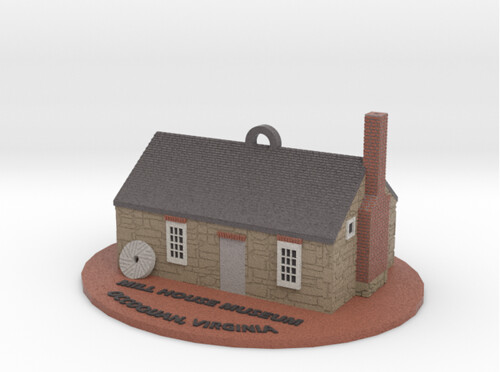
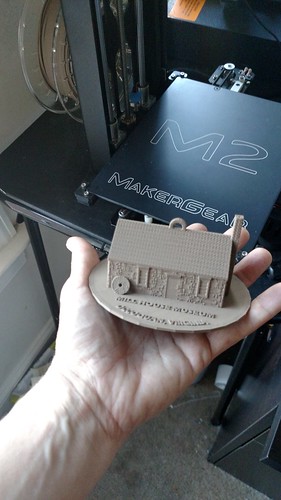
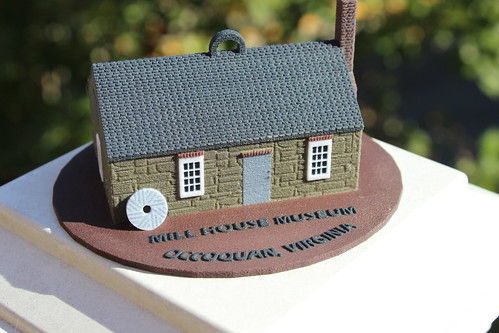
  • Mill House Museum in Occoquan, Virginia
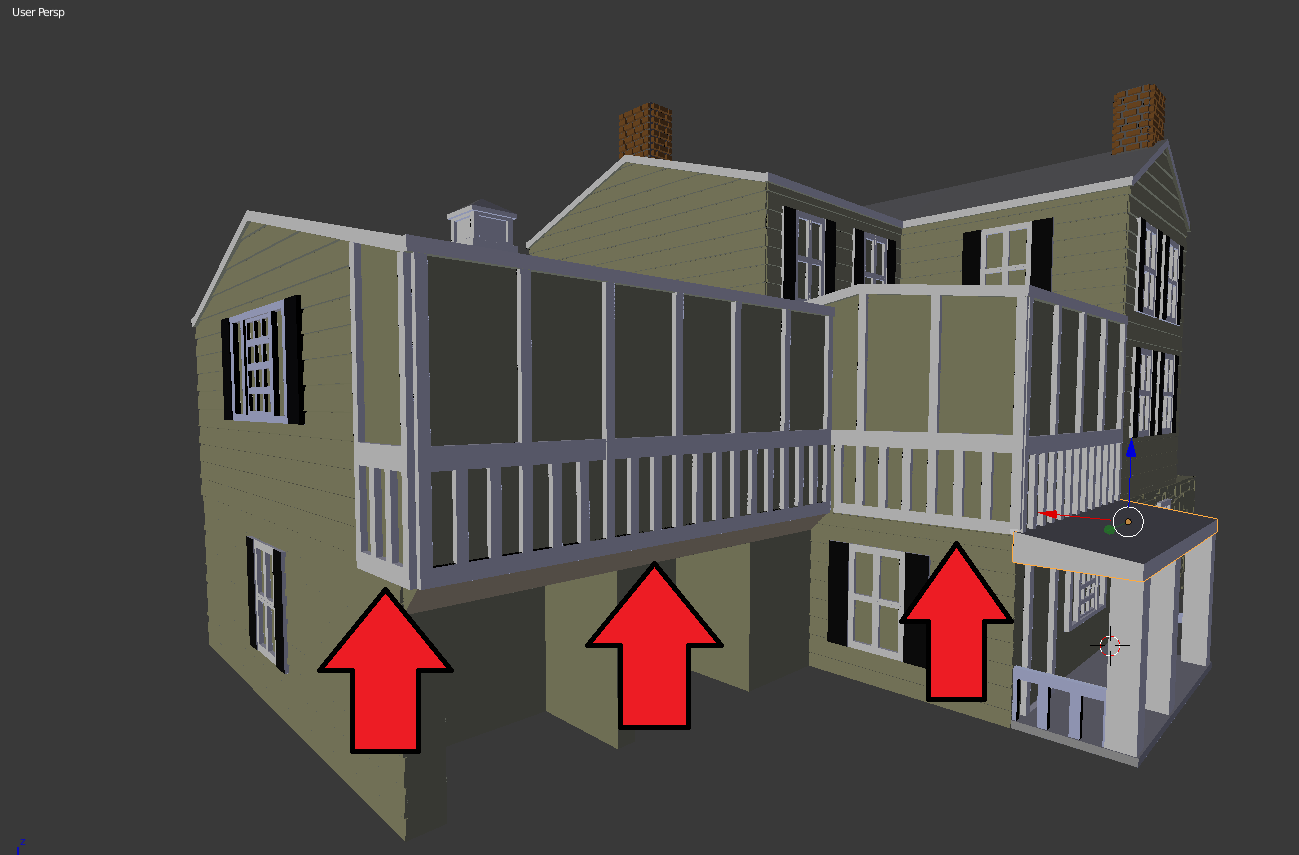
  • Rockledge Mansion from Occoquan Virginia
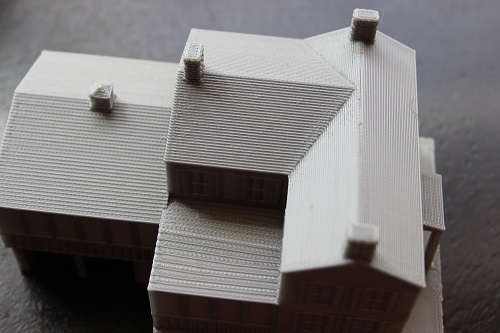
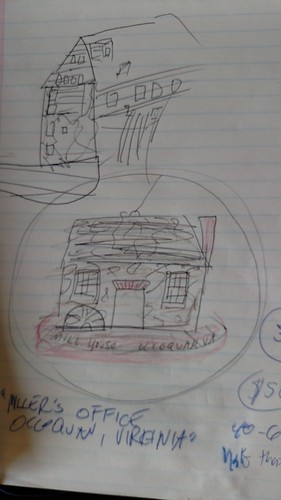
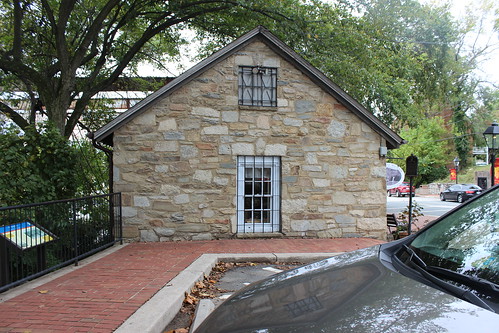
  • And then, a custom piece, My Old Neighbor’s House, Occoquan Virginia.

All of these I modeled in Blender and they all start with one thing.

Reference Images
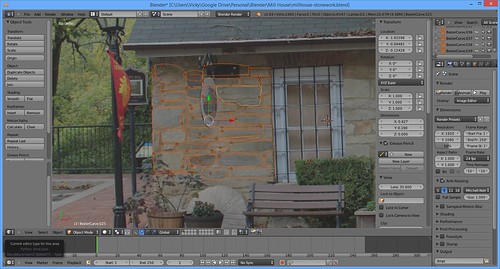
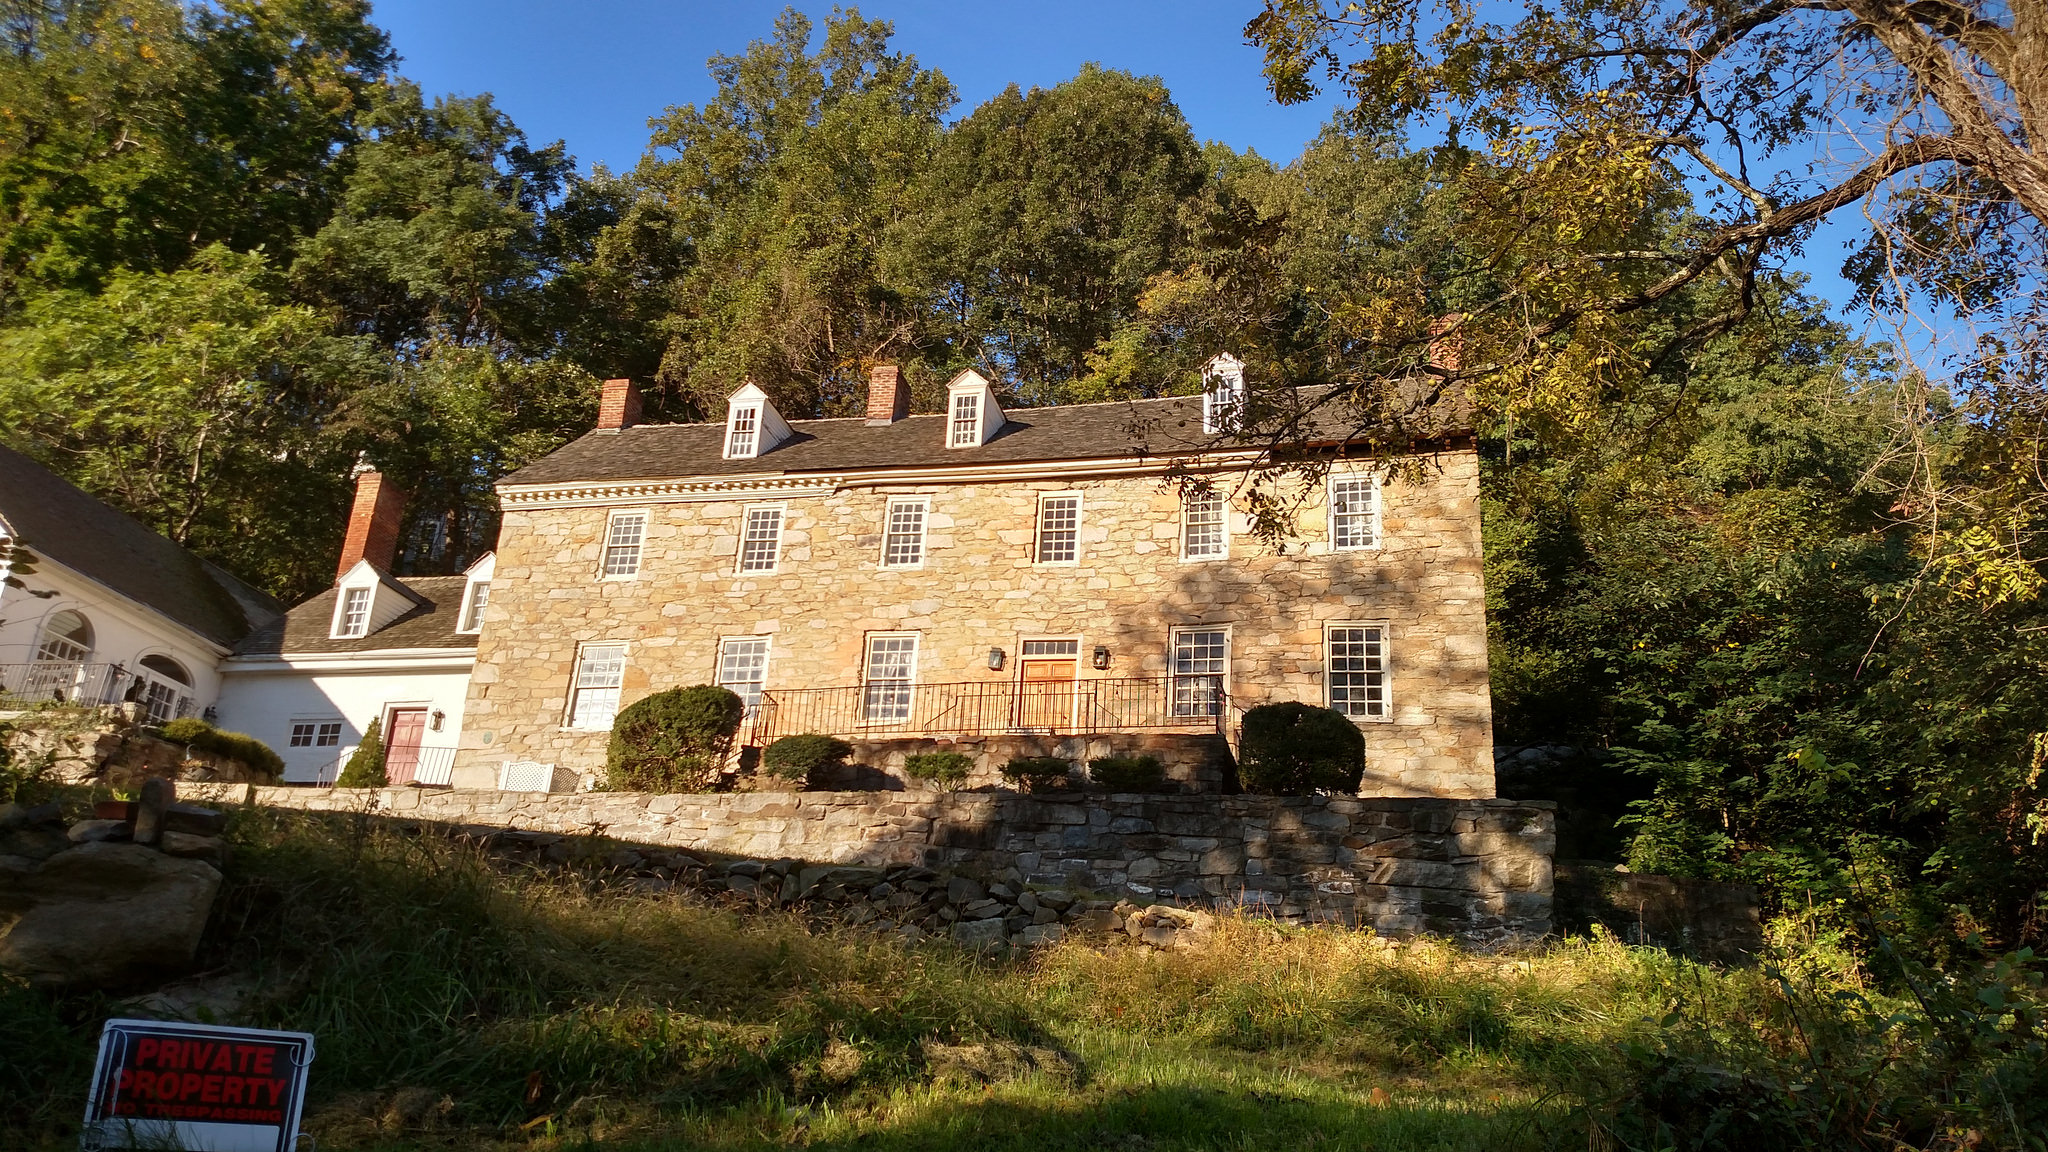
I go out and take reference images. In the case of my neighbor’s house, the prints were a gift and I needed to exercise stealth, so I actually tromped through the woods to snag some pictures of the back of the house. In the case of the Rockledge Mansion, I emailed the home’s owner which allowed me to open up a dialogue with them and I scored an amazing tour of the outside and the inside on the mansion.

Front

If I needed to supplement my own images, I found Flickr and Google Streetview to be a great resource for finding images of the more famous buildings

And…. there were two cases, where I really needed an aerial view to really get a good grasp of the building. The National Museum of the United States Marine Corps is a great example of that. I had all these side images and I just still could not figure out the geometry of the building. Something wasn’t right. Google Earth to the rescue! The aerial image was the missing piece I needed and suddenly everything clicked together.
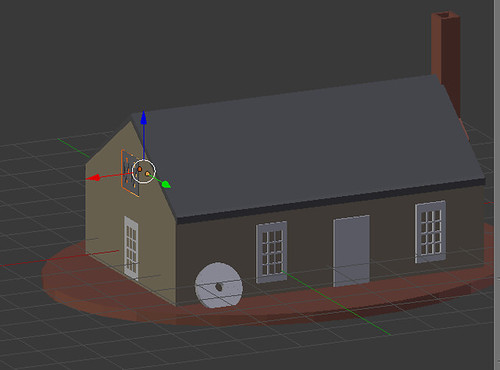
Google Earth FTW

Base Model
Blender does have the ability where I can create what’s called an Empty and import in an image. I can rotate these, scale them, make them translucent, so it is very helpful for me as I’m trying to get the proportions of my base shapes right.

Detailing
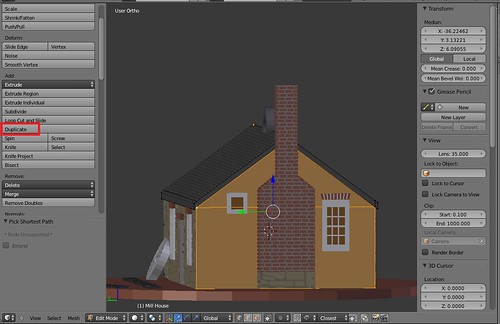
With the detailing, I have done it a very formal way where my windows and my doors are actually a part of the base model. I used a tool called Loop Cut and Slide to make segments in my house where I’m going to put my windows and doors and then I extrude and subdivide accordingly. What I’ve decided I preferred is do model these details as separate objects. I’ll have Window Model, a Door Model, a Light model, A Railing model. I rather enjoy how easy it is to copy and paste that way.

Tip – When you are doing separate models with your detailing (and you aren’t going to do formal Boolean Unions in Blender), you want to make sure they are exactly flush with the base house. At least in Simplify 3D, if there is overlap, Simplify 3D will leave gaps between the two objects– whereas if you have them lined up exactly, you can be super lazy in Blender and Simplify 3D will recognize them as objects that should be one and slice accordingly.

Detailing Design Guidelines
With my detailing, I tend to keep them 0.3mm – 0.5mm high. With my 0.35mm and 0.40mm nozzles, those “90 degree overhangs” have no trouble on my printers, don’t need supports and still render very well in the final print.

Detailing Tour – Windows
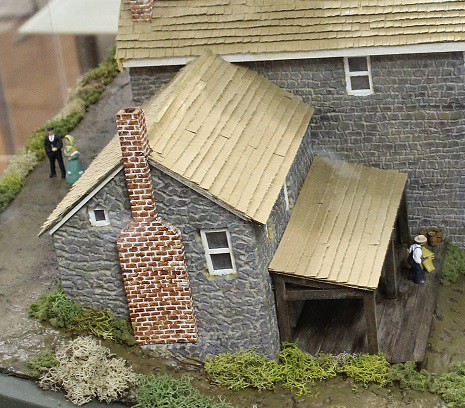
Like most things the window detailing is about 0.3mm – 0.5mm high. In my neighbor’s house, for example, the panes are 0.4mm high and then the shutters are another 0.1mm above that.

Window Sizing

Tip – Slice as you go
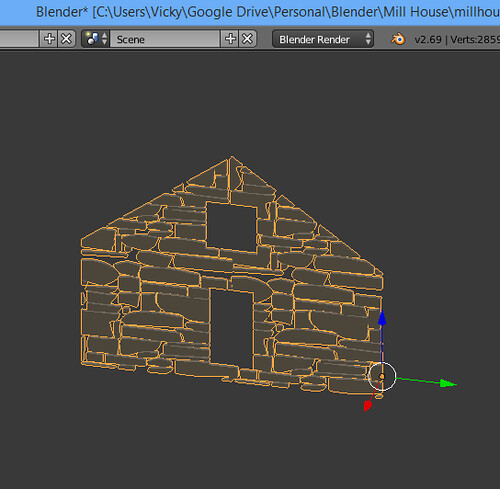
When I’m working with small details and I want to make sure they translate, one thing I do is slice as I go. A perfect example of this is window panes. My Mill House Museum, the windows came out fine on a Shapeways fancy Sand Stone Printer. When I went and printed it on my FFF printer, I noted the vertical panes were too thin so the printer didn’t bother with them. In subsequent models, I’ll preslice sections to see how it is going to look on my intended printer.

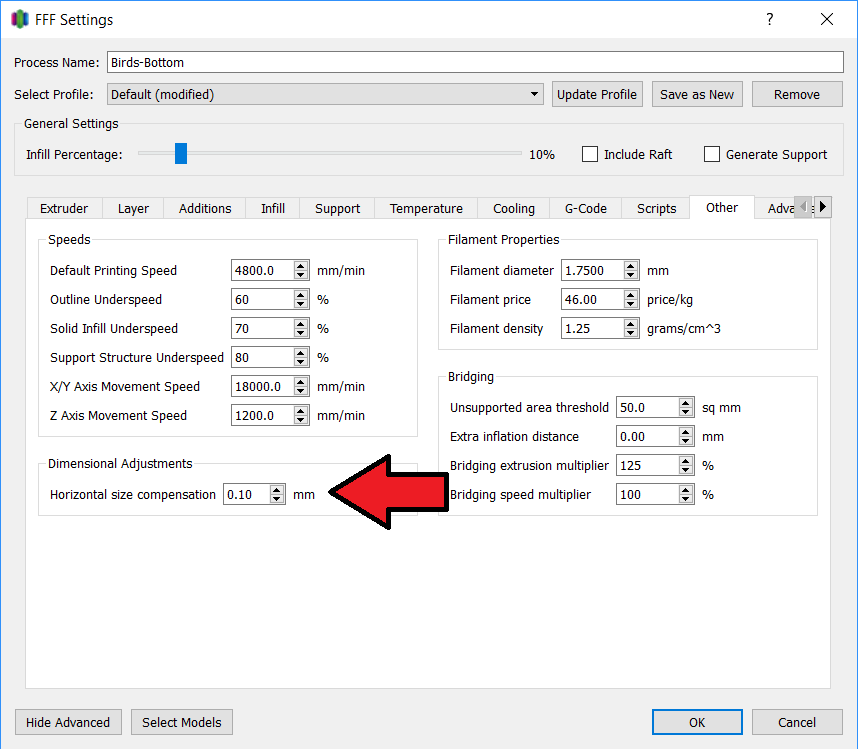
If you don’t slice as you go and you find some missing details, there are options. In Simplify3D, you can try to adjust Horizontal Size Compensation (It’s under the Other tab) to get a better slice.

Horizontal Size Compensation

Detailing Tour – Outdoor Lights, Bay Windows, Garage Overhangs
I modeled the light, but there was deviation from real life— if you look at it from the side, I taper the bottom up– I give it a nice 45 degree angle to help with the overhangs. I did the same thing with the Bay Window and also you’ll see a small triangular wedge between the car port and a screened in porch. This is just to give the printer some solid overhangs to work with.

Outdoor Lights

Detailing Tour – Railings
The biggest trick to the railings is coming up with the dimensions with the slats. I didn’t want something too delicate. I have found 0.65 – 0.85mm to work.

Railing Mrked U

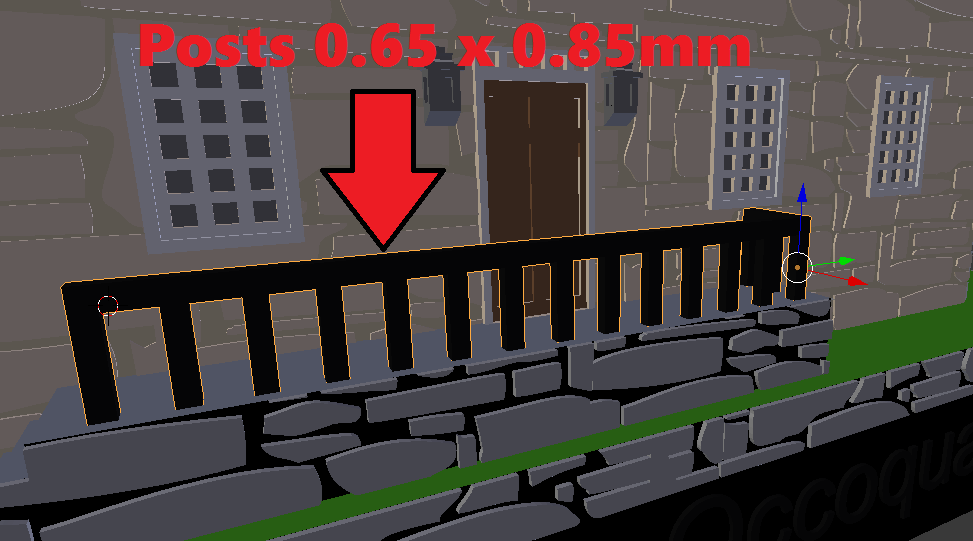
And I reused through measurements on my neighbor’s house. I just got and pasted to get their detailing for their screened in porches.

Reusing Railings

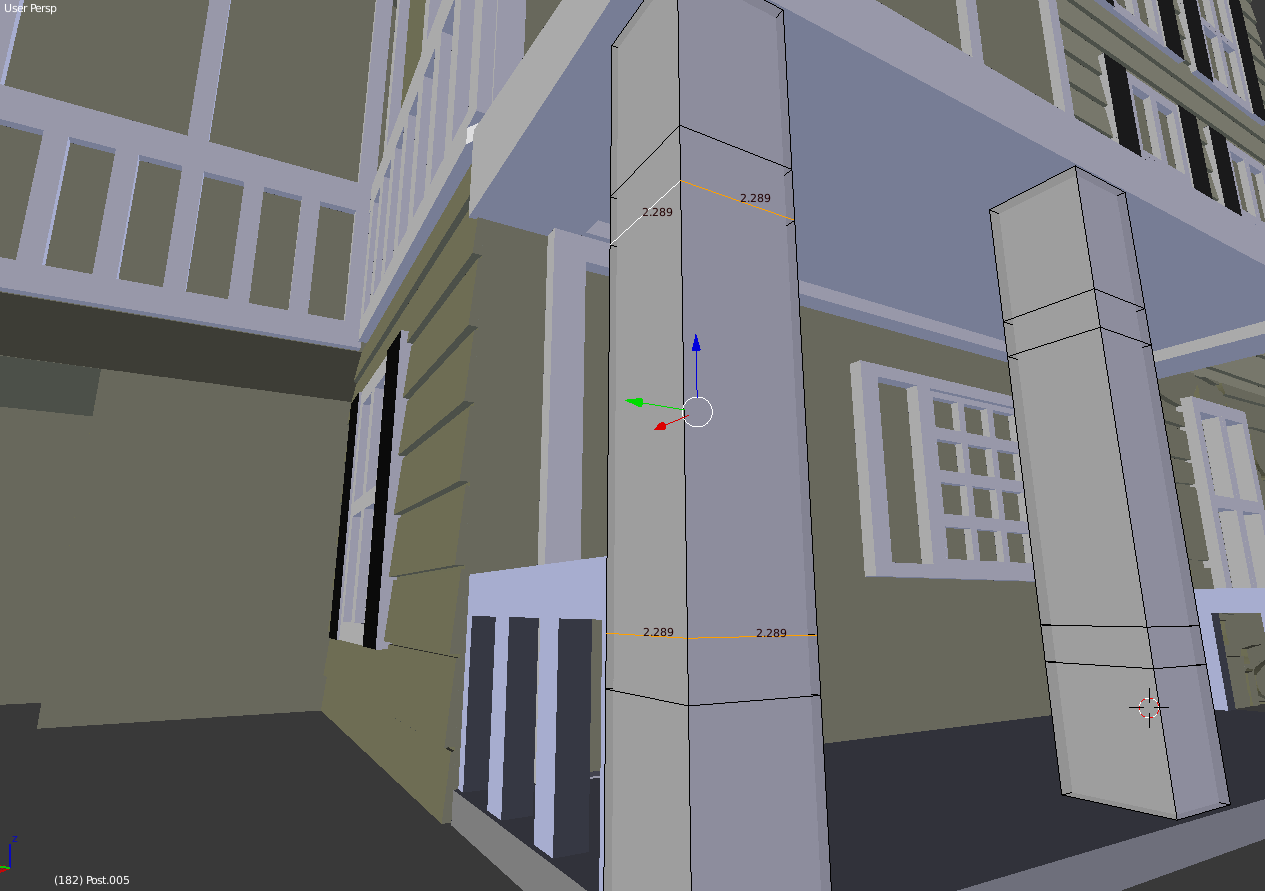
Detailing Tour – Supporting Posts
When I got to my neighbor’s house, I had some posts that would be supporting an awning. I went ahead and increased that to be over 2mm thick on each side so there was more strength and stability.

Awning Posts

Detailing Tour – Awning Hack
And with the awnings, I wanted to print those without supports. What I ended up doing there is I had two small layers connecting the main house with the posts. My very own support beams. They were just 0.5mm high which meant my printer would print two layers for it. Then, the rest of the awning came in and bridging settings kicked with ample parts to “bridge to”
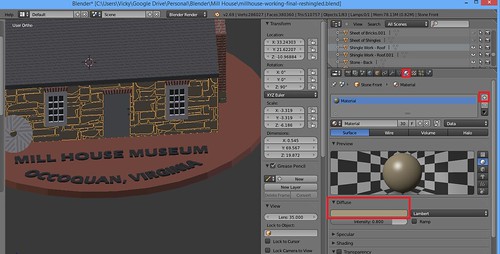
Awning Hack

Textures
There are other approaches you can do with textures. You can, for example, use a grey scale texture map and use the Distortion modifier. I have found that to be a little intensive on my machine resources and making it difficult to continue to the tweak the model.

Textures - Laying Out

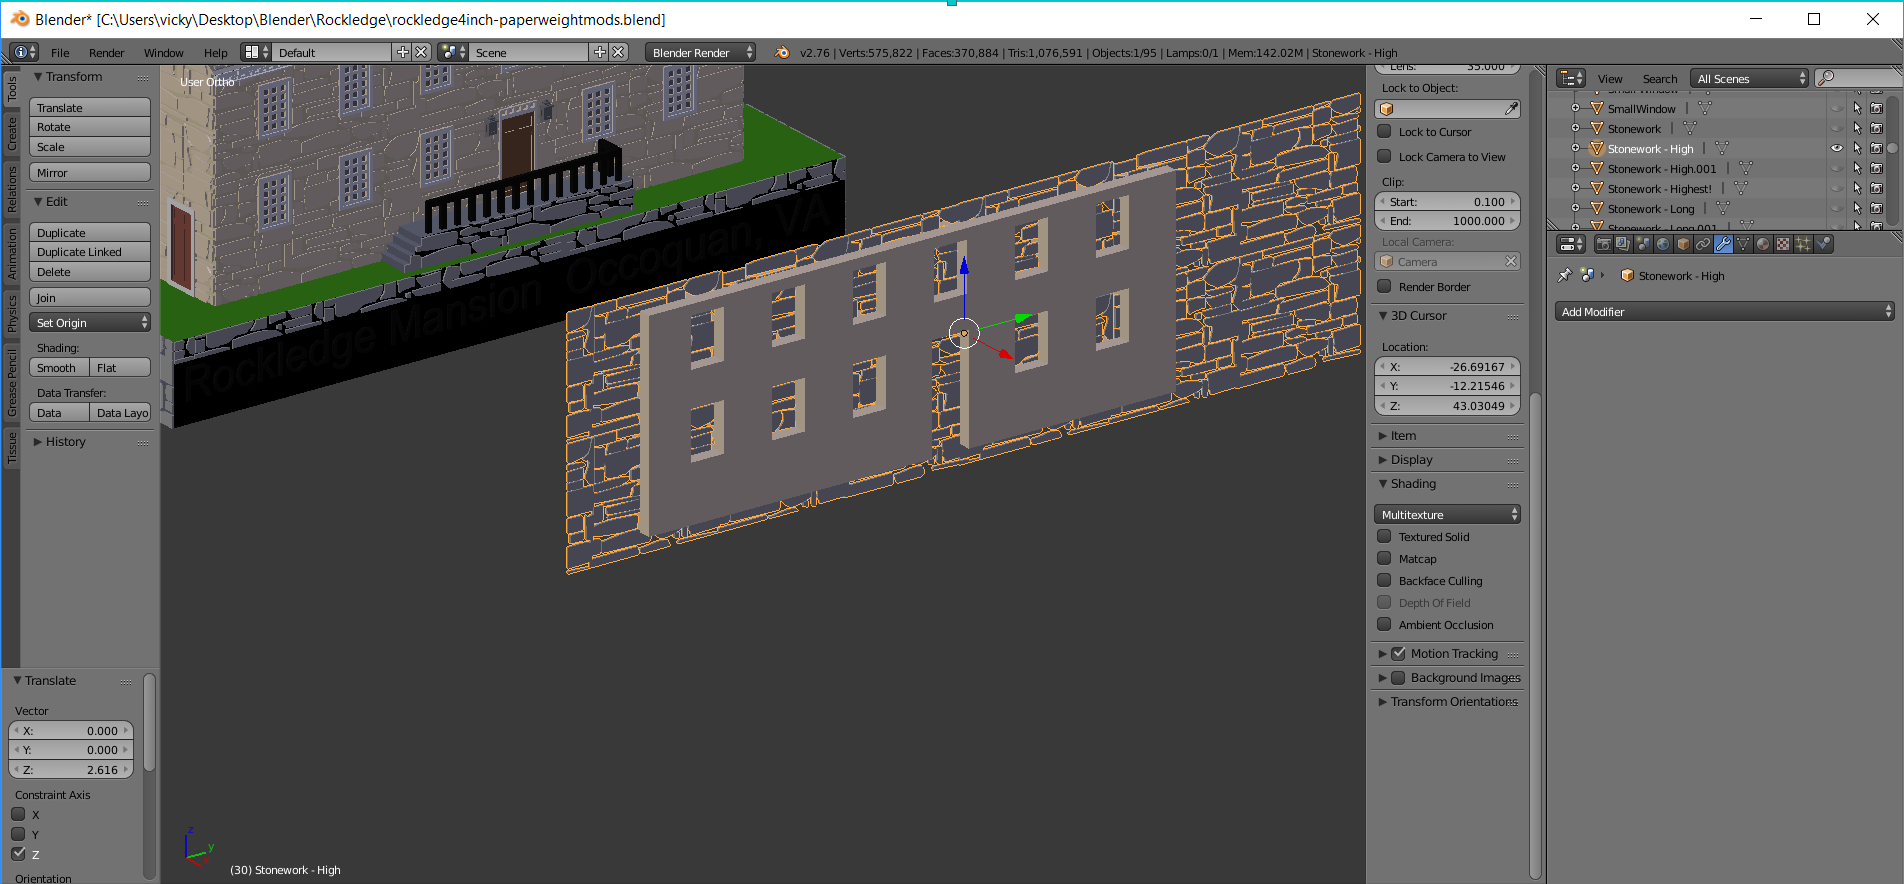
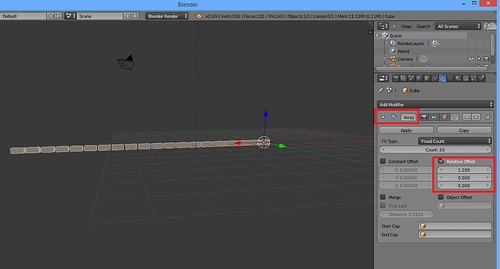
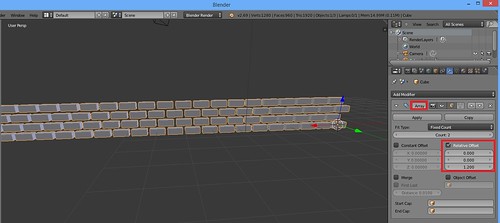
I do have a few “textures” I add to these models — stonework, brickwork, shingles, and finally siding. These I believe are mostly 0.3mm high. The Stonework I did slightly as purist. I actually used Bezier Curves to trace out real stones from one of the historic buildings in my town (Note– there are many ways to skin this cat). For bricks, siding, and shingles, I modeled one piece and then used the Array Feature in Blender to make an entire sheet.

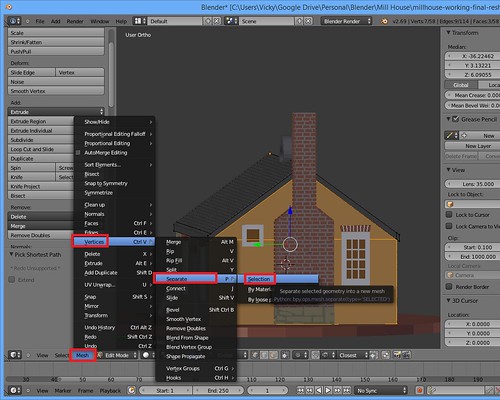
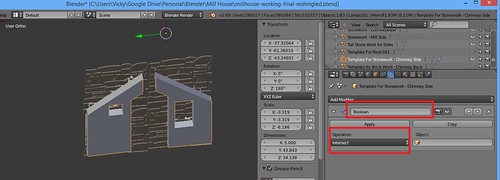
Remember with the Spinning Pokestop, I talked about the Power of Intersection? This is an example of that. By Duplicating key vertices and separating them, I would make a template of the part of the model I wanted texture for. Let’s take the front of my Rockledge Mansion. I wouldn’t want Stonework where the windows and doors were. So I make an object of just want I want textured.

Texturing Template

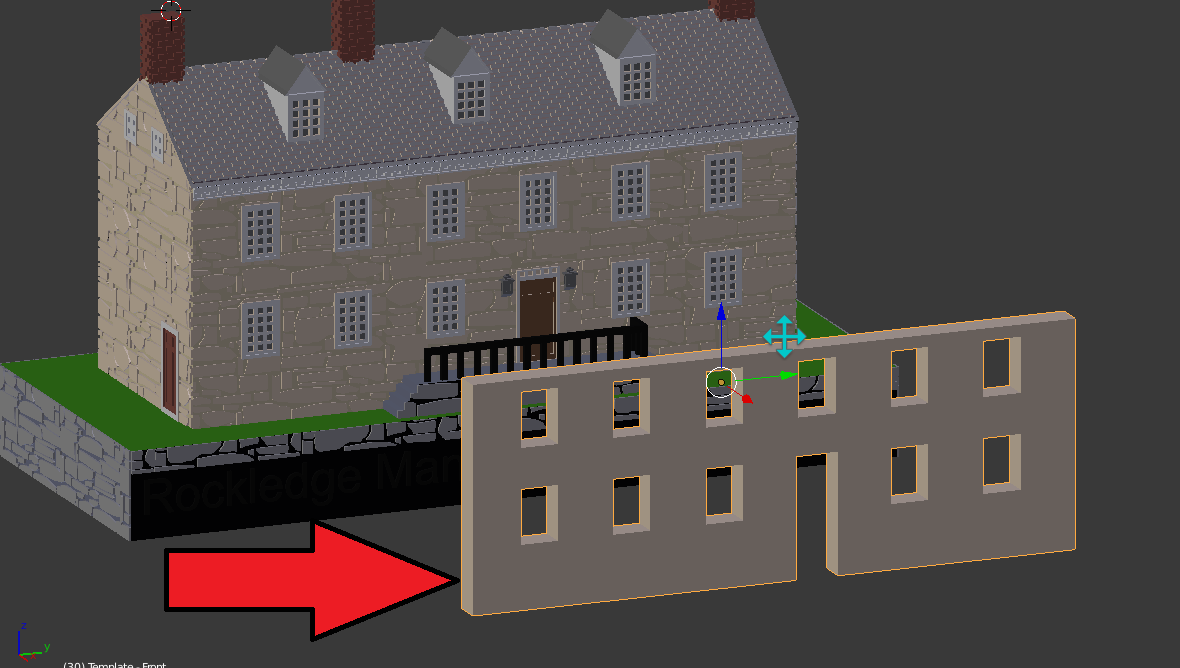
I put my textured piece, in this case, the Stonework in the middle of it and then I take an Intersetion. Viola! Texture.

Textures - Intersection

Texture Piece

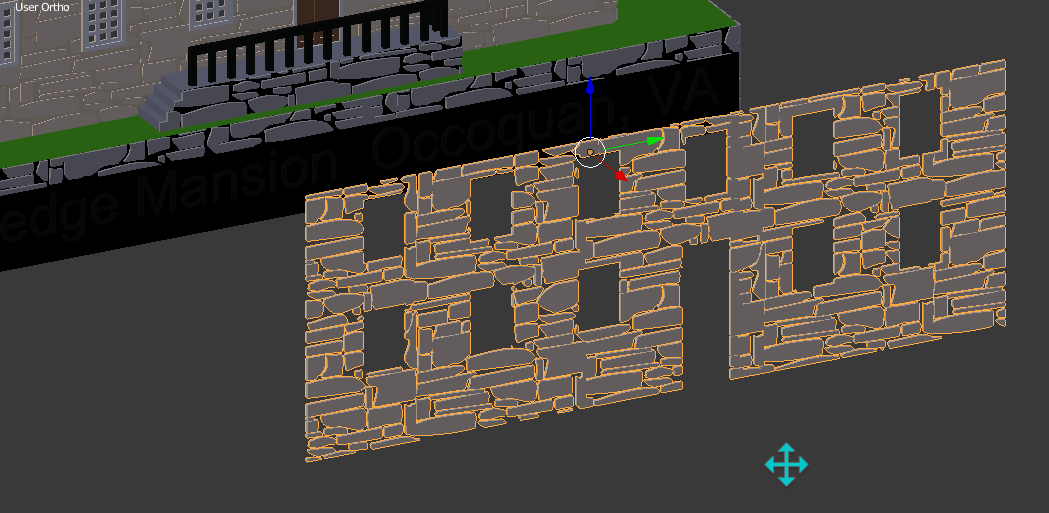
And just like my other details, I make sure that is flush exactly with my base model, so it slices nice and fine in Simplify 3D.

Hack – Use Layer Lines To Your Advantage
I had been doing shingles for everything… until my very last model, my Neighbor’s House. I was doing a “Slice As You Go” and I noticed, the natural layer lines looked remarkably like shingles, so I rolled with it.

Layer Line Shingles - FinalLayer Line Shingles -Small

Washington Post Highlights the Rockledge Ornament!

WashPostScreenshot

I had the honor of 3D Modeling and 3D Printing another ornament to represent the Town of Occoquan for the holidays at the Virginia Executive Mansion.

An article about the ornament appeared in the Prince William section of the Washington Post today.  You can read the full article at https://www.washingtonpost.com/local/occoquan-artist-trims-the-governors-tree-with-a-little-festive-3-d-history/2016/12/02/04ebb97c-b80c-11e6-a677-b608fbb3aaf6_story.html

Modeling Diary – Occoquan’s Mill House Museum

After the Occoquan Arts and Craft Fair, I was approached by the Occoquan Business Guild. This holiday season the Virginia Governor’s Mansion is celebrating Virginia’s localities. They invited counties, cities, and towns throughout the state to design an ornament for tree. I was asked to design the Christmas Ornament representing Occoquan!

Originally we discussed a replica of the old Ellicott Mill which was the very first automated mill in Virginia. But, the Mill looked to be particularly ambitious in the timeframe (end of October). So we ultimately decided to do an ornament based on the Mill House, which is a structure that still stands today and is home to Occoquan’s Mill House Museum. The Mill House’s shape seemed like it would aesthetically make a better ornament.

This structure also has an emotional connection to me and my family. My maternal grandmother worked at the Mill House Museum for many years.

I did some sketches and settled on a pretty literal translation of the Mill House. Since the Mill House is a stone structure, I recommended the final print be in Shapeways’ Full Color Sandstone. I felt its stone-like finish would be perfect for the ornament.

3D Printing - Mill House Museum  Original Sketch

Modeling – Base Structure and Details
For modeling, I used some reference photos I took of the building.

Mill House Reference - Front

Mill House Reference - Mill Side

The side of the mill with the chimney was tight for me to get pictures, so for that side I also used a reference photo I took of a model by former Council Member Dr. Walbert.

SMALL Mill House - Chimney Referene

One of the key features I wanted on the ornament was an old Mill Stone laying on the building. For that, I referred to good ole Wikipedia and its article on millstones!

Modeling – Mill House
I did all my work in the free modeling software Blender. The base model, the windows, the door, the brick trim above the windows and the chimney shape all went quickly and were pretty much done with cubes and basic mesh modeling.

3D Printing - Occoquan Mill House Museum -Mill House Start

Modeling – Physical Textures
And then I had the tricky part. The stone work and the brick work. Now, because we were planning on Full Color Sandstone, I did have the option of doing a UV Map and doing that details just through the colors. But I decided, I really wanted those textures to be actual textures. If we wanted to print the model in bronzeFill or plastic, I wanted the details to translate. I briefly researched Displacement Maps, but with the time clock ticking, I went with an approach I was more comfortable with. (One day I may look back and think, “Dude- you did this the HARD way!”)

All my physical textures I went with a height of 0.5mm. I have found 0.5mm details look good on my MakerGear M2– it’s big enough for the detail to be distinctive, but small enough that the printer doesn’t struggle with overhangs.

Modeling – Bricks
Bricks– I made a small cube as a brick and then used the Array Modifier to make a line of evenly spaced bricks.

3D Printing - Occoquan Mill House Museum -Screenshot - Brickwork

After I applied that Array Modifier, I did another! I made one row and offset it a little bit to get the stratified effect of two rows of bricks.

3D Printing - Occoquan Mill House Museum -Screenshot - Brickwork 2

Finally I used the Array Modifier one more time to make a big sheet of bricks!

3D Printing - Occoquan Mill House Museum -Screenshot - Brickwork 3

Modeling – Stones
For the stone work, I was partially a purist. I pulled up a new Blender project and traced out some of the real stones of the Mill House in Bezier Curves. And once I had a good selection, I used that mini sheet of stones to make bigger sheets.

3D Printing - Occoquan Mill House Museum -Screenshot - Stone Work

Modeling – Fitting the Brick and Stonework
To fit my stonework and brick work to the actual Mill House, I made little templates of the sides I wanted to work with. I started by making a template of the side I wanted the texture for. This would include window and detail cut outs where I did not want stone or brick. This took me a while to find a process I liked. I finally ended up with ended duplicating any pertinent vertices.

3D Printing - Mill House - Duplicate Vertices

Then I separated them into their own object by going to Mesh->Vertices->Separate->Selection.

3D Printing - Mill House - Seperate Vertices

I sometimes had to repeat with other objects (such as windows).

Once I had all the relevant vertices, I made a new face of what I wanted stonework for. From there, I used the Boolean Modifier and Intersection to cut my sheet of stonework into…a specifically shaped sheet of stonework.

3D Printing - Occoquan Mill House Museum -Screenshot - Intersection

And I ended up with my final textured piece that I could overlay over my Mill House.

3D Printing - Occoquan Mill House Museum -Screenshot - Intersection Aftermath

Modeling – Colors
With the Mill House, I didn’t have to create a UV Map for my coloring. I was able to do it all by the Materials tab for my objects.

3D Printing - Occoquan Mill House Museum -Colors

In a couple of spots, I assigned a different material to specific faces (like grooves in the Mill Stone)

3D Printing - Occoquan Mill House Museum -Color Faces

Modeling – Hollowing
To save on material cost I did hollow out my Mill House. It was an easy process– I Inset the bottom face and Extruded up.

Renders and Rework
Originally I did my shingles with an Subdivide, Inset and Extrude technique. It looked fabulous in my Mamie Davis Gazebo Ornament, but I did not like it in my Mill House renders.

3D Printing - Occoquan Mill House Museum - Sandstone Render

I went back and redid the shingles the way I did the bricks (so they were staggered).

3D Printing - Occoquan Mill House Museum - Sandstone Render - New Shingles

I met with my contacts and gave them a tour of the model and the renders and they loved it! The only tweak they had was to add a doorknob.

“That’s it!” I yelled enthusiastically!

The door had been bothering me all week. It just did not look right. As soon as they said doorknob– I knew that was it. That was the missing piece.

3D Printing - Occoquan Mill House Museum - Reshingled - Final

Test Prints
One of my concerns was the balance of the ornament would be off or that once printed, I wouldn’t be fond of the size I chose. So I did a test print on the Maker Gear M2. And….. I was in love. Even though my printer did not pick up the window panes and I noticed a few minor issues, I was impressed at how great all the detailing came out on my printer. I am so glad I went to the trouble to make that stonework and brick work physical details instead of just colors. As for balance– it balanced perfectly!

3D Printing - Occoquan's Mill House Museum - Test Print in White - It Balances

And for fun, I also did a version for myself in ColorFabb bronzeFill.

3D Printing - BronzeFill Mill House Museum From the M2

Final Print
My final print came out a little darker than I expected, but still very identifable as the Mill House. The most important part– the “customer” was thrilled! Phew!

Mill House - Top

And Now…
And now the ornament makes it way to the Virginia Governor’s Mansion! Exciting!

Beta Testing OCQ Keychains and the Merit of Simple Designs

Okay, don’t laugh. Sometimes the simplest designs is what resonates with people. My breastfeeding pendant, for example. It’s such a simple model– I could make it in minutes now, but that doesn’t keep it from drawing the attention and appreciation from breastfeeding mothers. My favorite example is Erin (below) who I got to meet at the National Maker Faire. She bought a breastfeeding pendant from me right after pumping. : )

Two Breastfeeding Mothers at National Maker Faire

So, I made these quick little OCQ keychains to represent my hometown–Occoquan and maybe even raise some money for the Occoquan Historical Society (though they don’t know those aspirations yet). Super easy– I just adapted some OpenSCAD code I had for some Virginia Tech wine stoppers. I used white text on blue background to match our new stunning town signs. They looked nice, but design-wise, nothing ground breaking or special.

“I want one,” my mother said as I sprayed some gloss on my day’s prints out on the deck.

Out of all the things I’ve printed, I believe this is the first time she’s wanted something for herself.

“I want one,” she repeated later as I stacked and counted prints on the dining room table. She even volunteered to take one of my rejects. “The one with the weird C.” So I gave her one (ahem… the one with the weird C).

She promptly put it on her keychain and it fit perfectly. And there you have it. Sometimes simple designs can make people happy.

3D Printing - OCQ Keychain - Anne's New Keychain

For those so inclined, my OpenSCAD code is below:

//
// This is our module that will create a base
// cylinder which we stretch out for aesthetic
// purpose.
//
// We pass in the dimensions and a flag whether
// we want an embossed outline outside of the cylinder
//
module base_cylinder(x,y,z, withOutline)
{
resize([x,y,z])
rotate([0,90,-90])
difference()
{

cylinder(r=30, h=22, $fn=100);

//If we want to do an outline, we are
//going to subtract out a smaller
//cylinder so we have an inlay.
if (withOutline==true)
{

//front
translate([0,0,17])
cylinder(r=28, h=5, $fn=100);
}
}

}

difference()
{
union()
{

base_cylinder(50,3,30, true);

//My OCQ Text
translate([-18,-1.5,-5])
{
rotate(a=[90,0,0]) {
linear_extrude(1.5)
text("OCQ", size=12, center=true);
}
}

}

//Keychain Hole
translate([-20,1,0])
rotate(a=[90,0,0])
cylinder(r=2, h=5, $fn=100);
}