
A friend of my brother’s passed away last week. He was in his thirties, so it was an unexpected death. Last night, my sister-in-law texted to see how soon I could 3D Print something for the funeral. She wanted a Sheriff’s Badge with one request– that it simply read “Fun Police”.
Thanks to Thingiverse, OpenSCAD, and Simplify3D, I was able to turn around her request fast.
Thingiverse and OpenSCAD
Thingiverse had a lot of Sheriff Badges to choose from. I went with the design by Bichiatari. I liked the standard six star approach and bonus– it was in OpenSCAD, which I taught a class on last June! I used his base code to make some slight alterations:
- I made the points of the stars spheres to give it a more three dimensional look.
- I changed the font to “Rockwell Extra Bold”. I liked the look of the text and I liked how thick the letters were
- And finally, I changed “Sheriff” to “Fun Police”.
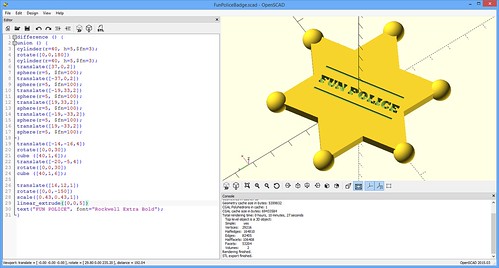
Original Model
Simplify3D
Now, when I was done, the points of my stars did extend below the base of the star thanks to the spheres.
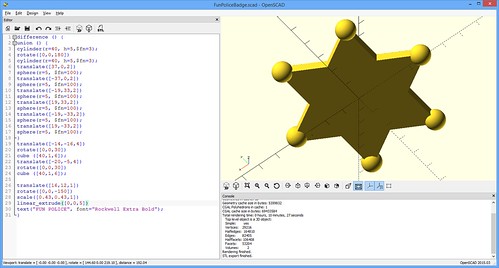
I didn’t want to print those sphere bottoms
For my first trial run, I didn’t go to the trouble of making that flat in OpenSCAD. I just flattened the bottom when I sliced in Simplify3D. I simply changed the Z offset, so the bottom part of those spheres were below my build plate, so those parts wouldn’t print. A nice handy trick.
I also felt the proportions were a little off, so I scaled just the height of the object down so it was only 6mm high.

Hack with Simplify3D – Changed my Offset To Lower the Object Down
Rev 2
The first print was okay— and I bet they would have been satisfied with it. I didn’t like how the “E” at the end of “POLICE” printed out and I thought it would be a better use of real estate to make the letters bigger.
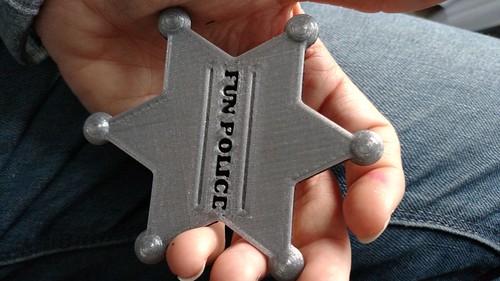
The First Print Had a Messed Up E
So I went back into OpenSCAD and made some changes:
- I put “FUN” on one line of text and “POLICE” on another
- I made the text bigger.
- I resized my object down to 4mm high
- Finally, I went ahead and chopped off the bottom of those spheres so it would all lay flat
For those interested in the code, the full OpenSCAD code is below.
As far as the second print— I liked it much better. I used the MakerGear Silver PLA filament.

Second Print
OpenSCAD Code
[js]
//I thought the current height was too chunky,
//so scale it down to 4mm high after everything
//else is done
resize([0,0,4])
difference () {
//Rotate the star 30 Degrees, so it is easier to visualize
//and place the text
rotate([0,0,30])
union () {
//The first two cylinders are our star
//3 sided cylinder is a triangle
cylinder(r=40, h=5,$fn=3);
rotate([0,0,180])
cylinder(r=40, h=5,$fn=3);
translate([37,0,2])
//Spheres at each star’s point
sphere(r=5, $fn=32);
translate([-37,0,2])
sphere(r=5, $fn=32);
translate([-19,33,2])
sphere(r=5, $fn=32);
translate([19,33,2])
sphere(r=5, $fn=32);
translate([-19,-33,2])
sphere(r=5, $fn=32);
translate([19,-33,2])
sphere(r=5, $fn=32);
}
//These cubes are our engraved lines
translate([-23,10,1])
cube ([50,1,4]);
translate([-23,-10,1])
cube ([50,1,4]);
//This is our text for engraving
scale([0.7,0.7,1])
translate([-30,3,1])
linear_extrude([0,0,5])
text(” FUN “, font=”Rockwell Extra Bold”);
scale([0.7,0.7,1])
translate([-30,-9,1])
linear_extrude([0,0,5])
text(“POLICE”, font=”Rockwell Extra Bold”);
//Finally this cube is to cut everything off at the bottom to make it flat
translate([-50,-50,-5])
cube([100,100,5]);
}
[/js]