The Northern Virginia Community College is working on a T-Shirt 3D Printer. They invited me to come by and show the students how they could use Blender and Bezier Curves to turn 2D ideas into simple 3D models for the T-Shirt Printer. I had an absolutely fantastic time, as I always do talking about 3D Printing. If you missed it, you can still follow along with my slides from SlideShare.
Greetings All! Working with Packt, I wrote a project-based learning book to teach Blender for 3D Printing. It got published last week! I decided my return to YouTube should be called, “You Guys, I Wrote a Book!!!”.
The book walks through four separate projects to teach Blender tools and skills.
Profile Pendant
Background Images
Bezier Curves
Extrude
Boolean Union
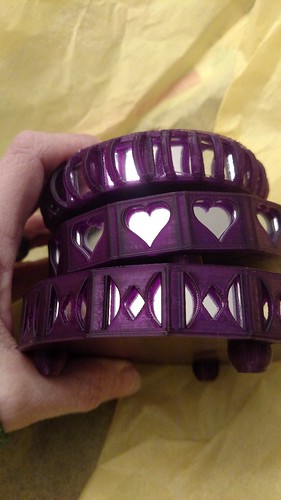
Coordinate Bracelet
Standard Shapes
Mirror Modifier
Boolean Difference
Text
House Figurine
Loop Cut and Slide
Extrude
Inset
Subdivide
Array Modifier
Using SVGs
Boolean Intersection
Human Hand
Subdivision Surface Modifier
Topology Edits
Proportional Editing
Materials
UV Maps
YOU DO NOT HAVE TO BUY MY BOOK! I am already very happy as is. If you do wish to have a copy, you can purchase the book on Amazon.
What’s next for me? I have a long list of videos I would like to make. I’ll be working on my proposal and projects for the MakerFaireNova on March 18, 2018. I will also be helping with the East Coast RepRap Festival which is looking like it will be in late June. Also don’t forget to check out the Friday Night 3D Printing Community Hangouts . I’ve been known to show up from time to time. 🙂
One of the things that gives Blender its reputation of having a large learning curve is it is geared towards animation. It has a lot of extra features or capabilities we don’t use for 3D Printing.
Or do we?
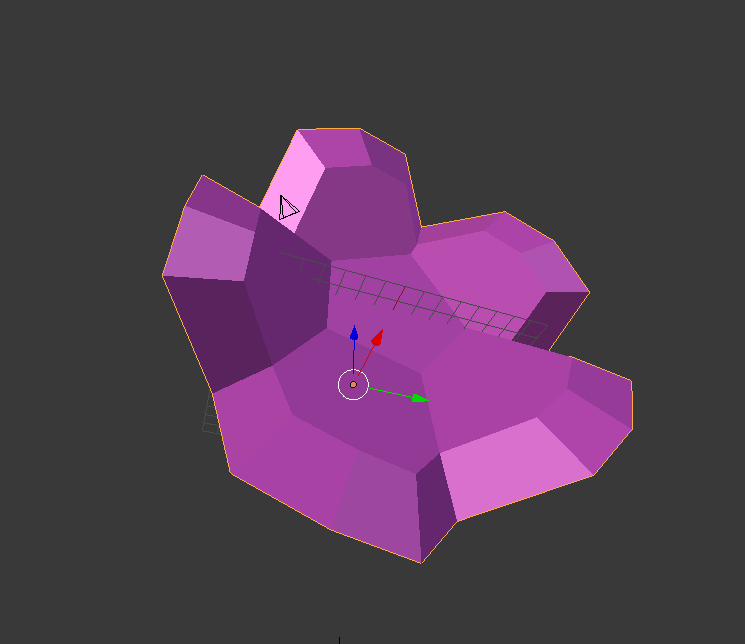
Homesick for the Appalachian Trail, I embarked on making rhododendron themed drawer pulls. It was a Blender animation feature helped me pull off my vision. I had never heard of “Particle Systems” before and with good cause. They are typically used for animating dust, smoke, water, and hair. Thanks to a wonderful tutorial video by Blender Facile, I learned how I could also use this feature to convert a single flower model into the trademark ball of flowers for the rhododendron.
My steps for using the Particular System were:
First, I made a model of an individual flower. Thinking about how I wanted this to be sturdy for people to grab, I kept the petals thick and shallow.
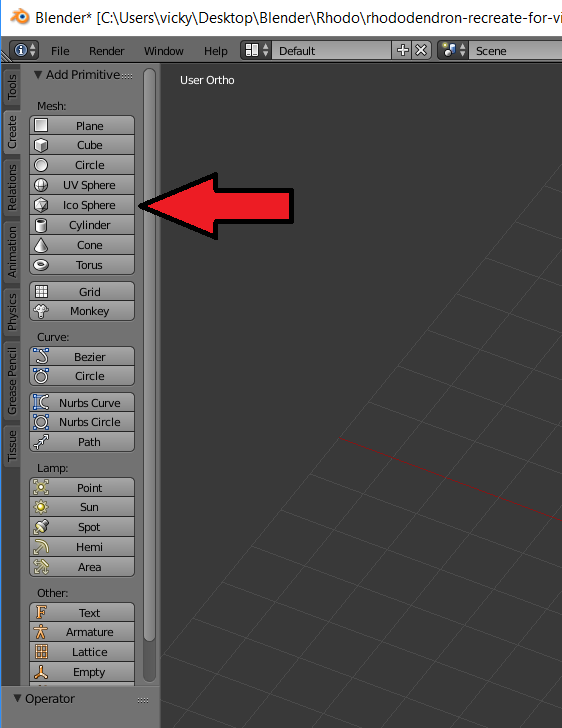
To convert my single flower into a ball of flowers, the first thing I did was add an Ico Sphere with 2 subdivisions to my Blender project.
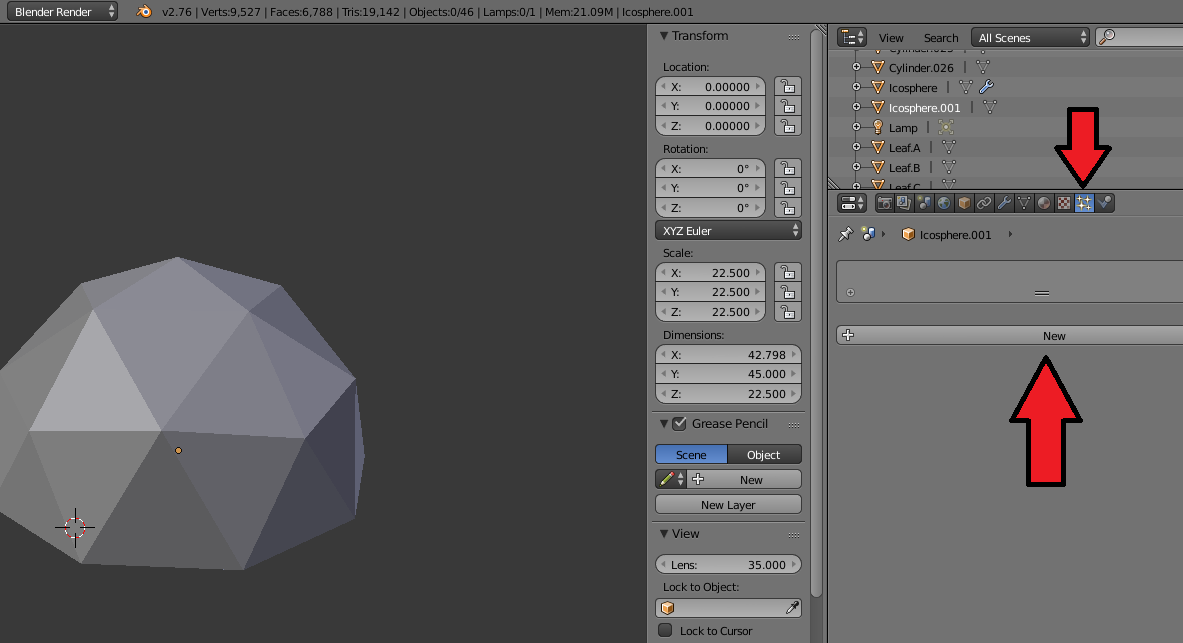
I went ahead and removed the bottom half of my Ico Sphere and gave it a flat bottom.
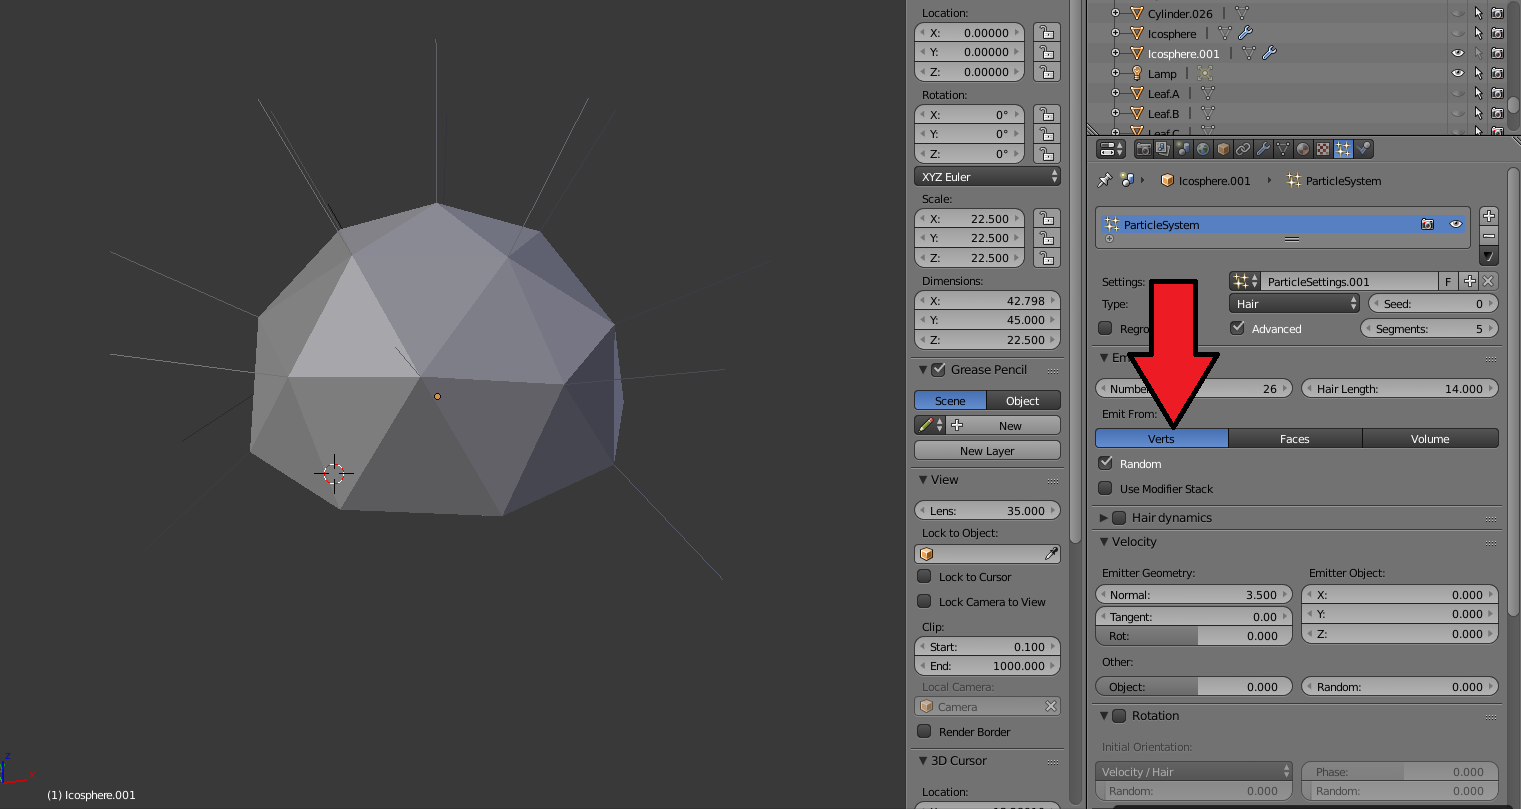
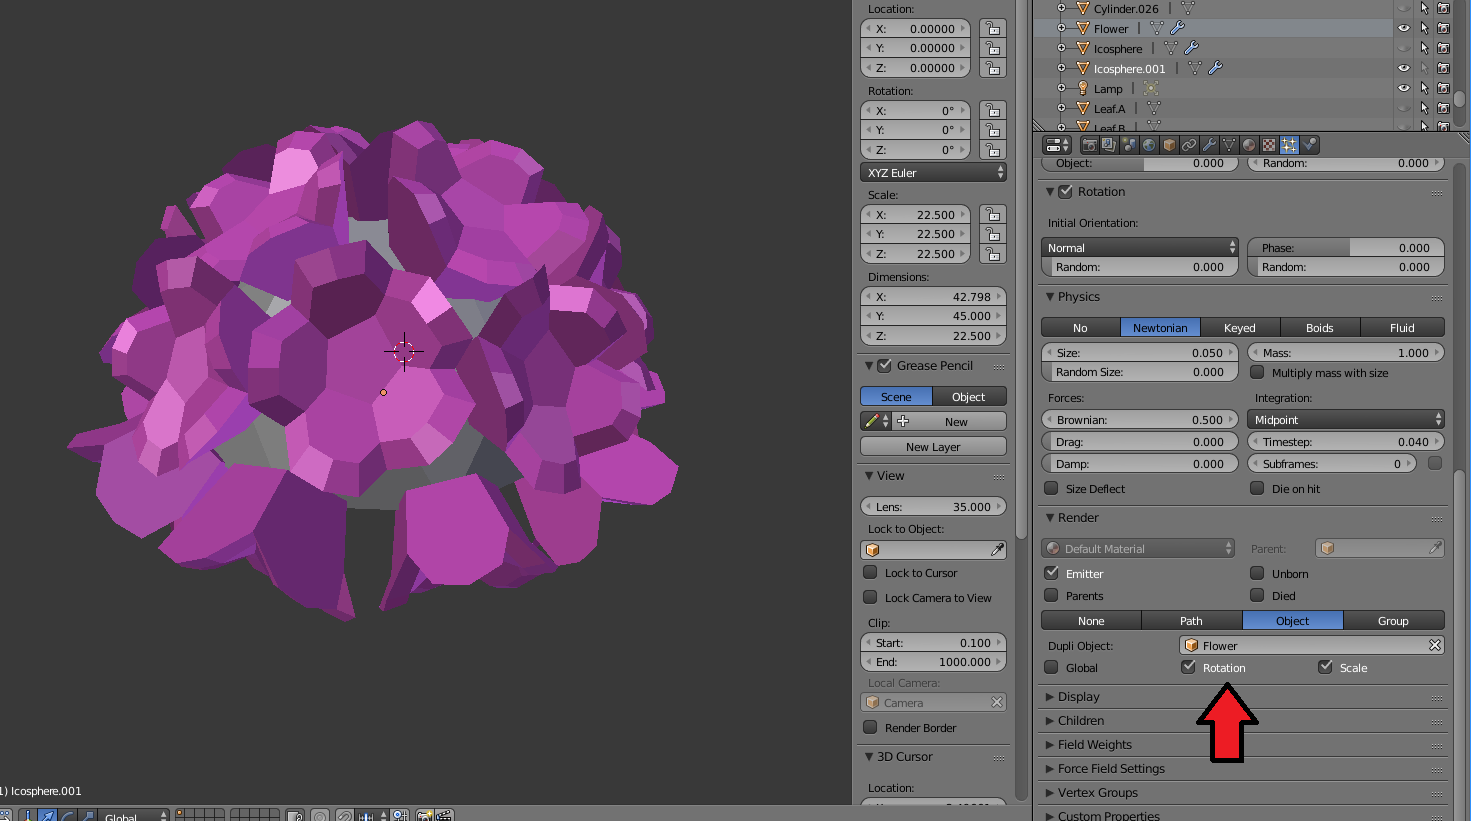
Once I was satisfied with my Ico Sphere, I clicked on the Particle Systems icon
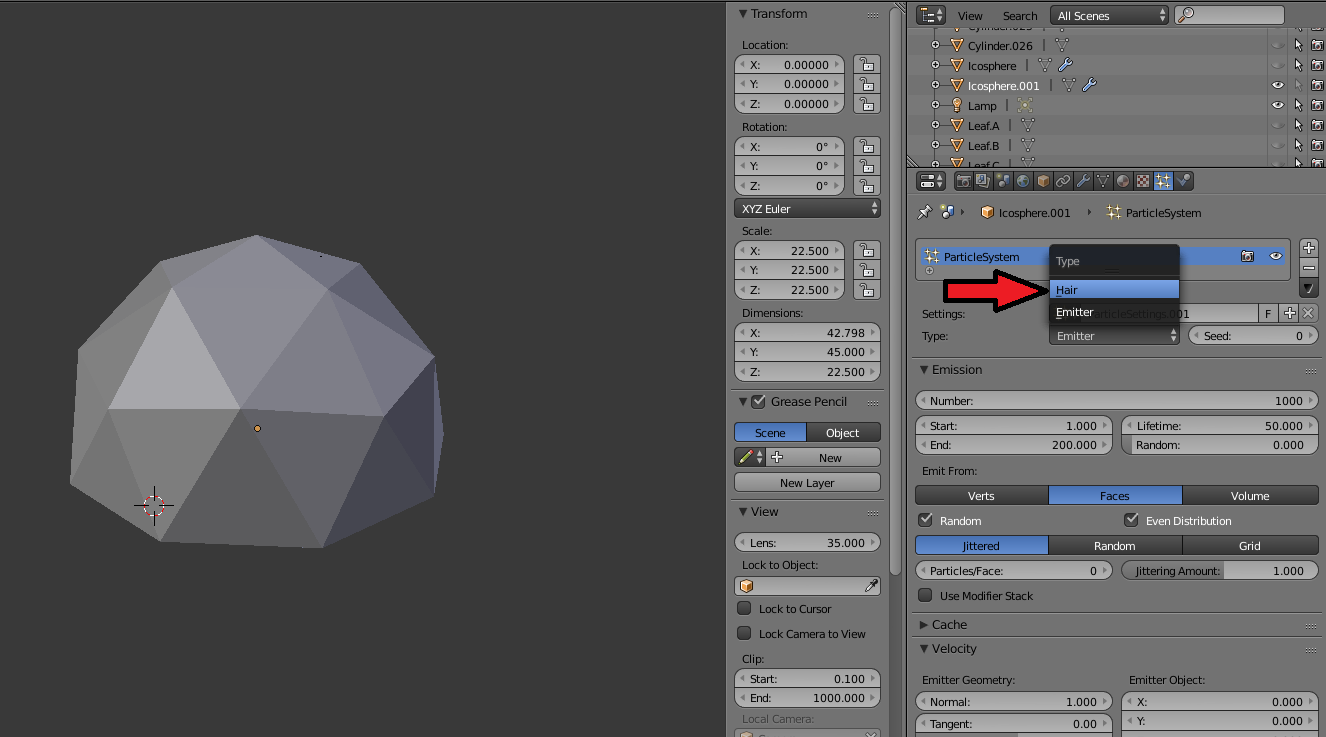
I clicked on New to create a new Particle System
I changed Type to “Hair”
I checked the Advanced box which would allow me to change some rotation settings later
Under the Emissions section, I clicked Verts. This is telling Blender that each “hair” (aka flower) is going to be associated with a vertex in my model. For Number, I put in 26. This just happens to be the number of vertices in my modified Ico Sphere.
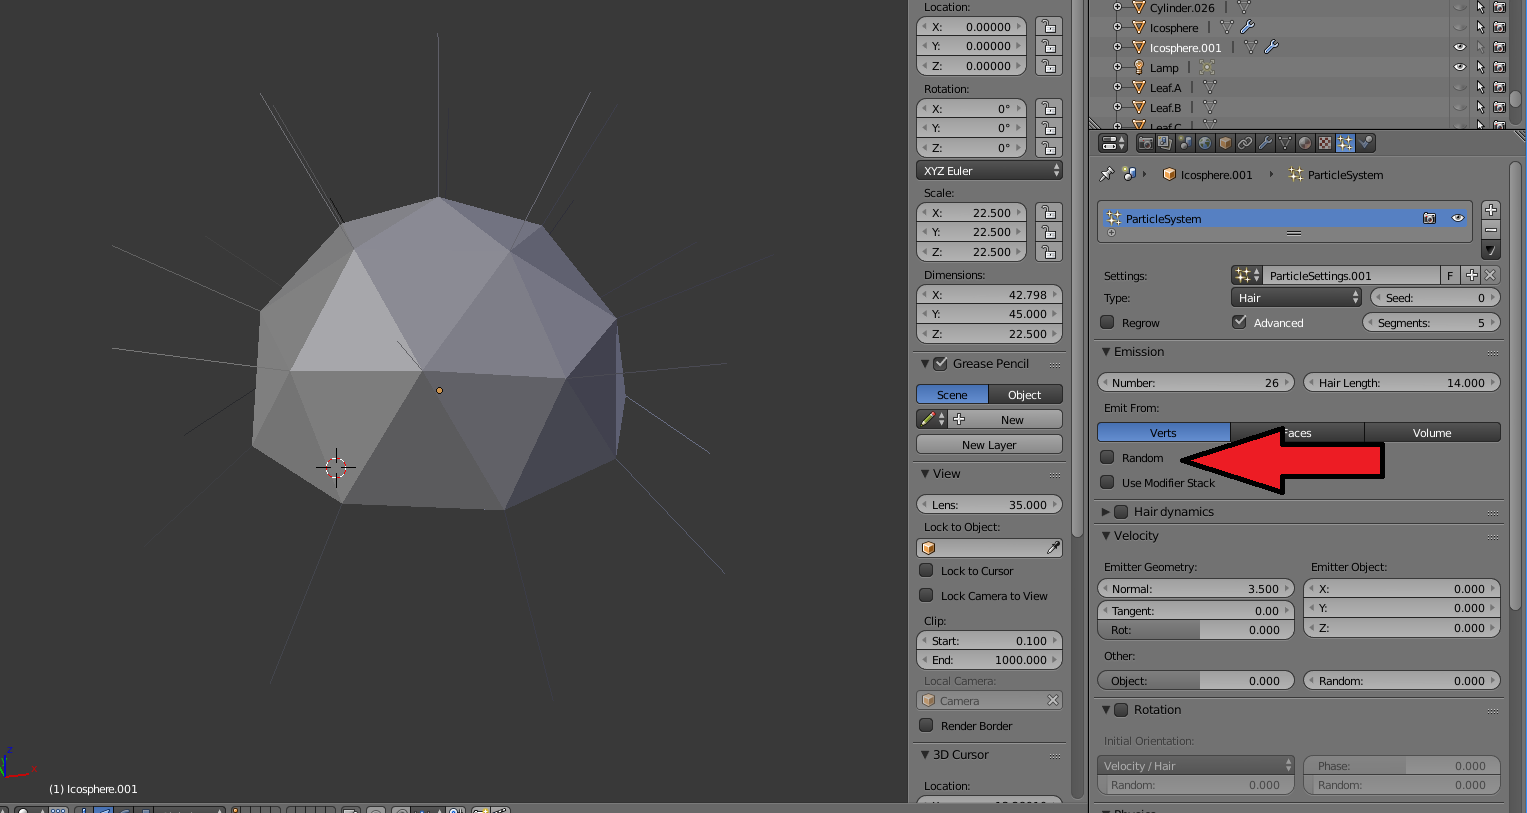
I also unchecked the Random box.
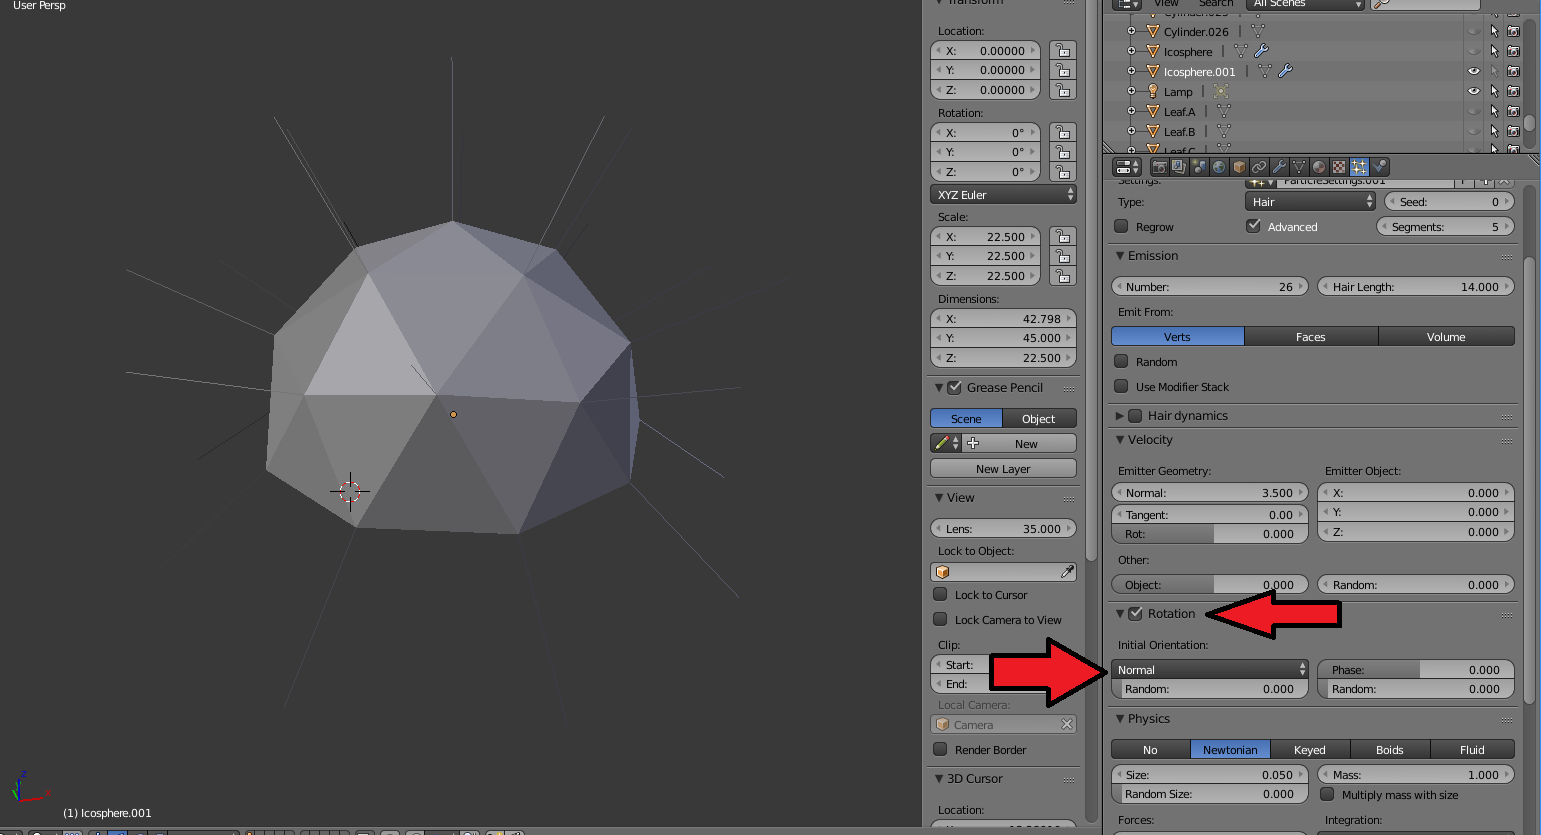
Under the Rotation section, I first checked Rotation and then for Initial Orientation, I picked Normal. The system is going to rely on my Face normals (the direction my faces are) to determine which way to rotate my “hairs”.
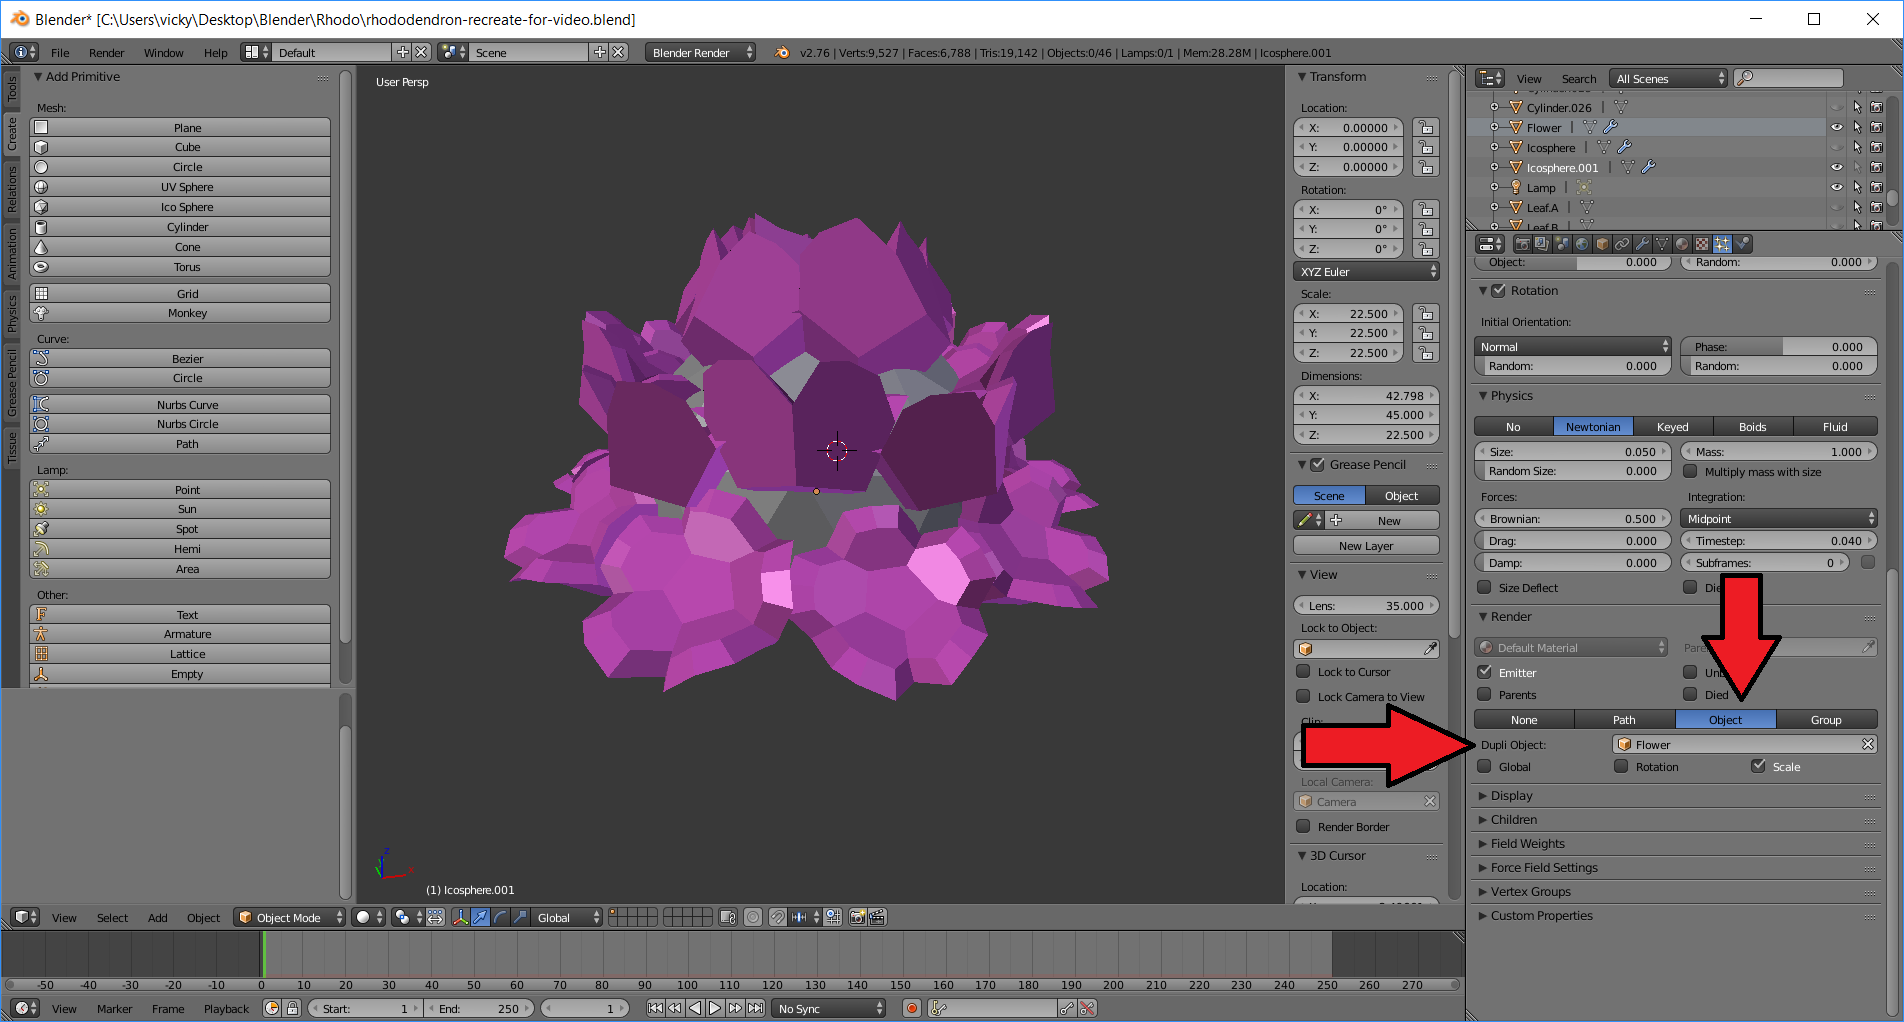
Under the Render section, I picked Object and for Dupli Object, I selected the single Flower model I made. And then my flowers appeared on my sphere.
Under the Render section, I checked Rotate and my flowers oriented themselves accordingly.
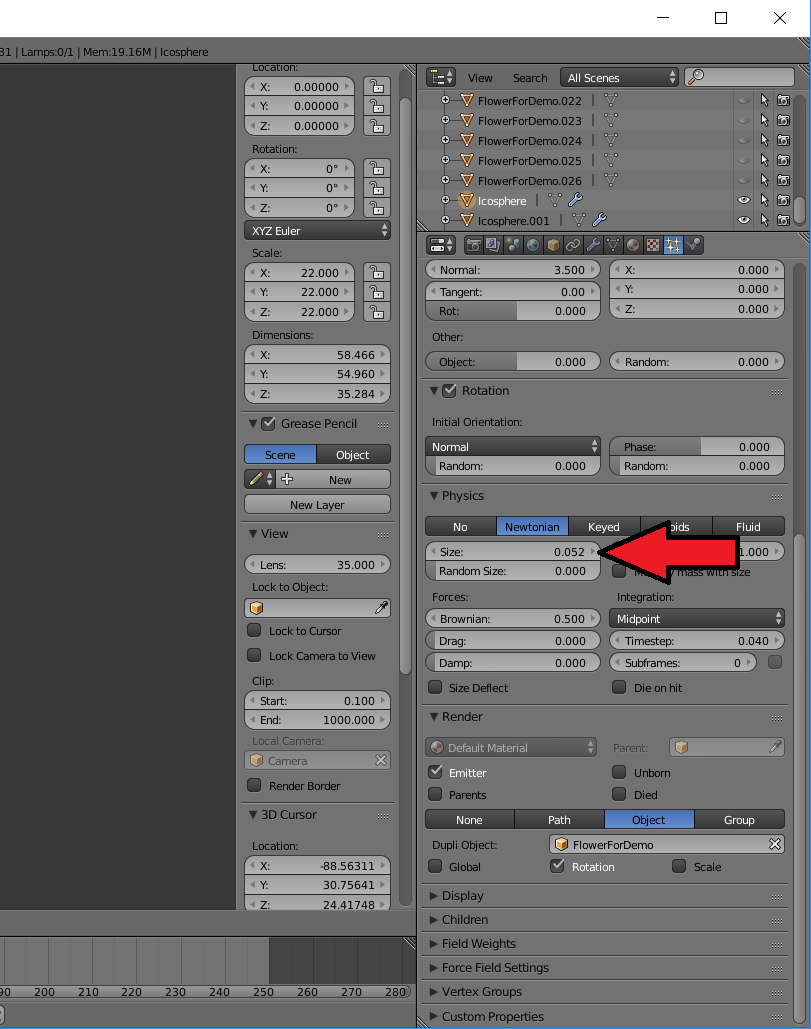
Since this is a feature geared towards animation, there is a large Physics section that really does not apply to my purposes. The one thing I did play with was the Size. By adjusting this setting, I was able to get my flowers to a size that provided some good coverage over the Ico Sphere.
Once I was satisfied with all my settings, I clicked on the Modifiers icon and clicked on Convert.
All of my “hairs” (aka flowers) became official objects in Blender. I was able to click on each one and manipulate it like any other Blender object. For example, I went ahead and rotated my bottom row of flowers to better achieve the look I was going for.
Eureka! I had my ball of flowers! My modeling journey was far from over, but the hardest part about that journey was done, thanks to an animation feature I never thought I would need.
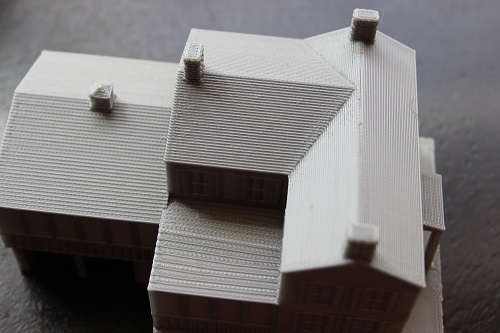
Greetings! I am starting to build up quite a collection of 3D Printed buildings! Today I thought I would give you a little tour of them and my design process and share some of my design guidelines and tips.
I’m from Prince WIlliam County Virginia which is outside of Washington, DC. With the exception one gazebo from New York, all my buildings hail from Prince William County, Virginia and most of those right smack from my town, Occoquan. So far, I have
Mamie Davis Gazebo in Occoquan, Virginia
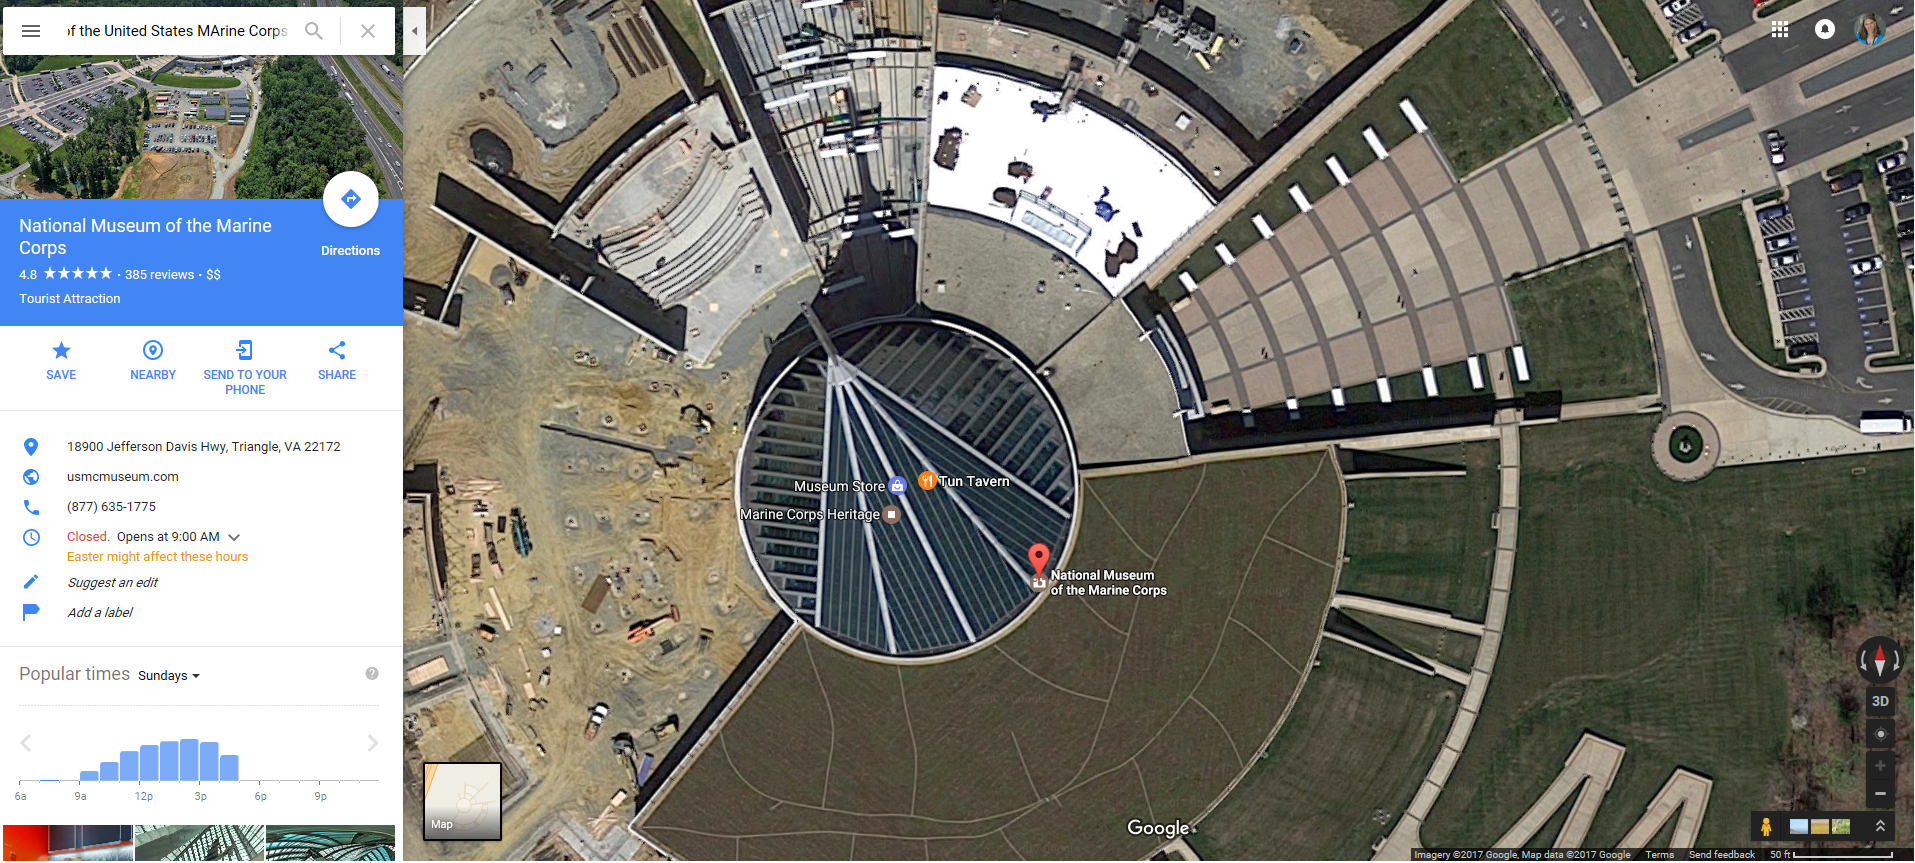
The National Museum of the United States Marine Corps from Quantico
Mill House Museum in Occoquan, Virginia
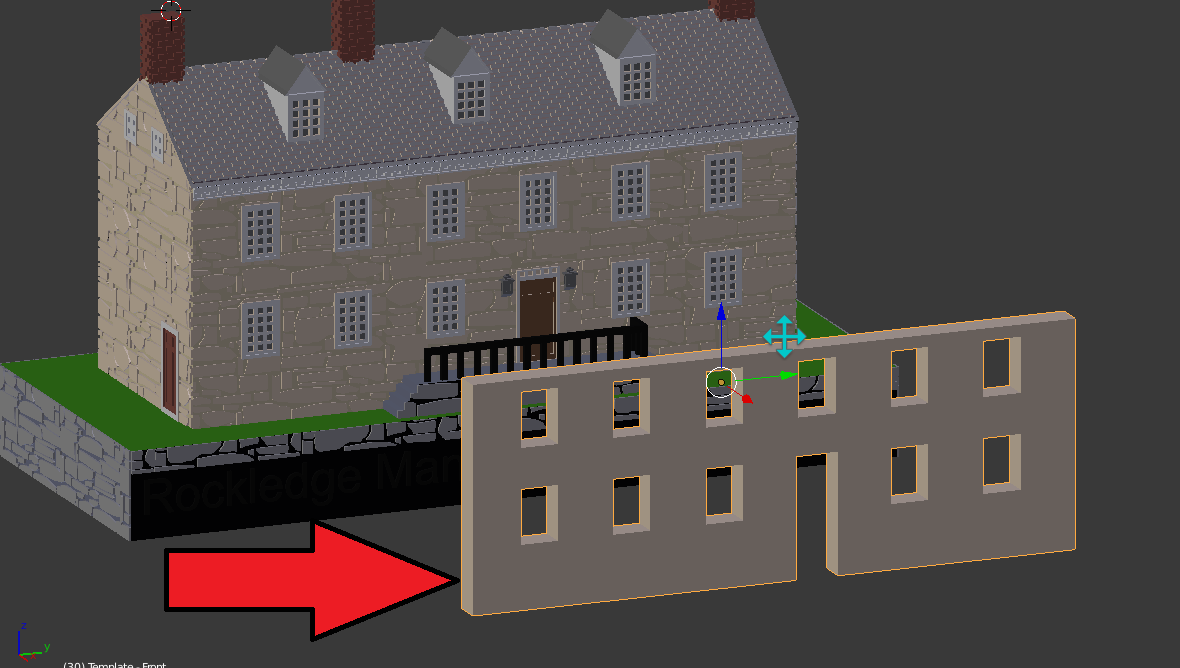
Rockledge Mansion from Occoquan Virginia
And then, a custom piece, My Old Neighbor’s House, Occoquan Virginia.
All of these I modeled in Blender and they all start with one thing.
Reference Images
I go out and take reference images. In the case of my neighbor’s house, the prints were a gift and I needed to exercise stealth, so I actually tromped through the woods to snag some pictures of the back of the house. In the case of the Rockledge Mansion, I emailed the home’s owner which allowed me to open up a dialogue with them and I scored an amazing tour of the outside and the inside on the mansion.
If I needed to supplement my own images, I found Flickr and Google Streetview to be a great resource for finding images of the more famous buildings
And…. there were two cases, where I really needed an aerial view to really get a good grasp of the building. The National Museum of the United States Marine Corps is a great example of that. I had all these side images and I just still could not figure out the geometry of the building. Something wasn’t right. Google Earth to the rescue! The aerial image was the missing piece I needed and suddenly everything clicked together.
Base Model
Blender does have the ability where I can create what’s called an Empty and import in an image. I can rotate these, scale them, make them translucent, so it is very helpful for me as I’m trying to get the proportions of my base shapes right.
Detailing
With the detailing, I have done it a very formal way where my windows and my doors are actually a part of the base model. I used a tool called Loop Cut and Slide to make segments in my house where I’m going to put my windows and doors and then I extrude and subdivide accordingly. What I’ve decided I preferred is do model these details as separate objects. I’ll have Window Model, a Door Model, a Light model, A Railing model. I rather enjoy how easy it is to copy and paste that way.
Tip – When you are doing separate models with your detailing (and you aren’t going to do formal Boolean Unions in Blender), you want to make sure they are exactly flush with the base house. At least in Simplify 3D, if there is overlap, Simplify 3D will leave gaps between the two objects– whereas if you have them lined up exactly, you can be super lazy in Blender and Simplify 3D will recognize them as objects that should be one and slice accordingly.
Detailing Design Guidelines
With my detailing, I tend to keep them 0.3mm – 0.5mm high. With my 0.35mm and 0.40mm nozzles, those “90 degree overhangs” have no trouble on my printers, don’t need supports and still render very well in the final print.
Detailing Tour – Windows
Like most things the window detailing is about 0.3mm – 0.5mm high. In my neighbor’s house, for example, the panes are 0.4mm high and then the shutters are another 0.1mm above that.
Tip – Slice as you go
When I’m working with small details and I want to make sure they translate, one thing I do is slice as I go. A perfect example of this is window panes. My Mill House Museum, the windows came out fine on a Shapeways fancy Sand Stone Printer. When I went and printed it on my FFF printer, I noted the vertical panes were too thin so the printer didn’t bother with them. In subsequent models, I’ll preslice sections to see how it is going to look on my intended printer.
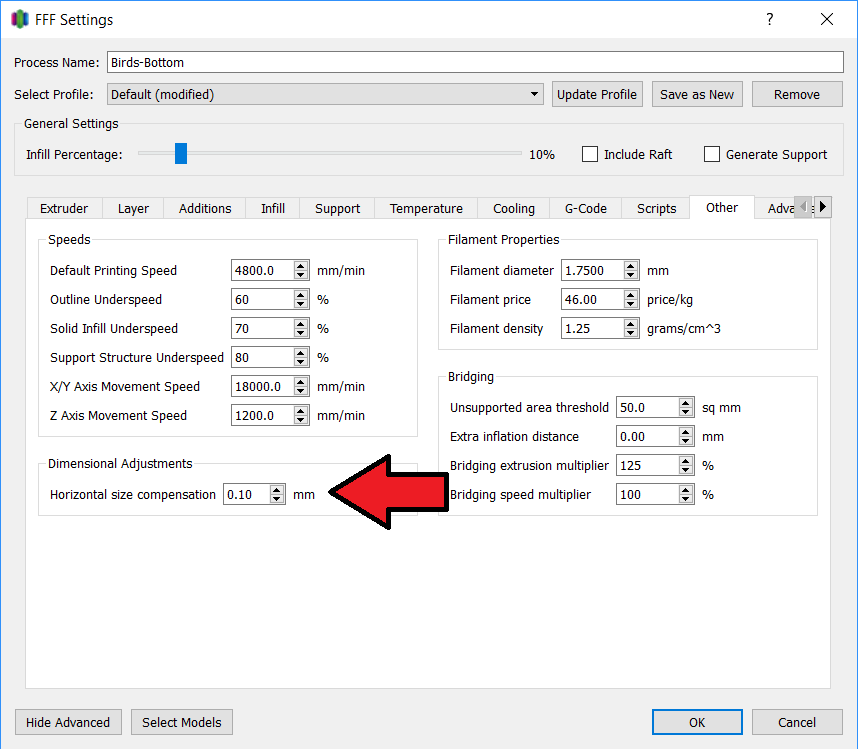
If you don’t slice as you go and you find some missing details, there are options. In Simplify3D, you can try to adjust Horizontal Size Compensation (It’s under the Other tab) to get a better slice.
Detailing Tour – Outdoor Lights, Bay Windows, Garage Overhangs
I modeled the light, but there was deviation from real life— if you look at it from the side, I taper the bottom up– I give it a nice 45 degree angle to help with the overhangs. I did the same thing with the Bay Window and also you’ll see a small triangular wedge between the car port and a screened in porch. This is just to give the printer some solid overhangs to work with.
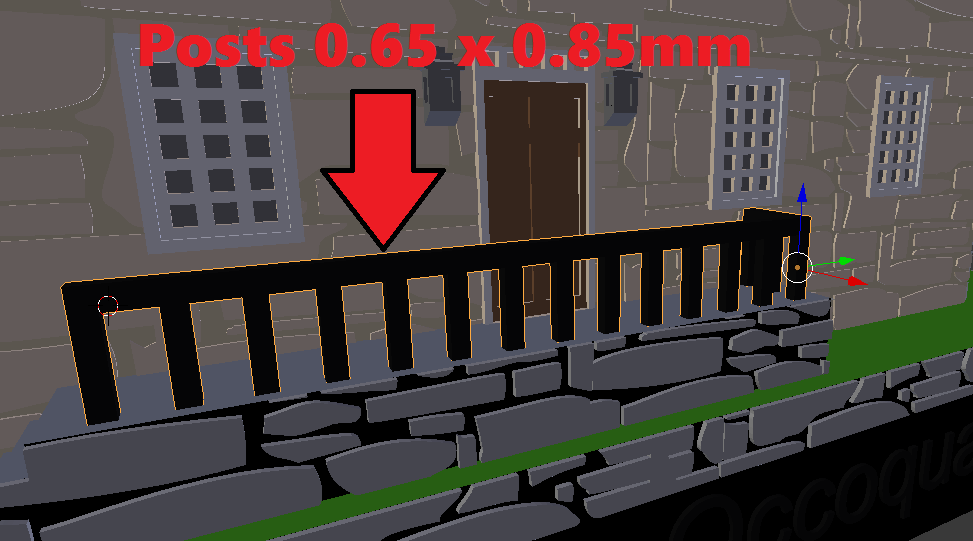
Detailing Tour – Railings
The biggest trick to the railings is coming up with the dimensions with the slats. I didn’t want something too delicate. I have found 0.65 – 0.85mm to work.
And I reused through measurements on my neighbor’s house. I just got and pasted to get their detailing for their screened in porches.
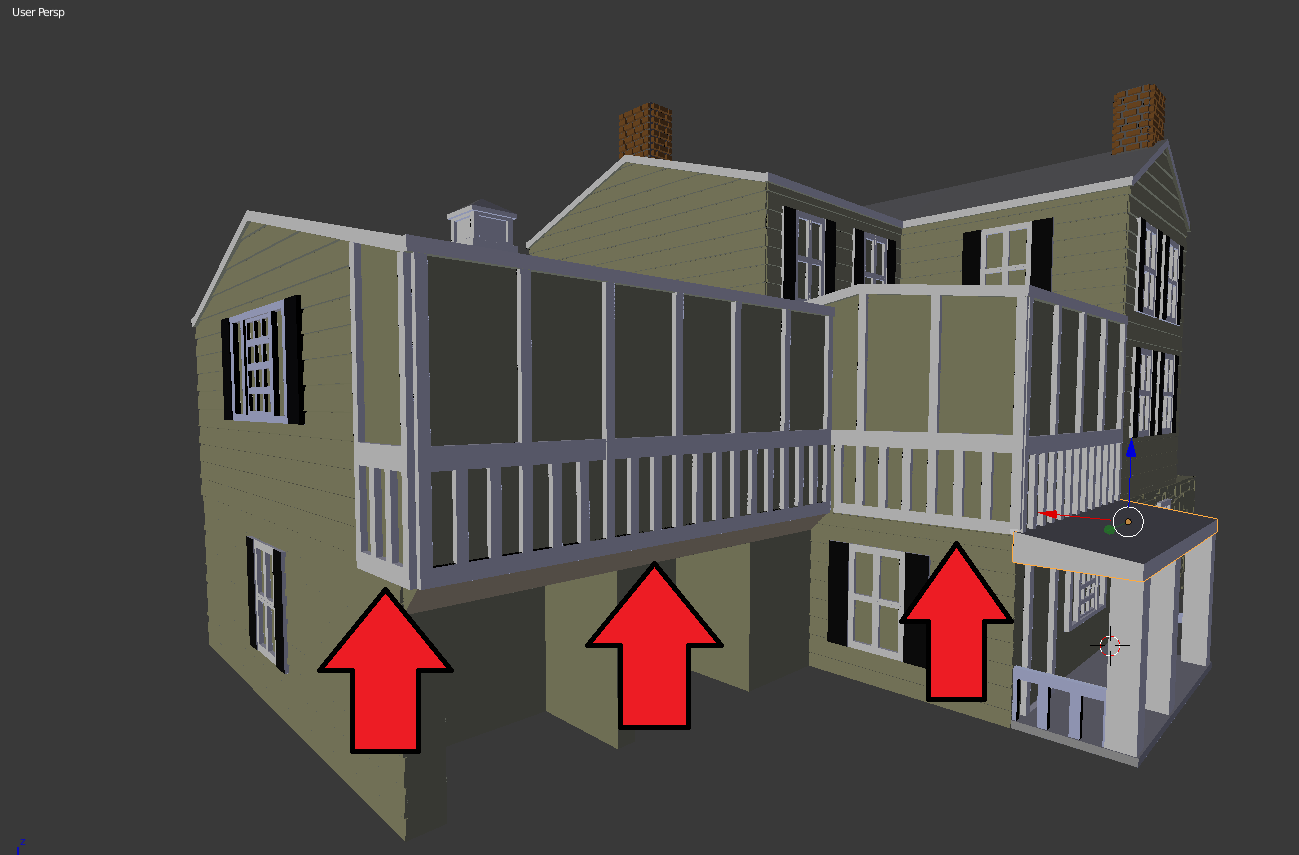
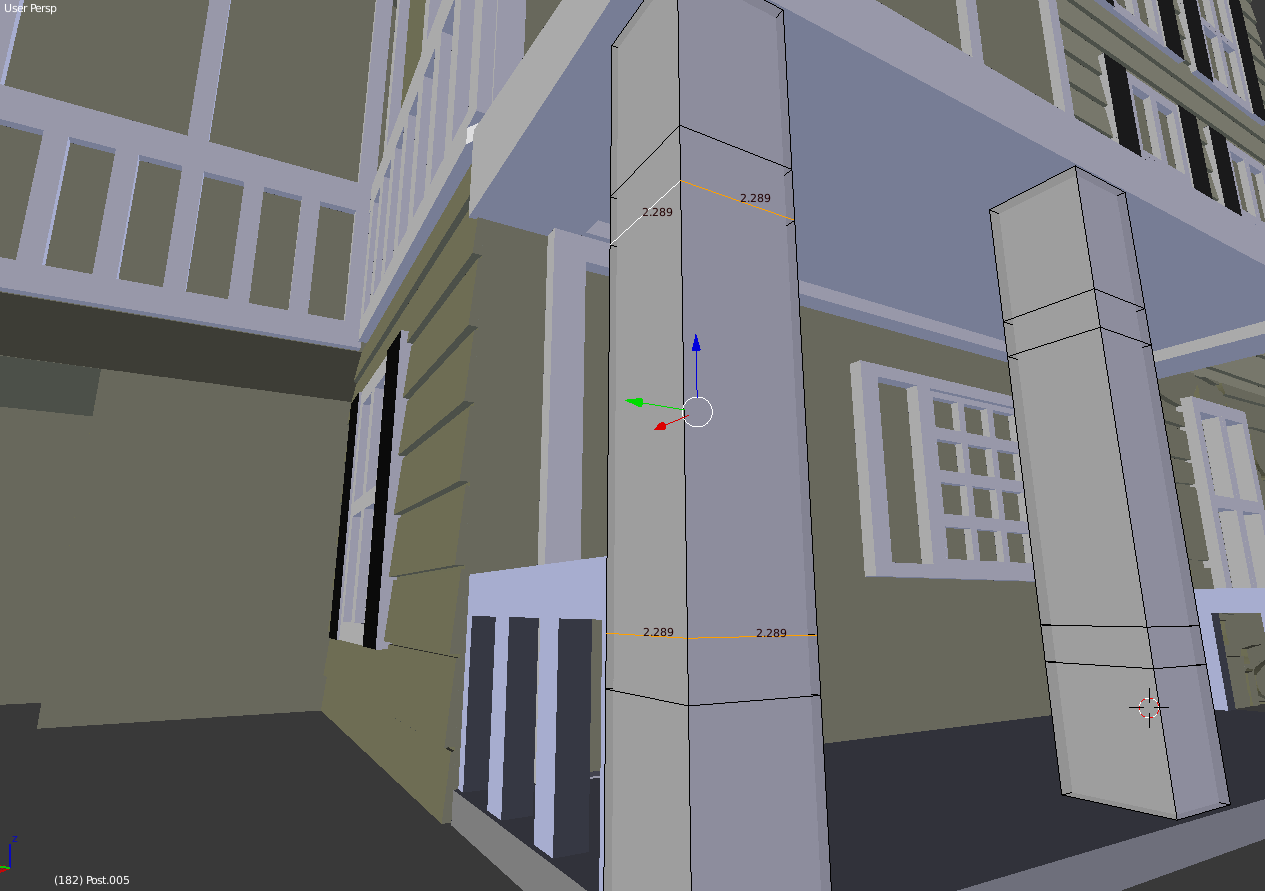
Detailing Tour – Supporting Posts
When I got to my neighbor’s house, I had some posts that would be supporting an awning. I went ahead and increased that to be over 2mm thick on each side so there was more strength and stability.
Detailing Tour – Awning Hack
And with the awnings, I wanted to print those without supports. What I ended up doing there is I had two small layers connecting the main house with the posts. My very own support beams. They were just 0.5mm high which meant my printer would print two layers for it. Then, the rest of the awning came in and bridging settings kicked with ample parts to “bridge to”
Textures
There are other approaches you can do with textures. You can, for example, use a grey scale texture map and use the Distortion modifier. I have found that to be a little intensive on my machine resources and making it difficult to continue to the tweak the model.
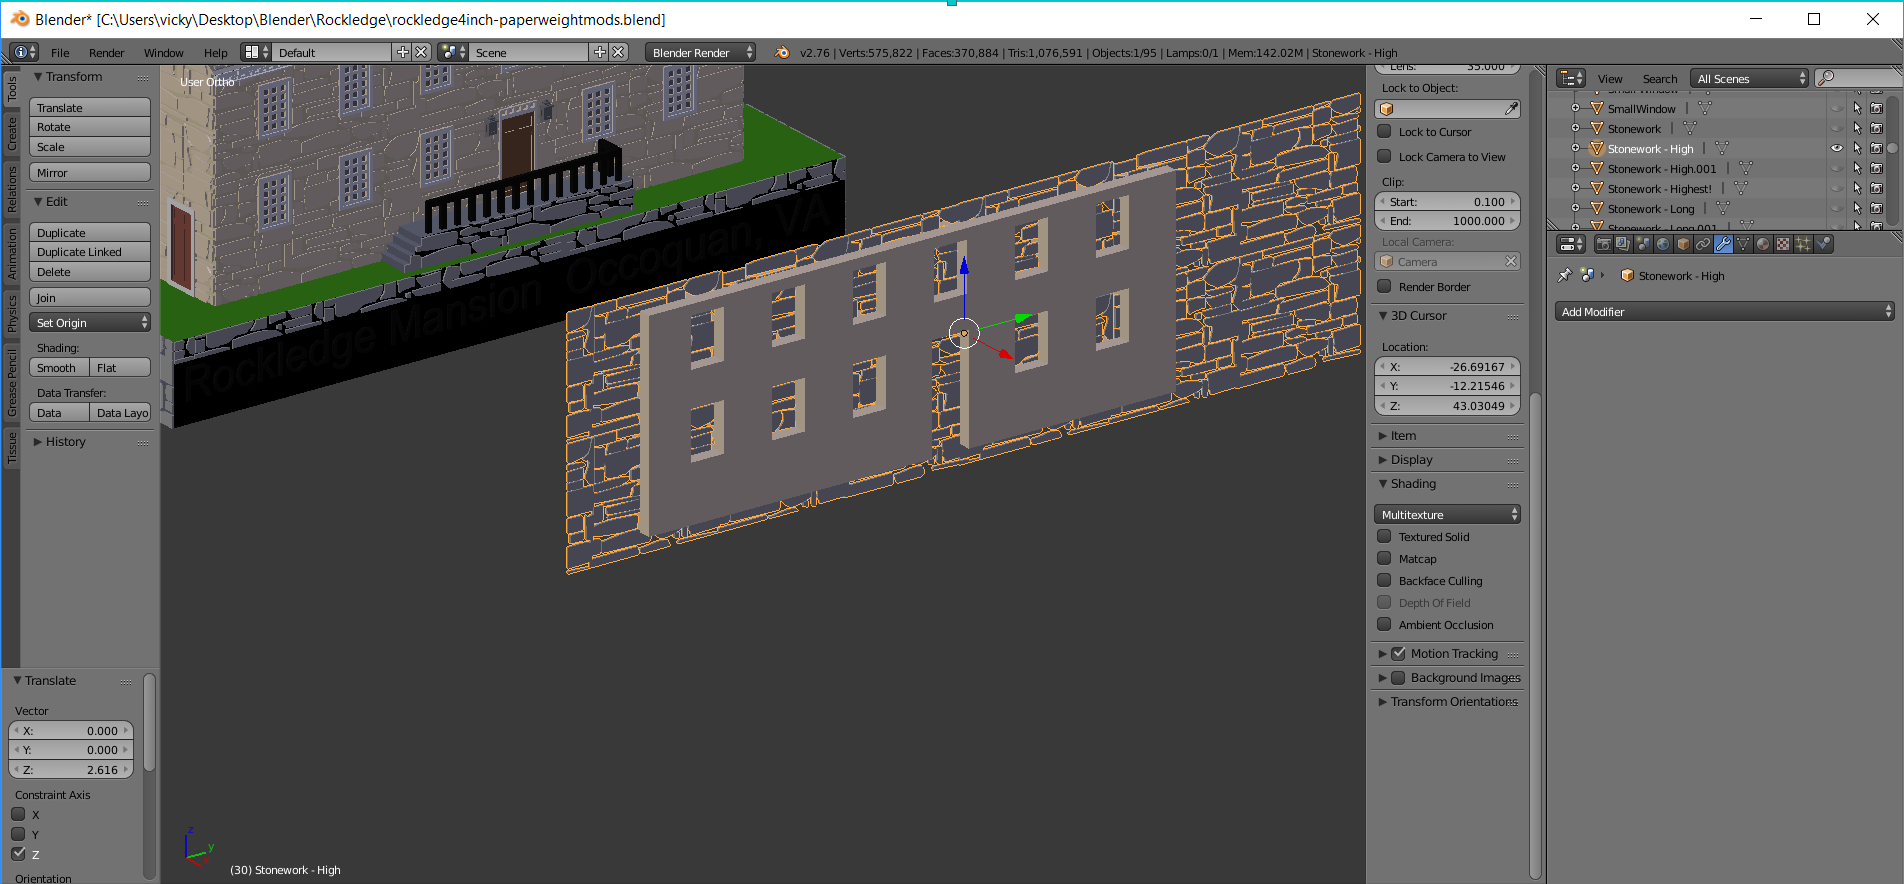
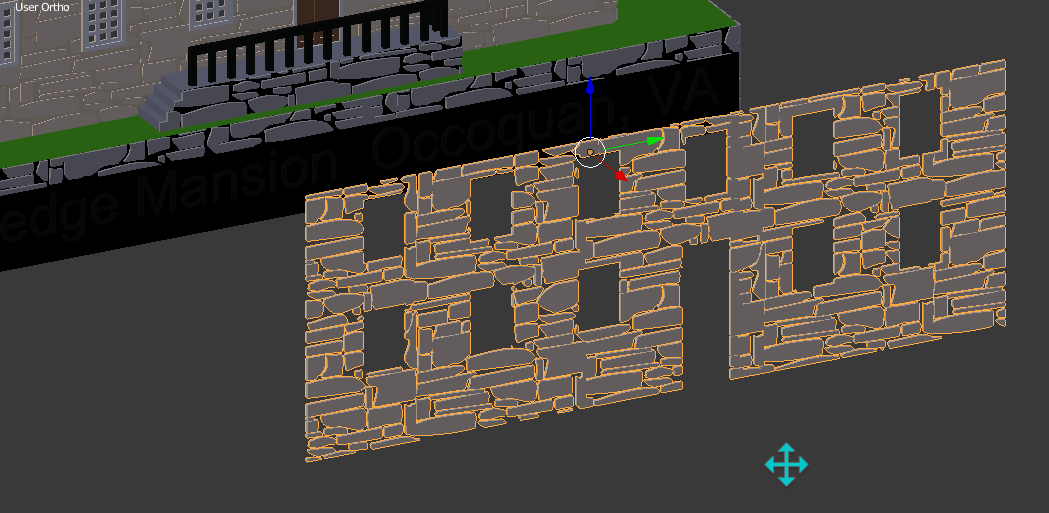
I do have a few “textures” I add to these models — stonework, brickwork, shingles, and finally siding. These I believe are mostly 0.3mm high. The Stonework I did slightly as purist. I actually used Bezier Curves to trace out real stones from one of the historic buildings in my town (Note– there are many ways to skin this cat). For bricks, siding, and shingles, I modeled one piece and then used the Array Feature in Blender to make an entire sheet.
Remember with the Spinning Pokestop, I talked about the Power of Intersection? This is an example of that. By Duplicating key vertices and separating them, I would make a template of the part of the model I wanted texture for. Let’s take the front of my Rockledge Mansion. I wouldn’t want Stonework where the windows and doors were. So I make an object of just want I want textured.
I put my textured piece, in this case, the Stonework in the middle of it and then I take an Intersetion. Viola! Texture.
And just like my other details, I make sure that is flush exactly with my base model, so it slices nice and fine in Simplify 3D.
Hack – Use Layer Lines To Your Advantage
I had been doing shingles for everything… until my very last model, my Neighbor’s House. I was doing a “Slice As You Go” and I noticed, the natural layer lines looked remarkably like shingles, so I rolled with it.
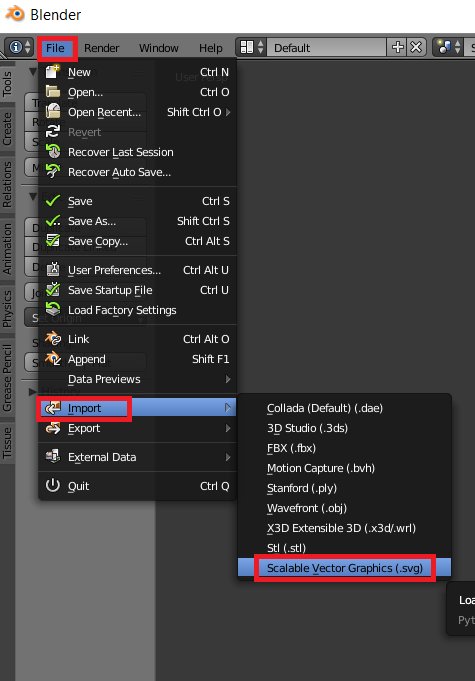
Despite some earlier blog posts on the matter, I have become fond of using Inkscape to make SVG files for my 3D Models. (My breakthrough came when I started saving as a “Plain SVG” format instead of an “Inkscape SVG” format).
I figured I should document my process at pulling and prepping those files in Blender.
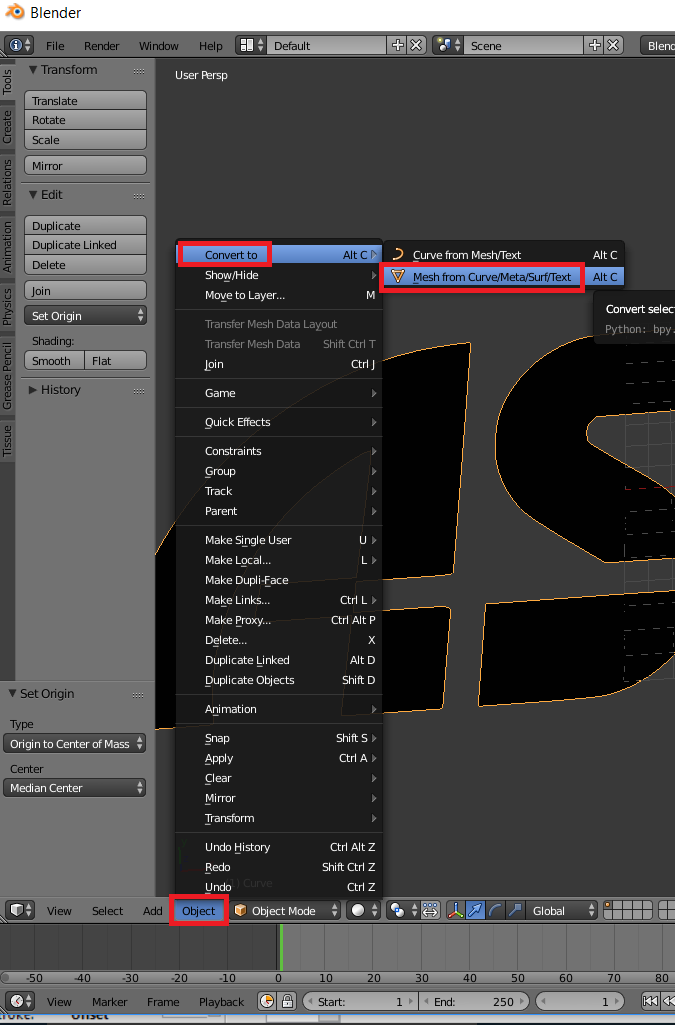
Import the SVG file. File->Import->Scalable Vector Graphics (.svg)
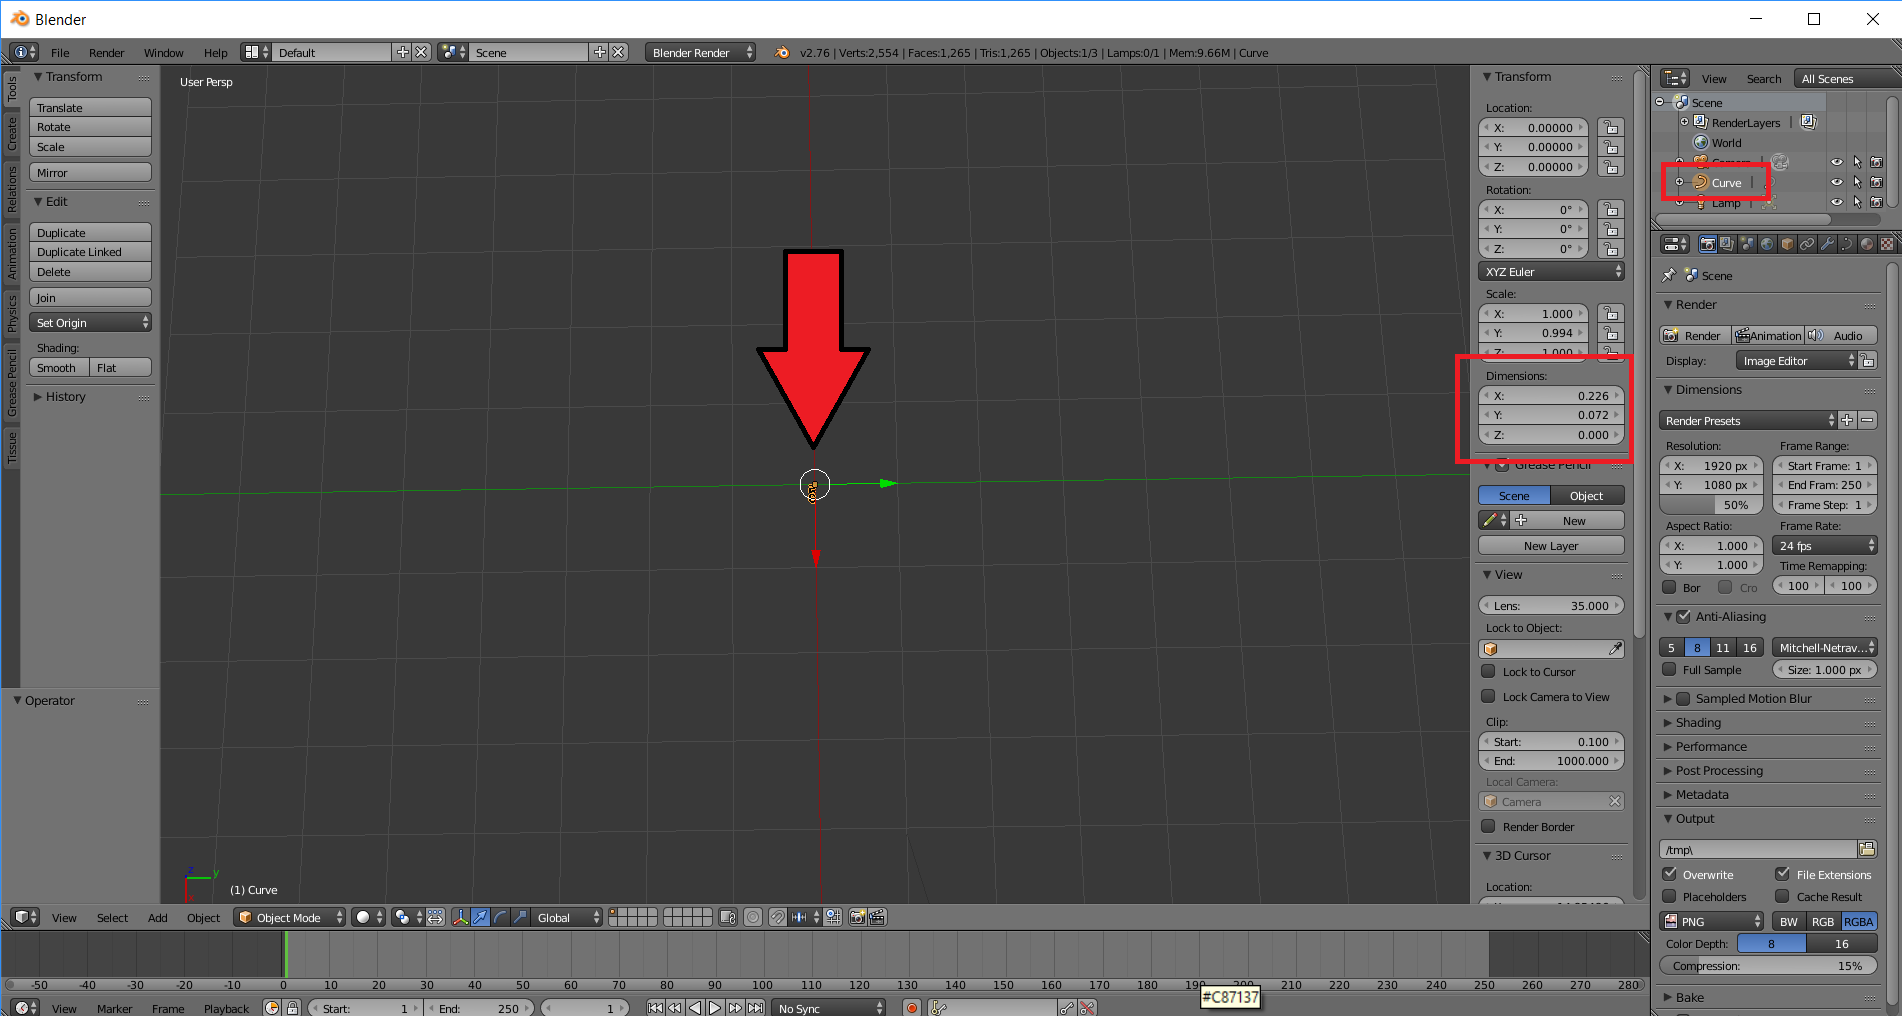
It looks like nothing happened, but your SVG is there. It’s just really really really small. If you look to the right in your Objects listing, you can see a new “Curve” that was not there before.
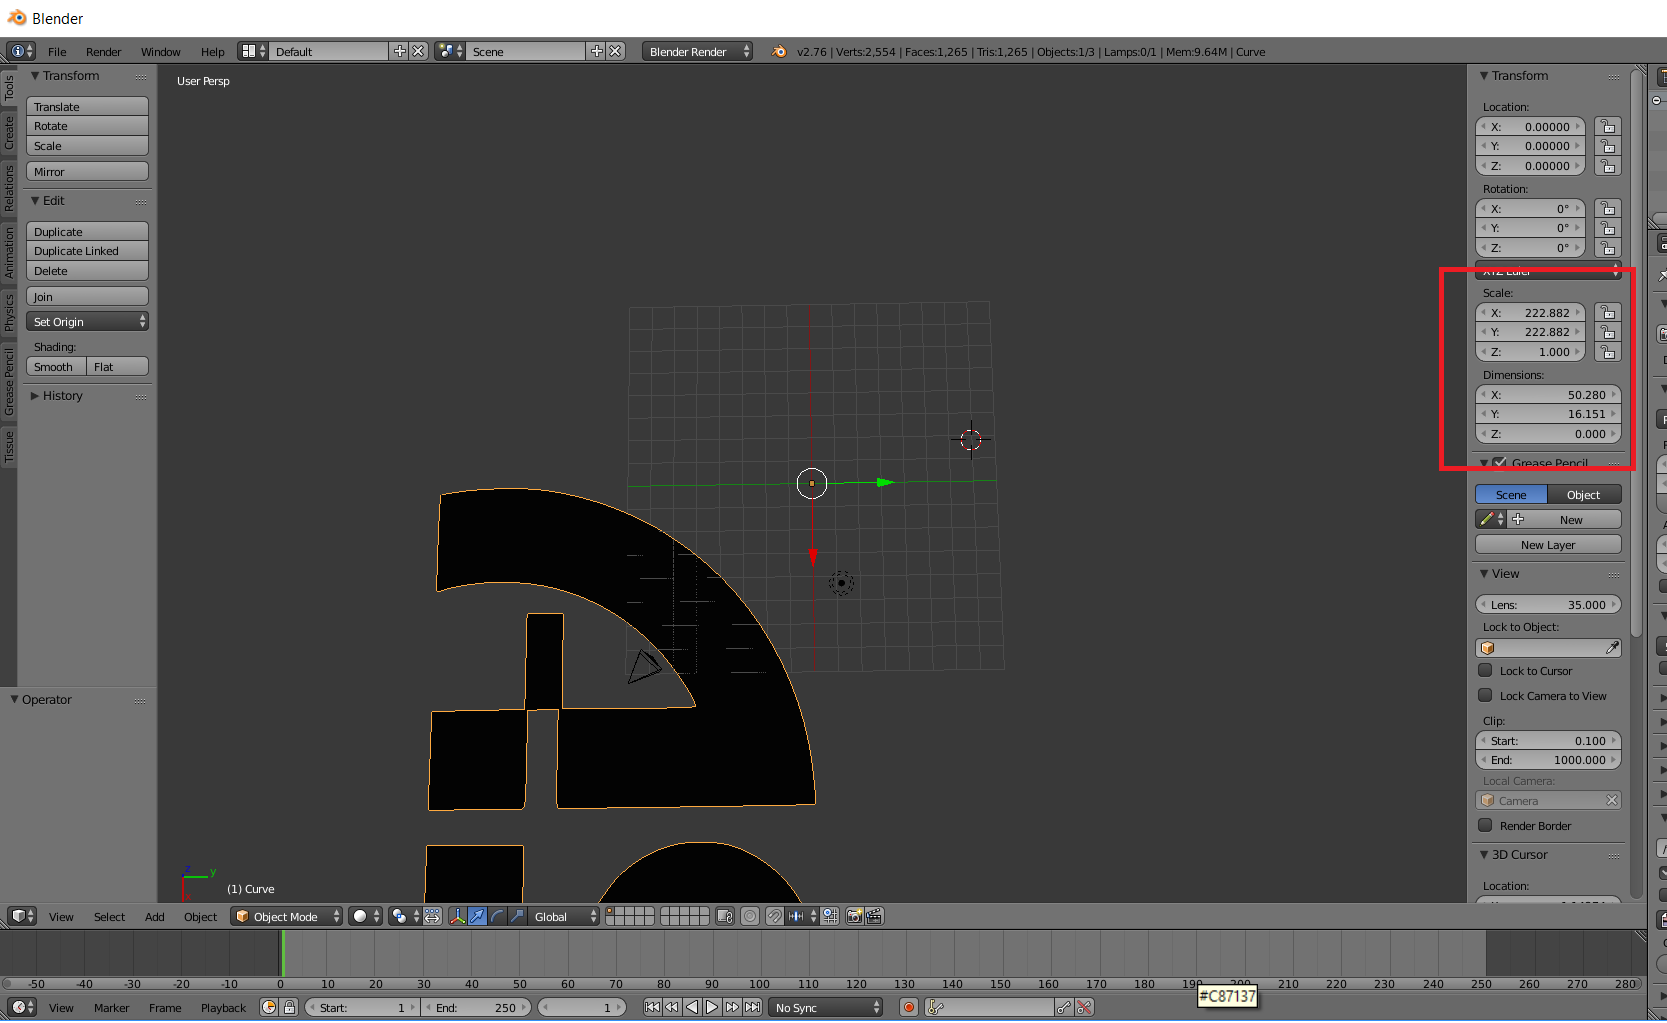
Resize the object so you can see it better.
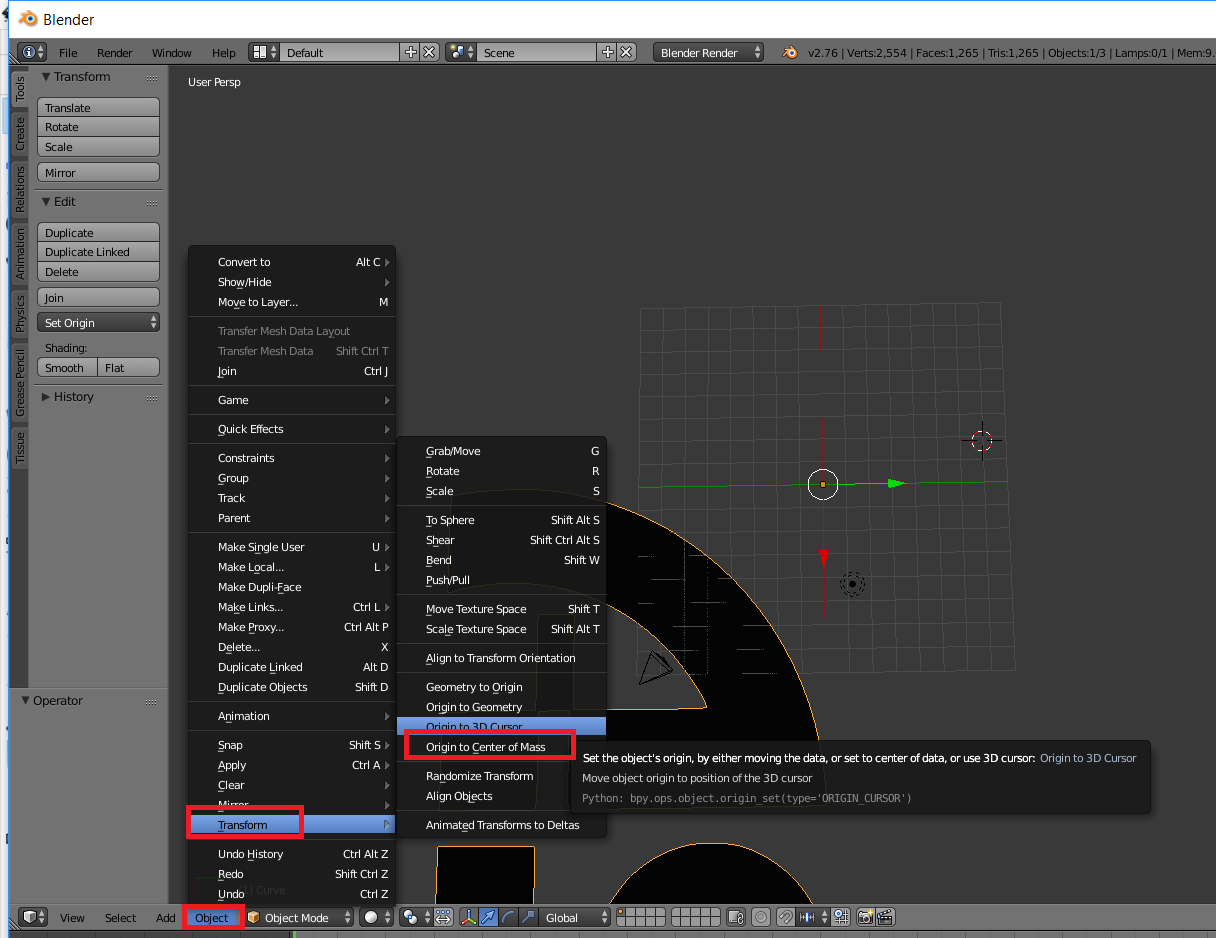
Sometimes resizing it takes it off the screen and the Object’s Origin is not very intuitive For that, I change the Object’s Origin to the Center of the Mass. I do that by going to Object->Transform->Center of Mass
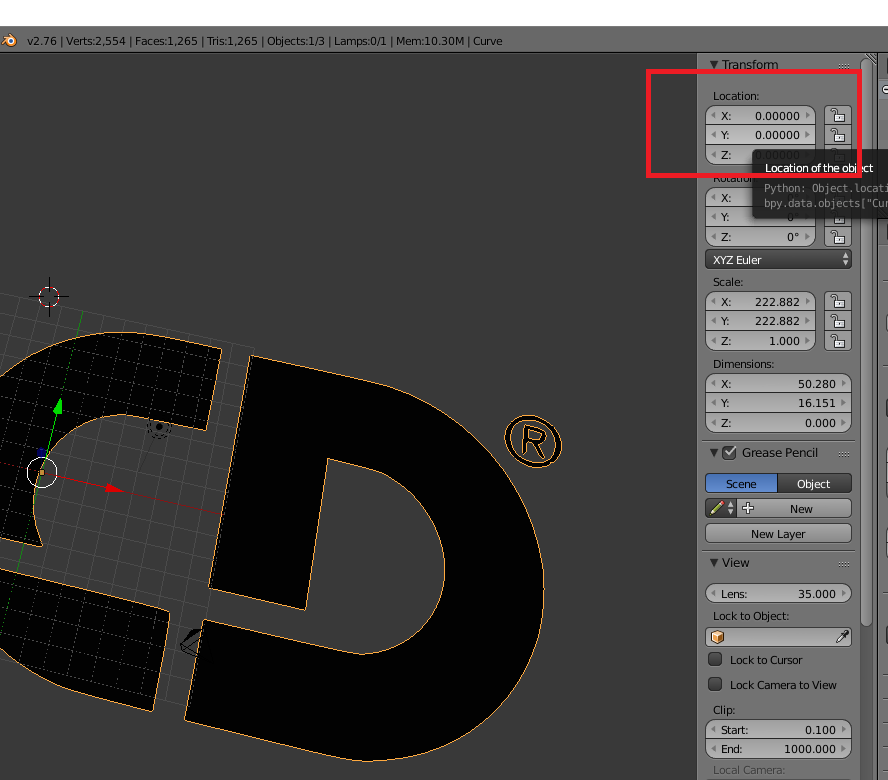
Then I can change all the Transform coordinates to 0,0,0 to center my new SVG
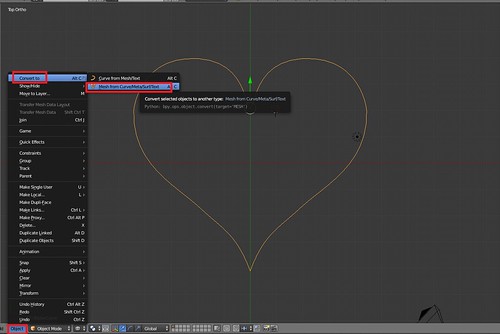
SVGs pull in as Curves. You’ll want to convert it to a Mesh before doing anything with it. You can do that by going to Object->Convert to->Mesh from Curve/Meta/Serf/Text
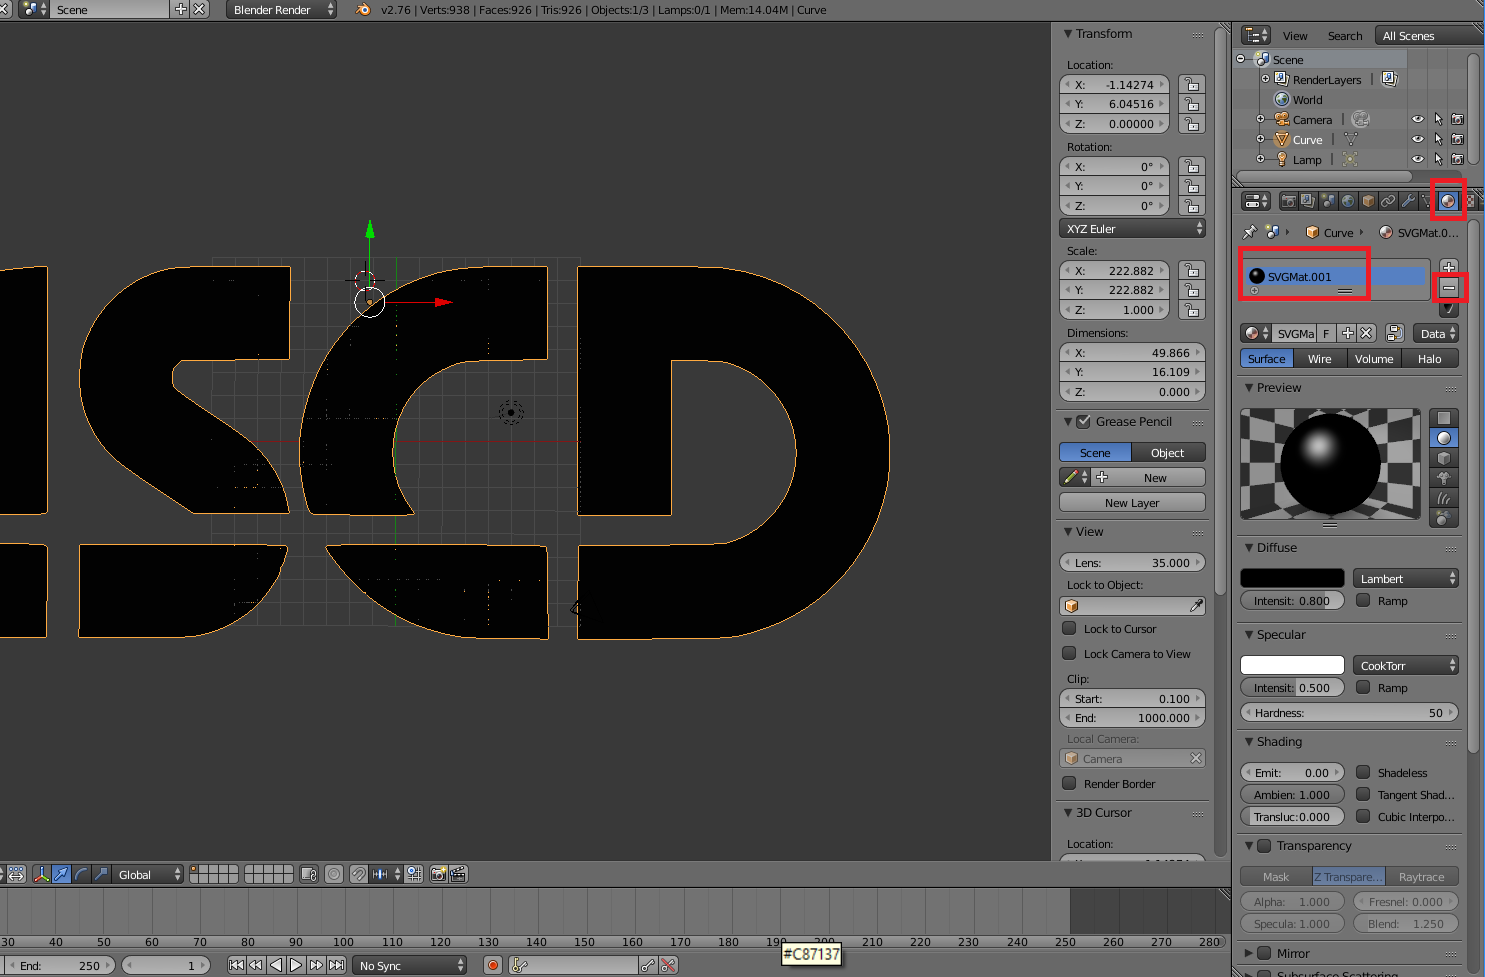
OPTIONAL – Get Rid of Black Color
When I was new to Blender and Inkscape, I could not figure out why my Inkscape SVGs were all black… and I just did not know enough to find the right keywords to Google. Later when I learned about Materials, it will started to click. The SVGs import in with a Default Material. If you want to get rid of that, click on the Materials icon for your object, click on the black material and hit – to get rid of it.
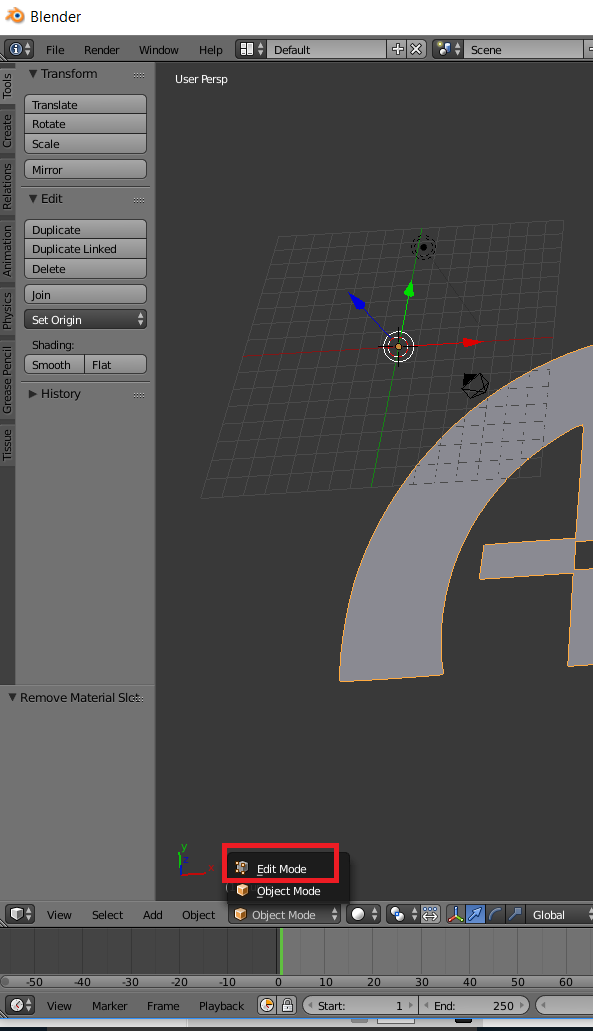
With your newly converted Mesh selected, switch to Edit mode.
Click A to select all vertices.
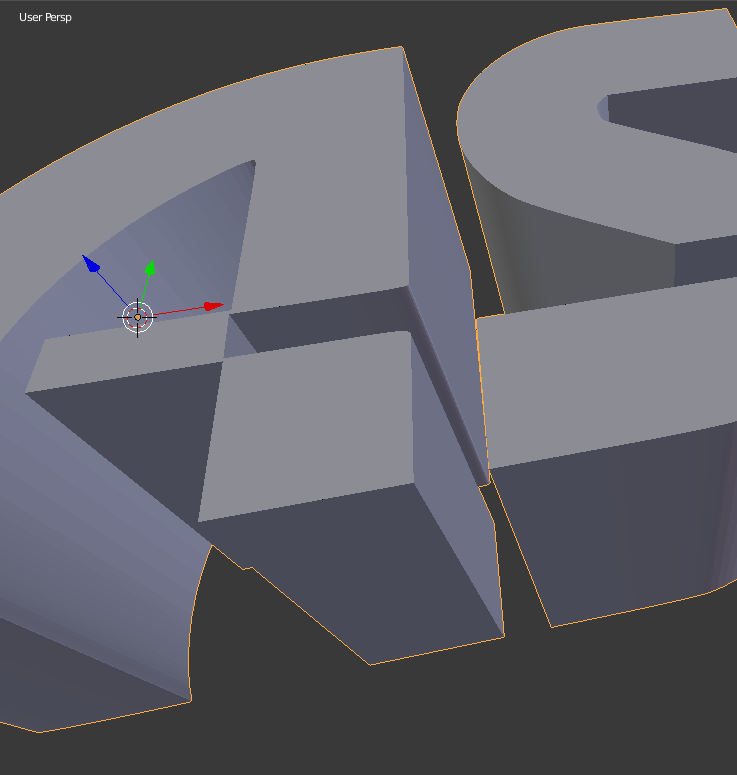
Go to Extrude->Region to give your 2D Object some Depth. If you can you the mouse to size or type in a measurement– for example 0.5 for 0.5mm.
And then you have a 3D Object in Blender from an SVG file.
When we are pushing the limits, we are going to encounter fails. But through failure comes knowledge and at times, it even brings about extra creativity. On that note, I hope 2017 brings you many fails!
In December, I did a last minute contribution to the A Pyro Design Maker Coin Holiday Tree. In my coin, I wanted to celebrate the failures that comes along with learning 3D Printing. I call it, “From Failure Comes Knowledge“. This video details the inspirations behind the coin, a little taste of the modeling in Blender, and the [embarrassing] two fails I had printing it.
My very first Thingiverse upload was glowing pumpkin pendants/pins for kids. This video hits briefly on how I print these via Multi-processes in Simplify3D (Spoiler alert – they are three separate prints). It will also show you how you can import in the pendant template into TinkerCAD and quickly make your own customizations. Finally, have a drawing you want to use? I’ll go over using Inkscape to make a SVG file from a black and white image/photo/scan that you can also pull into TinkerCAD to “carve” your pumpkin.
Anglerfish
Blog post with more details on the creation of my bronzeFill/GlowFill Anglerfish. I do have one more if you happen to covet one. 😉 http://tgaw.com/wp/?p=307
Bow Ties!
I’ll work on a video about their design in Blender and the attachment design in OpenSCAD. It’ll use words like “Texture”, “Baking”, “Displacement Maps” and “Boolean Intersection”. In the meantime, I do have some listed on Etsy at https://www.etsy.com/shop/VickyTGAW
Make Your Empty Filament Spools into a Shelf
As promised, the model is up on Thingiverse as well as the original OpenSCAD code. http://www.thingiverse.com/thing:1677024
Print in Place Gyro Cube!
Wanna beta test my version of the Gyro Cube on YOUR printer? Lemme know!
My sister turned 40 this month and get this– I have never, ever, ever printed her anything. I printed something for her husband, but not her. Bad Vicky! That definitely needed to change. Her house is a very visually stimulating house. They have a variety of lighting and effects– think blacklights, giant flatscreens with screensavers dancing to the music, lasers making patterns on the walls, lava lamps. I wanted my design to fit in and interact with the lighting in her house. I wanted something with mirrors.
Designing
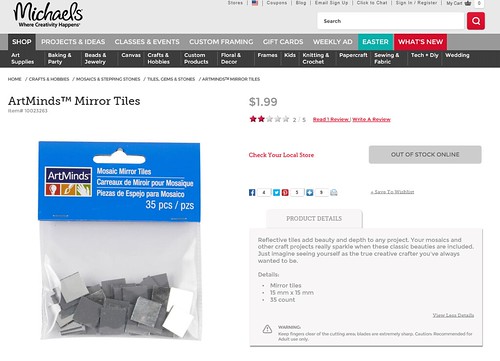
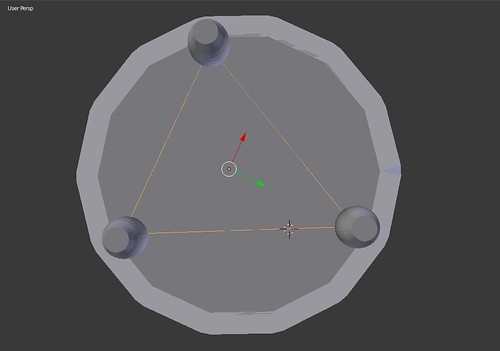
At Michael’s I bought little mosaic mirrors– 35 of them for $1.99.
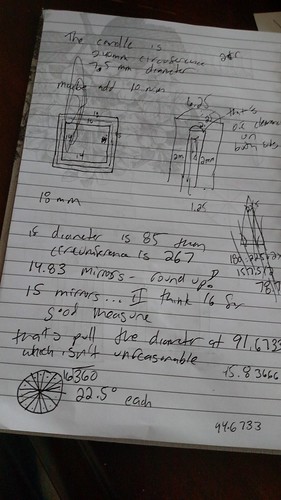
Then I got out the trusty calipers. There was some variance in the measurements, but the mirrors were pretty much 15 millimeters by 15 millimeters and 1.75 thick. I designed in cavities into my model for the placement of the mirrors. I used 0.5 millimeter clearance– which meant my “hole” came out to 16 x 16 millimeters and 2.25 thick.
All my design work was in Blender. I decided my design was going to built out of a series of 18 x 18 millimeters squares– each ready to hold a mirror. I used some simple math to figure out how many mirrors I would need to be a good stand for a 3″ pillar LED candle and the ultimate radius of my final product.
I made one template square and put in the proper placement of where it would be in the final holder. Another simple math equation told me how many degrees I would have to angle each piece.
360 degrees / # of Mirrors
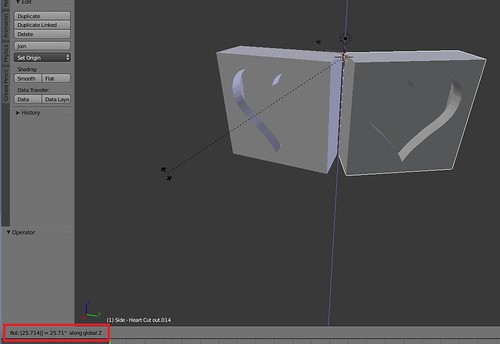
So for example, in a design with 15 mirrors, each piece would be angled 24 degrees from the previous one. If I did 14 mirrors, each piece would be angled 25.714 from each other.
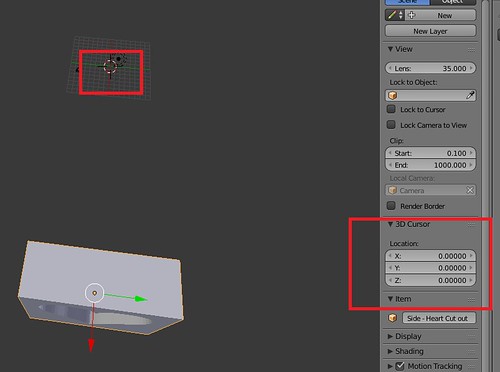
In Blender, when you rotate items, you are rotating around the Point of Origin of that object (where the little yellow dot appears when you select the Object).
Usually this is the Center of Mass of the object, but guess what! You can control it and the origin doesn’t have to be in the object itself. Once I had my template square in its proper position in the final candle holder, I placed my 3D Cursor at 0,0,0.
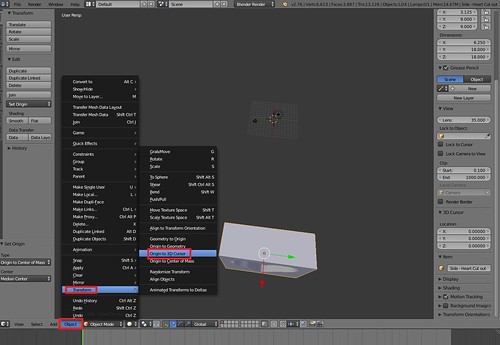
I went to Object->Transform->Origin to 3D Cursor.
This meant the origin was right smack in the middle of my candle holder. It also meant, when I rotate, I rotate around that point.
So I proceeded to Duplicate the square, hit R (for Rotate), hit Z (for around the Z axis) and then type in my angle (25.714).
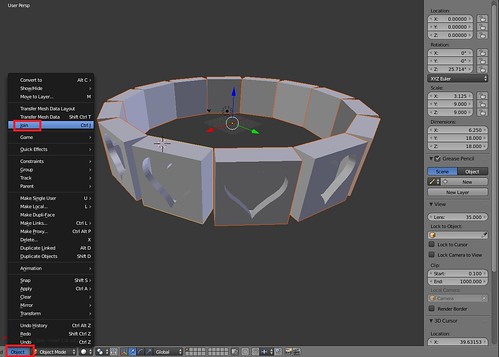
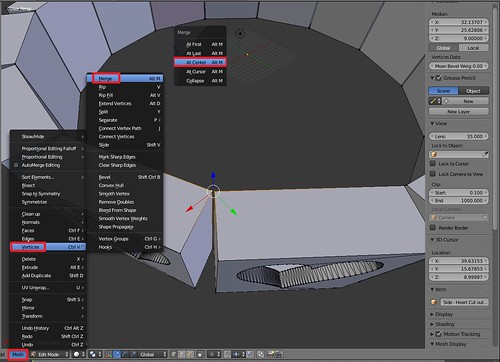
I would then Duplicate that square and Rotate it and so on until I had my entire ring. I did Object->Join to merge all my panel pieces into a single object.
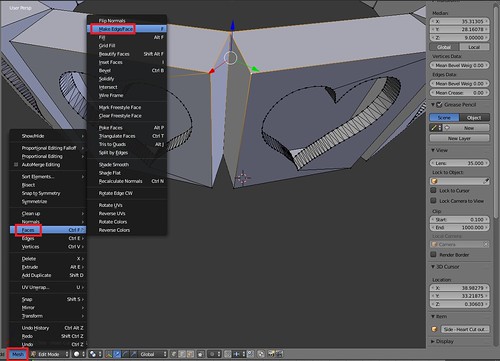
I switched to Edit mode and did some cleanup. I Merged Vertices that were close together and then added in new Faces to fill in the gap.
The inside of the candle holder is a 14-sided Cylinder. When you add a new Cylinder, you can specify the Number of Sides. I made it match the number of mirrors.
I cheated with the placement of the three feet. I added a 3-sided Circle and used that to help me determine where the place my feet.
Under Modifiers I did a Boolean Union on my panel piece, my inside cylinder and my feet and voila– I had a model!
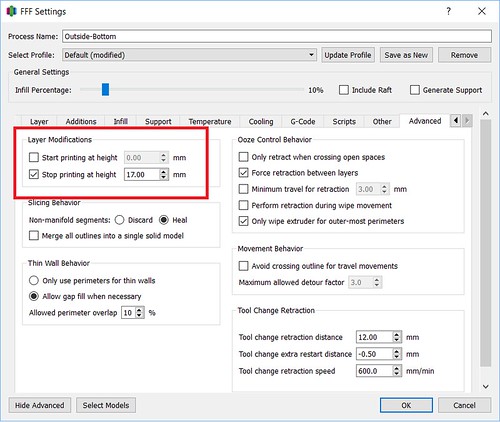
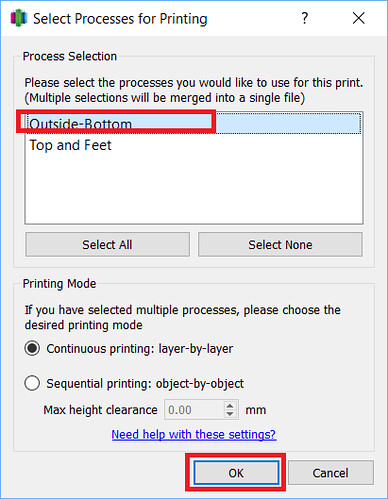
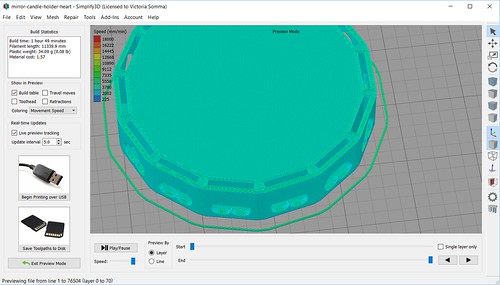
Slicing – Simplify3D
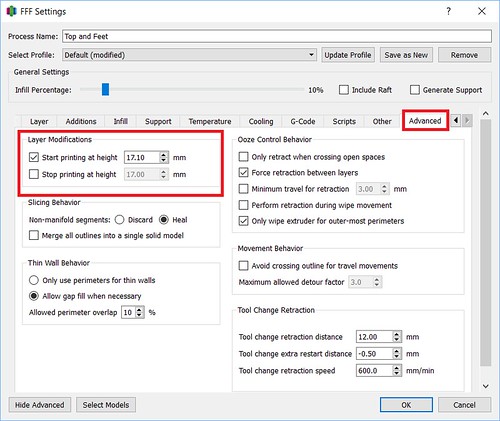
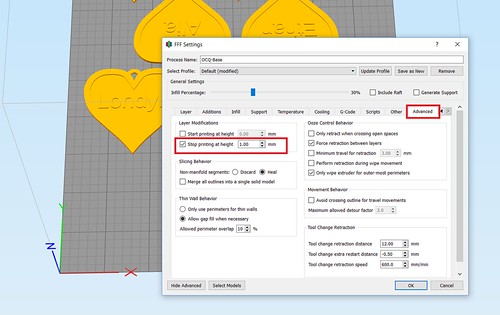
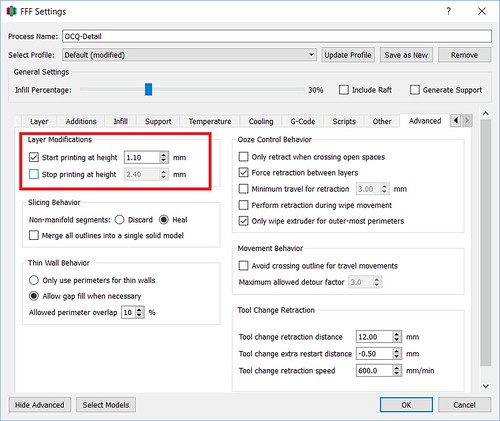
In Simplify3D, I set up two separate processes. The first process ran from the 0.00mm – 17.00mm (You can set that up in the Advanced tab under Layer Modifications). That is the point right before my mirror cavities would get sealed up.
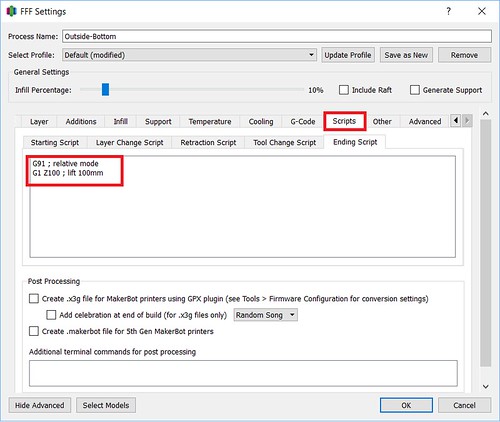
Usually when a process finishes, it’ll run a default ending process– turning off the extruder and disabling the motors, completely dropping the bed. I didn’t want that to happen. In this case, I just wanted the bed to drop down enough for me to put those mirrors in without burning myself and more importantly, get that hot nozzle off my print so it isn’t melting and deforming it and making it hard for me to slide my mirrors in. I went under Scripts and customized my Ending Script. Instead of the usual process, I did two simple steps:
1) I changed it to Relative mode, so my next instruction would use the nozzle’s current position as it’s starting point
2) I told it to move the nozzle up 100mm.
G91 ; relative mode
G1 Z100 ; lift 100mm
When I prepared just that process for printing, you could see how it was going to stop while I still had openings for my mirrors.
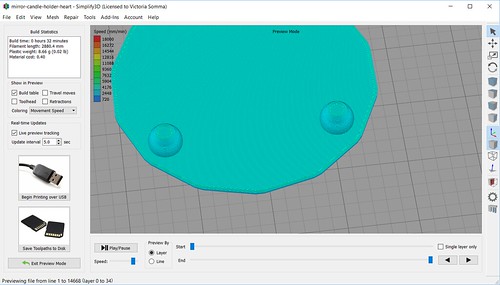
My second process was set up to run from 17.10mm on (again under the Advanced tab)
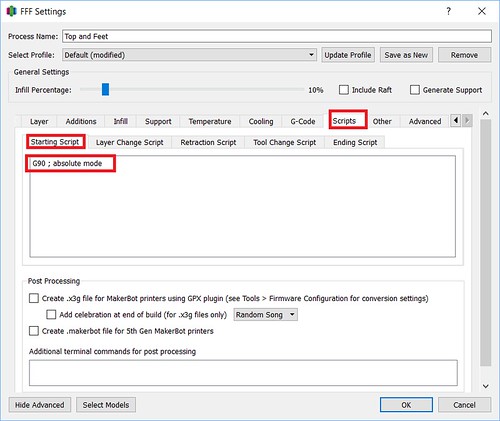
When a process begins, there are a number of things the printer typically does at the beginning such as turning on the extruder, turning on the fans, homing the axis’s, running off the side of the bed and oozing some filament. I didn’t want to do this for my second process. My axis’s are already homed, my extruder is already heated up, my filament is already flowing. All I had to do was set my printer back to Absolute mode and go. So for this second process, I went under Scripts and customized the Starting Script.
G90 ; absolute mode
A preview of the second process, illustrates how the mirrors will get sealed in by the print.
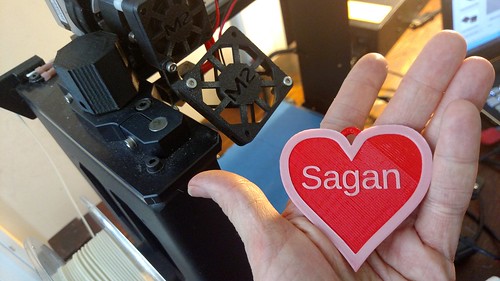
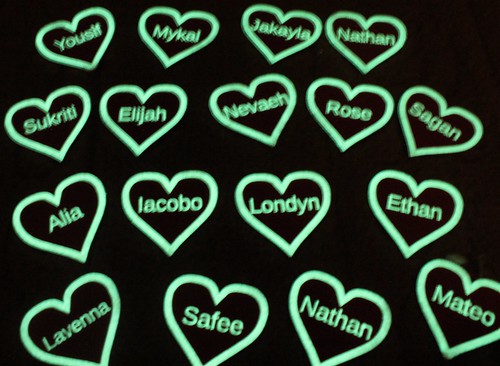
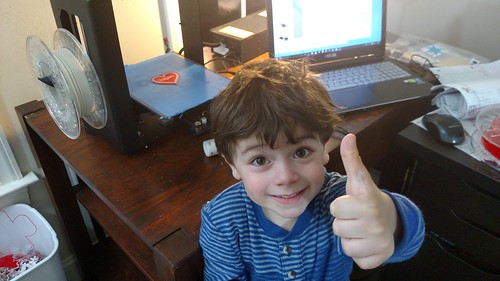
My son is named Sagan, after Carl Sagan. Over here in the U.S., that’s a unique name. As a result, he won’t be going into gas stations or souvenir shops and finding mass produced keychains and trinkets with his name on it.
Luckily, I have the MakerGear M2. I am not bound to get what someone else has decided to design and make. I can make it myself!
In my son’s pre-K class, a vast majority of the students are in the same boat– most of them have unique names. This seemed like a great use for the flexibility of a 3D Printer.
The Design
The design is not especially ground breaking. Hey, it’s a little heart pendant/medallion with a name on it. I printed most of it in ColorFabb Traffic Red PLA/PHA (duh) and then the detailing and the name are in GlowFill. One thing I have noticed with my kids is they LOVE glowing things. They love taking it into the bathroom and turning off the lights to see it glow.
Modeling – Blender
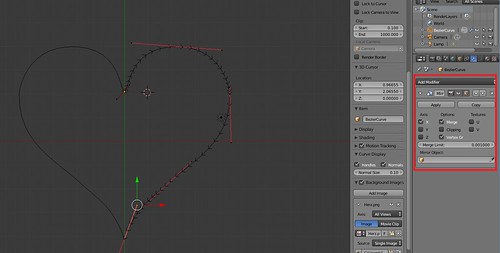
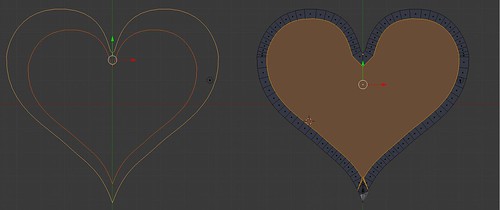
The base model I did in Blender. I started with a Bezier Curve. I used the Mirror modifier to make it symmetrical.
I converted the curve to a Mesh.
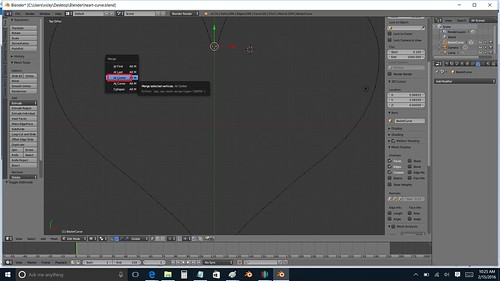
I did a little cleanup of the Vertices, by Merging a couple of oddly mirrored vertices to the center.
The detailing of my design, I wanted an outline of a heart in GlowFill. I’ve worked with hearts in the past and I knew that just scaling another heart down wasn’t going to do the trick. Inset is key to that! Scaling Versus Inset – Inset Will Give You Consistent Widths
I did an Inset of my face and did some manual cleanup of the vertices.
After that, it was just straight Extrusion to the heights I wanted.
The hook was just a cylinder subtracted from another cylinder (courtesy of the Boolean Modifier). I decided to keep the hook separate in case anyone wanted to print just straight up hearts.
At the end of my Blender session– I had two .STL files — my heart and my hook to make it a medallion.
Modeling – OpenSCAD
Although I had experimented with Python scripting for Blender roughly a year ago, OpenSCAD seemed easier and quicker for me. There is an Import command in OpenSCAD where you can pull in STL files. I went ahead and brought my Blender STL files into my OpenSCAD project and set a variable name for the “Child’s Name”. I was then able to rapidly run through and create 17 models for all my son’s classmates.
Slicing and Printing – Simplify3D and MakerGear M2
I printed on my trusty MakerGear M2. Since I have a single extruder machine, I used Simplify3D to set up two processes to print my heart:
GlowFill
From 1.1 – 1.7mm, I printed in ColorFabb GlowFill. I printed those in 0.10mm heights. Usually I have found with detailing 3 or 4 layers were sufficient. In this case, because the GlowFill was a little translucent, going up to 6 and 7 layers made sure the text appeared more crisp and white. (It also gave me a little more leeway to recover if an edge came unstuck from the build plate).
Quick Tip
And a quick tip. Sometimes parenting is harder than 3D Printing. When I printed my first batch of hearts, I was quite pleased. I showed my son and was ready for a positive response. It did not go well. I..uh… I kinda didn’t include his name in the first batch of hearts. He can read and he was quite miffed when he did not see his name. Luckily, I started an emergency print and was able to get back on his good side. But you can avoid such drama. Make sure to print your kids’ in the first batch. : )
On Thingiverse!
If you covet a heart for Valentine’s Day or a special occasion, I was able to make a Customizer on Thingiverse. Feel free to make your own.