At the time of publishing this video, I have about 8 days left until Maker Faire Nova on March 19, 2017. More information about the event and tickets can be purchased at http://nova.makerfaire.com/
For my third time participating, I am focusing on 3D prints with embedded elements. With the help of my MakerGear M2, the Wanhao Duplicator i3, and my ever trusty Simplify3D, here’s what I got brewing:
For this video, I get to share a fun project I did for a new brewery called Heroic Aleworks! You can find them at http://www.heroicaleworks.com
The owners of Heroic Aleworks, don’t just consider themselves brewers, but nerds as well! As a great compliment to their very geeky tasting room (they even have a bathroom painted like a tardis), they have 3D Printed Tap Handles.
This is a great illustration of the “rapid product development” 3D Printing is touted for. They approached me on a Tuesday and we had working Tap Handles by Friday!
To make the tap handles functional, we embedded a standard 3/8″ nut into the print itself to screw onto the keg hardware and that’s where the project got fun!
This video talks about how thinking about the printing orientation ahead of time impacted the design, particularly with the consideration of the hole for the nut.
It also goes over my multiple processes in Simplify 3D and my custom starting and end scripts (same old, same old– very similar to what was used for embedding mirrors and the multi colored Gyro Cube).
Design Notes:
Final Dimensions for my Hole for 3/8″ Nut – 15mm x 17.8mm x 9mm
Final Dimensions for Octagon Hole for Bolt – 11mm Diameter
Custom Ending Script for my processes:
G91 ; relative mode
G1 Z100 ; lift 100mm
Custom Starting Script for Third Process
G90 ; absolute mode
Custom Starting Script for Final Process (After Color Change)
G92 E0 ; zero extruder
G1 E25 F225 ; purge nozzle
G92 E0 ; zero extruder
G90 ; absolute mode
When we are pushing the limits, we are going to encounter fails. But through failure comes knowledge and at times, it even brings about extra creativity. On that note, I hope 2017 brings you many fails!
In December, I did a last minute contribution to the A Pyro Design Maker Coin Holiday Tree. In my coin, I wanted to celebrate the failures that comes along with learning 3D Printing. I call it, “From Failure Comes Knowledge“. This video details the inspirations behind the coin, a little taste of the modeling in Blender, and the [embarrassing] two fails I had printing it.
Last Thursday night, I had the delight of participating in a Meetup with the Delaware 3D Printing Group. The event was hosted by Printed Solid. The group was kind enough to let me yammer on about my 3D Printed Crafts. 🙂 I very much enjoyed chatting with other printing enthusiasts and left the event invigorated. I should make it a point to do an event like this every November when the fatigue that accompanies Cyber Week looms in my brain. 🙂
My very first Thingiverse upload was glowing pumpkin pendants/pins for kids. This video hits briefly on how I print these via Multi-processes in Simplify3D (Spoiler alert – they are three separate prints). It will also show you how you can import in the pendant template into TinkerCAD and quickly make your own customizations. Finally, have a drawing you want to use? I’ll go over using Inkscape to make a SVG file from a black and white image/photo/scan that you can also pull into TinkerCAD to “carve” your pumpkin.
As some background information, the way the MakerGear M2 Homes its Z axis is it has a bolt on the platform that raises and lowers your bed.
Above it, just beneath the X-axis rail, is a switch that triggers when there is contact.
When the printer is homing its Z axis, it raises the bed until the bolt triggers that switch. At that point, the printer considers itself a Z-Home.
MakerGear has some great videos for the maintenance and setup of your machine, including how to do your Z Endstop calibration! Basically you raise your bed until a business card can just fit under the nozzle and then you raise the bolt to ensure it trips the switch at that exact height.
Disclaimer– I love my MakerGear M2 profusely and I will continue to love it profusely. That said, I find the bolt awkward and tough to raise.
One day I needed to update my Z Endstop application and I struggled getting that bolt to do my bidding.
“If only…if only I had something to stick on top of this bolt to make it taller.” I thought.
It turns out I did have something, something that was already a part of my 3D Printing arsensal– Painter’s Tape!
I cut out little squares of painters tape, made a tower, put it on top of my bolt. I fine tuned the tower’s height until my nozzle was a business card height above my bed. BAM! ZEndstop calibration!
Honestly, I never expected this solution to have the staying power it has, but I continue to use it to this day! I was worried about the repeatability of the Z-Home, that there would be variances in run to run in how the painter’s tape compresses, but it has proven to be consistent and reliable. I have also been shocked (SHOCKED) that it weathers travel well.
I have found this painter’s tape hack to help speed up my process of switching nozzles. When I switch to my 0.5mm nozzle for woodFill, I just have to add or remove squares of painter’s tape and I am ready to print.
Anglerfish
Blog post with more details on the creation of my bronzeFill/GlowFill Anglerfish. I do have one more if you happen to covet one. 😉 http://tgaw.com/wp/?p=307
Bow Ties!
I’ll work on a video about their design in Blender and the attachment design in OpenSCAD. It’ll use words like “Texture”, “Baking”, “Displacement Maps” and “Boolean Intersection”. In the meantime, I do have some listed on Etsy at https://www.etsy.com/shop/VickyTGAW
Make Your Empty Filament Spools into a Shelf
As promised, the model is up on Thingiverse as well as the original OpenSCAD code. http://www.thingiverse.com/thing:1677024
Print in Place Gyro Cube!
Wanna beta test my version of the Gyro Cube on YOUR printer? Lemme know!
I’ve led a bit of a charmed 3D Printing life. I’ve had my bobbles and frustrations, but overall, I have been floating by with relatively few worries, a happy little 3D Printing Princess without a care in the world. La la la la la.
And so it happens I have never ever done a cold-pull. Well, until recently.
I purchased a bag of used extruder/hot ends from another MakerGear owner. They arrived with eSUN Cleaner Filament in them and a note to do a cold pull when I was ready to use them.
Now, I know roughly what a cold pull is… and the term is a little self explanatory. Though one could also argue the term “sweet tea” is self explanatory as well and I thoroughly baffled a waitress in upper Michigan once with that beverage order.
When it was time to use my “new” nozzles, vaguely knowing the concept of a cold pull wasn’t going to cut it. I needed some specifics.
I unplugged the power to everything on the extruder I wanted to remove– my thermistor, the heating block, my 40mm fan, my 50mm fan.
I got out my Allen wrench and removed the fans and the filament drive.
I plugged in the thermistor and the heating block of the new nozzle. Holding it by the groove mount (I couldn’t get it in the Filament Drive until I removed the eSun filament), I used Simplify3D to heat the nozzle to 240 degrees.
Once there, I pushed the eSun filament with my hand and confirmed it was coming out of the nozzle.
Then I turned off the heat and watched the stats in Simplify3D.
I watched, waited (and regretted not having a better way to hold the nozzle) until the temperature hit 90 and then I tried to pull the filament out by hand. I actually did not succeed until the temperature hit 80 and I had some help with pliers. Then the filament pulled out and was the most lovely little, clean whisker.
Once the nozzle finished cooling, I slipped the groove mount into the filament drive and assembled everything back together (Being careful to make sure the 50mm fan goes into Fan 0 and the 40 mm fan goes into Fan 2)
And after that I checked my Z-End Stop calibration by Homing the Z-Axis and checking with a business card.
What I’ll Do Differently Next Time
So…. I had the foresight to grab a pair of needle nosed plyers with the intent of holding my hot end by the groove mount while it was hot. Know what I didn’t do? Test those plyers to make sure they’d be able to get a good grip on that rounded surface. So I ended up holding that thing with my bare hands. It was do-able.. but did get uncomfortable at times. Next time I will be better prepared. If not better plyers, then gloves. : )
As the Nova Mini Maker Faire came to a close, my demonstration print was far from done. I stopped the print, turned off and unplugged the machine, loaded the machine up into the trunk of my car, drove the 26 miles home (with a strategic stop by Burger King for some yummy yummy Chicken Fries), and set the machine back up at home. A week later, I was ready to start printing again and I wanted to start where I left off. I was able to do so with my trusy MakerGear M2 and Simplify3D. Here’s how!
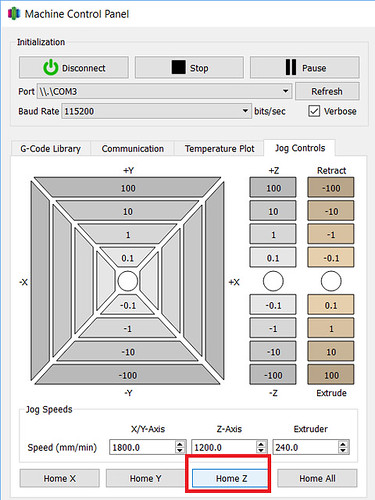
Homing the Axes
Before I could resume printing, I needed to rehome all my axes so my nozzle had all its bearings, particularly the tricky Z axis. In this case, my print was not very high, so under the Machine Control Panel in Simplify3D, I was able to move the bed around to a good spot for me to hit Home Z without my print hitting the nozzle or the X axis support bar.
Homing the Z axis can be trickier with taller prints. Since the MakerGear M2 set its Z-Endstop with a bolt on the side of the bed and it has a removable glass bed, I do have a little “hack”. When resuming taller prints, I remove the glass bed, home all the axes and then replace the bed. Sometimes there is a slight variation with the positioning of the print, but so far it has not been very noticeable in my final prints.
Where to Restart
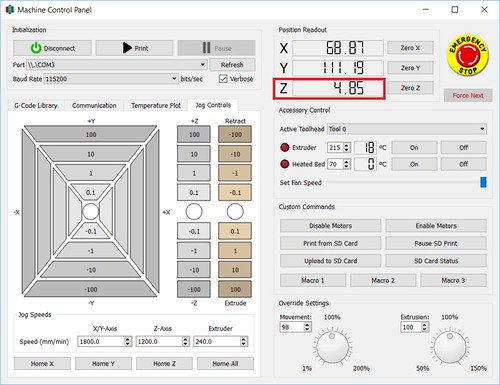
I know, I know. There are downsides to printing via the USB cable. An upside though– in Simplify3D, you have a continuous update of exactly where the nozzle is, most notably how high it is in the Z axis. In the case of my Maker Faire print, I was the one that stopped the print, so I was able to note and record the exact Z position I stopped off at. That meant I knew exactly what height I wanted to restart the print at.
Sometimes I don’t have that kind of information at my disposal. The other week, I had a filament tangle. I returned to my print to find the printer had been printing nothing for who knows how long. In those cases, I use the Jog Controls tab in the Machine Control Panel to do some sleuthing:
I start with my nozzle way above the print and I lower the Z position until I get close. The closer I get, the smaller the increments I move down, until I am using the -0.1 Z button. When I feel I am pretty much there, I pick an inconspicuous spot on the print and move the nozzle on top of it to make sure the nozzle is just barely above my print. I have found that sometimes touch is easier than sight, so I use a handy dandy business card to gauge the distance. Once I’m satisfied, I only have to refer to the positioning information in Simplify3D to get my Z startng point.
Resuming the Print
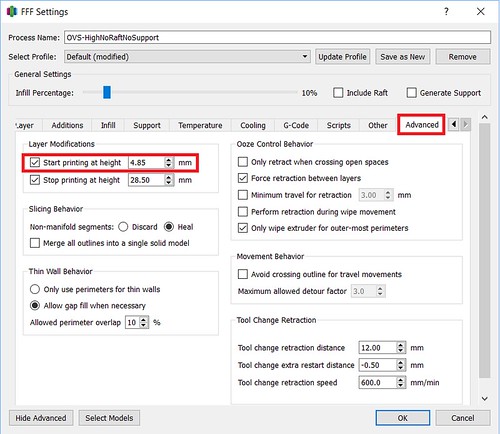
Next I tell Simplify3D where it needs to start printing. I do that under the Advanced tab and setting the Start Printing At Height setting.
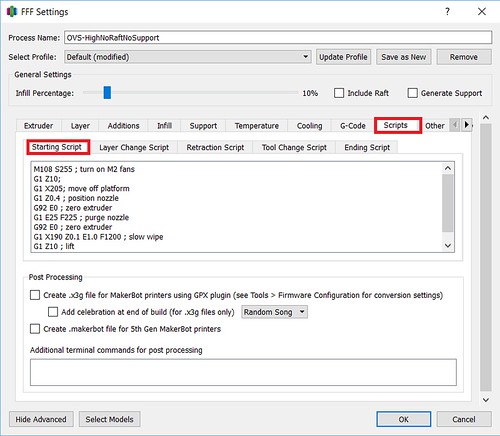
Finally, I need to give attention to my Starting Script in the Scripts tab. There are steps in the normal start up script I do not want to run. For example, I don’t want to home my axes (G28;)– I already did that manually. And depending on the object and its positioning on the bed, I may opt to alter other steps that may cause the nozzle to collide with my print. In the case of my Maker Faire print, I made some slight adjustments to the script that has the nozzle go off to the side of the bed to ooze some filament before beginning. I still wanted to do that, but I wanted to make sure the nozzle lifted up high enough (G1 Z10;) to safely cross over my object.
My normal Starting Script went from:
M108 S255 ; turn on M2 fans
G28 ; home all axes
G1 Y50 Z0.3 F9600 ; move forward to avoid binder clips
G1 X205 Z10 ; move off platform
G1 Z0.4 ; position nozzle
G92 E0 ; zero extruder
G1 E25 F225 ; purge nozzle
G92 E0 ; zero extruder
G1 X190 Z0.1 E1.0 F1200 ; slow wipe
G1 X180 Z0.25 ; lift
To
M108 S255 ; turn on M2 fans
G1 Z10;
G1 X205; move off platform
G1 Z0.4 ; position nozzle
G92 E0 ; zero extruder
G1 E25 F225 ; purge nozzle
G92 E0 ; zero extruder
G1 X190 Z0.1 E1.0 F1200 ; slow wipe
G1 Z10 ; lift
Of course, your mileage may vary, but hopefully some of this information translates or inspires a technique that works with your printer and slicer. Happy Printing!
Blogging the trials and successes of 3D Modeling, 3D Printing…and trying to make a business out of the whole thing. : )