Category Archives: Print Diary

Print Diary – July 31st – Process Improvement and Cyanocitta cristata

Tethered by Filament Change
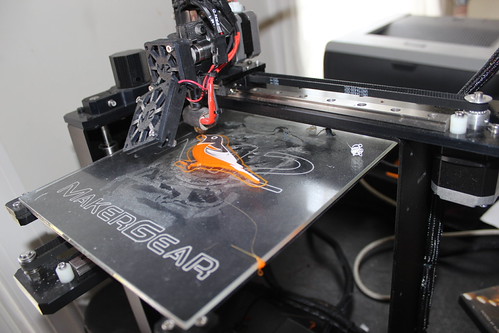
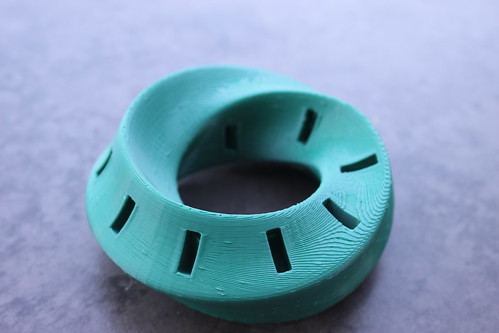
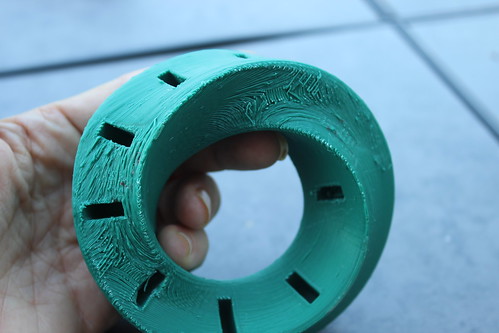
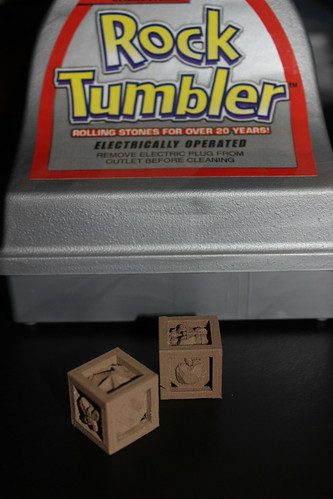
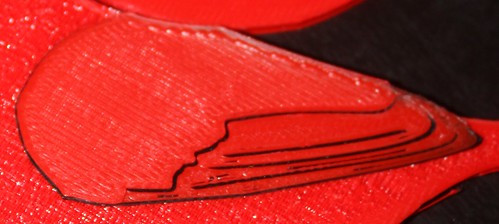
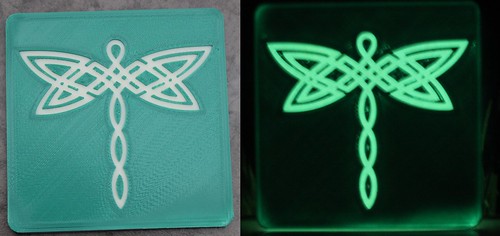
First thing in the morning, I started a print run of some coasters. This time I was etching in this lovely Creative Commons Celtic Dragonfly by blah_59. After the first 2 millimeters, I was going to change colors for the top. It was after the print I realized……

Starbucks Day

On Fridays, I usually take my kids out to breakfast at Starbucks. The timing of my filament change was totally going to muck up Starbucks Day. I wanted to be around to pause my print and switch colors.

Compromise. My oldest son and I ran to Dunkin Donuts and picked up a special breakfast and brought it home. I was deprived of my weekly Flat White, but boy, the kids didn’t care one bit. They loved eating Dunkin Donuts on the deck.

All was well and I ended up with my glowing Celtic Dragonfly Coaster.

3D Printing - Glowing Celtic Dragonfly Coaster (Green) - Before After

But it was a sign that I needed a better process. I’m a working mother. It isn’t going to be sustainable for me to be tethered to the printer waiting for the exact moment to change my filament.

3D Printing Nerd to the Rescue
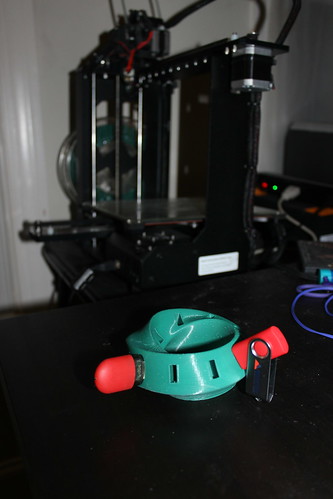
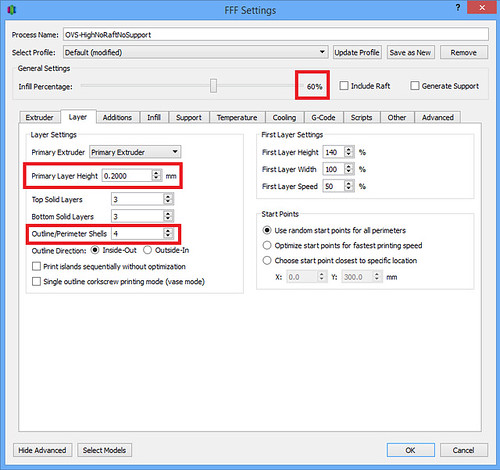
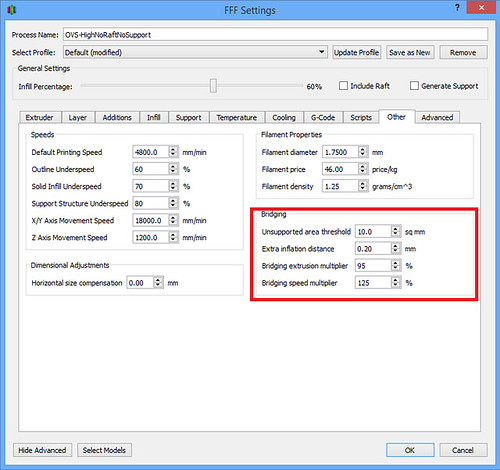
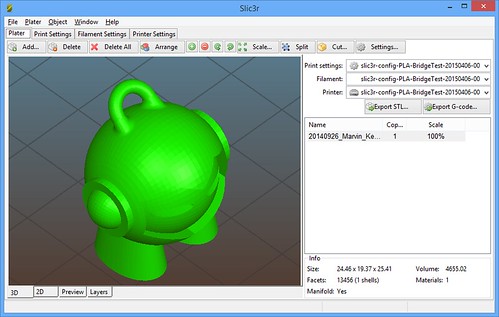
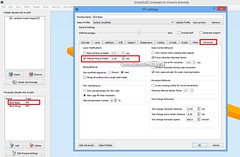
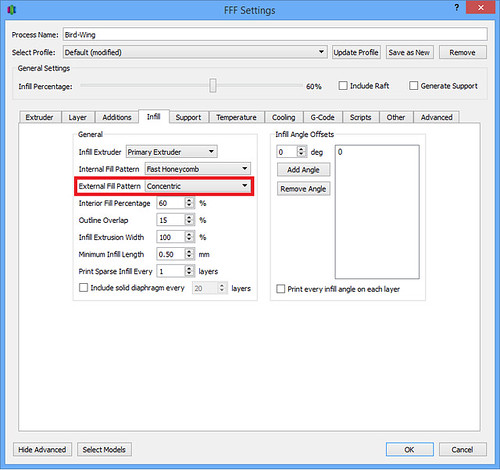
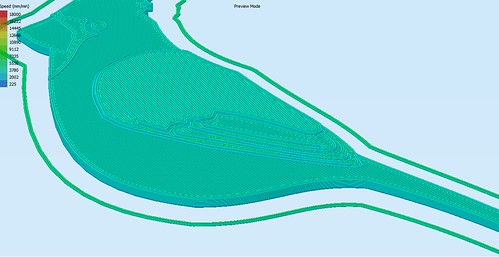
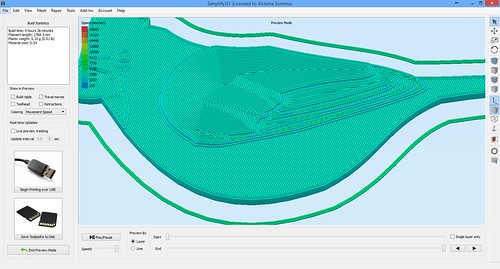
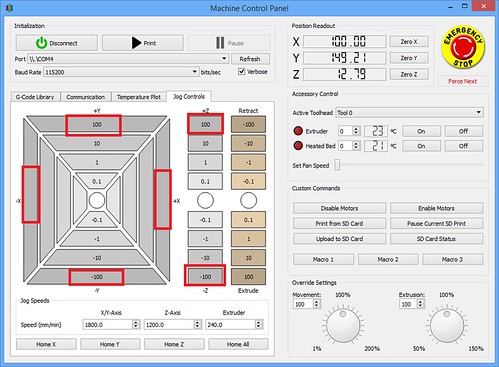
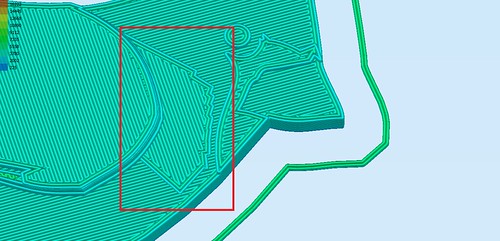
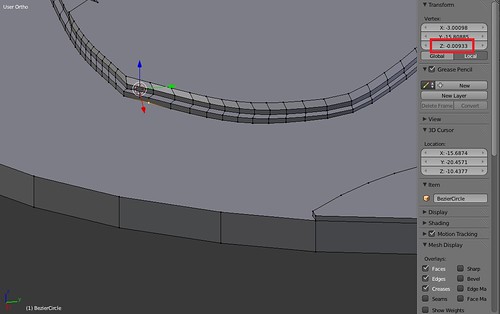
I thought my solution was going to lie in adding custom G-code, but it turns out I don’t even need to do that! I just so happened to watch the latest video from the 3D Printing Nerd that very same morning. He also does a lot of creations by switching filament colors and he also uses Simplify3D. I mentioned yesterday and we saw it before with some experiments with the cardinal wing that I do use multiprocesses to change my settings for different sections of the print. Well, I never thought about the implications of running those multiple processes one at a time. I had always let them run as a single print run, meaning I still would have to monitor and pause my print when I wanted to switch colors.

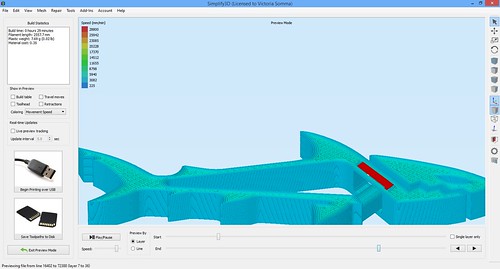
The 3D Printing Nerd’s video showed me to run them one at a time. So when the printer finishes one color it stops and then waits for you to take the next steps…on your time.

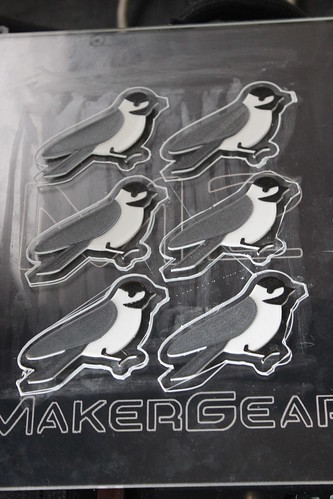
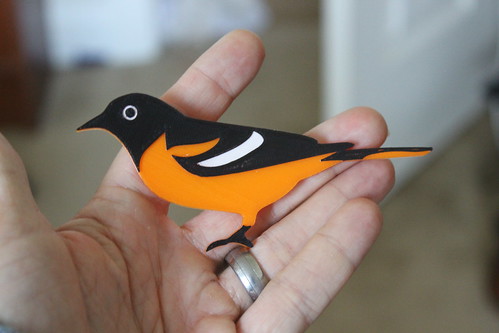
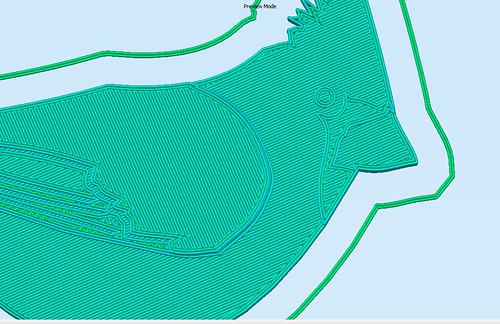
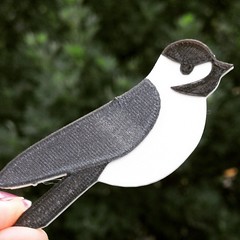
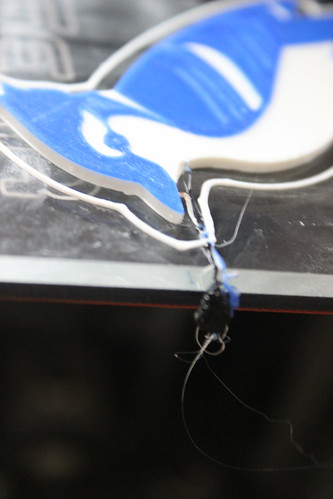
I gave it a test run on my new Blue Jay (Cyanocitta cristata). It worked splendidly. I ran the white. I ran the blue. I ran the black. Wonderful! This is just what I needed to keep my sanity and prepare for the Occoquan Arts and Craft Fair.

The latest bird from the MakerGear M2- Cyanocitta cristata (American Bluejay). #3DPrinting

A photo posted by Vicky Somma (@vickytgaw) on

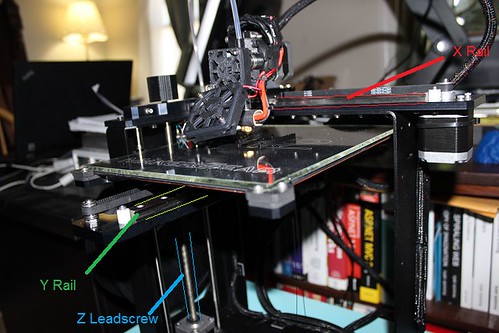
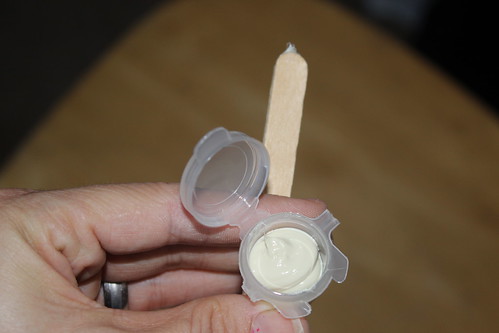
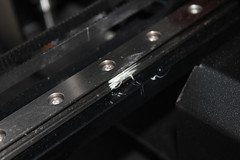
I did notice one tiny best practice for the future. When I start a new color, the print runs through it usually start up process (which I can change if I want). It squirts out some plastic off the side of the bed and then it swipes the nozzle clean on the bed. When I ran a bed full of bluejays, I did notice I put one a little too close to that swiping action. He was just barely getting knicked by the nozzle as it passed by. So either I not place things that close to that section… or I change my start up G-Code.

3D Printing - Swipe Collides with Bird

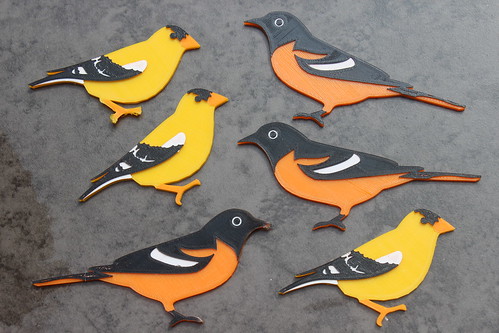
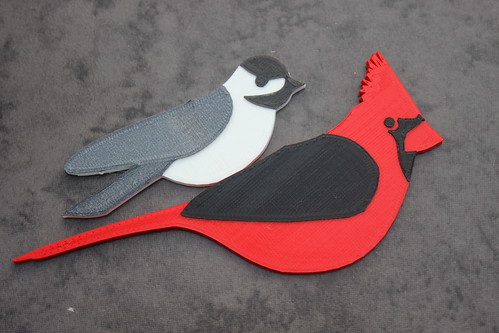
I’m really excited. A HUGE thanks to the 3D Printing Nerd for helping me improve my process. It’s really going to help as my collection of birds continues to grow!

3D Printing - Blue Jay, Monarch, Goldfinch, Cardinal, Chickadee, Baltmore Oriole

Print Diary – July 30th – Taking the Plunge!

Going for the Craft Fair
My town has an annual craft fair every September and June. After much discussion with my husband, we decided we are going to try to do the fair’s very first 3D Printed booth this year. If anything, we will be testing the waters for future 3D printing vendors. I applied for an official business license with my town. Yikes! : )

My prints today were some items in preparation for the faire– orioles, coasters, monarch butterflies.

Process Improvement
I did improve my bird printing process. Previously, I was printing all the birds at 0.10 layers. This allowed me to get more layers in of colors so they filled in better, but keeping the overall detail small.

Well I realized the backing of the bird didn’t need to be that short. In Simplify3D, I added an additional process where I printed the bottom of my birds at 0.2mm layers and then decreased down to 0.10 when I got to my color switches.

The result– it’s now quite fast to produce out a full bed of birds!

3D Printing - A Whole Slew of Chickadees

Science-Themed Pendant by Rosie Campbell
I did also try out the Science Themed Pendant by Rosie Campbell. It’s lovely and licensed Creative Commons (with commercial use). I like it, I’m satisfied with the print. I can see myself wearing it.

But…

Man, that hole is awfully small. It could be done— but you might need one of those needle threaders to do it.

3D Printing - Science Themed Necklace by Rosie Campbell

Nonetheless, it’s lovely!

Print Diary – July 28, 2015 – Spinus Tristis…. and an Ass-Kicking Danaus plexippus

Greetings! I’m currently prepping for a business trip, so this will be a quick entry.

American Goldfinch
I have a new 3D Printed bird to my collection. Spinus tristis, otherwise known as the American Goldfinch.

3D Printed Birds - Spinus tristis (American Goldfinch)

He’s my second favorite bird at the moment. I’m thinking of simplifying the white patches on his wings to make him match my FIRST favorite bird from the MakerGear M2– the Baltimore Oriole.

I’m getting quite a collection of little birds. : )

3D Printed Birds - Goldfinches and Orioles

Gah – Monarch Butterfly
I had this grand idea to do a Monarch Butterfly– it has the same color scheme as the orioles so I figured I could print them together. I stumbled upon a lovely Public Domain model by Liz Havlin. LOVE. It is exactly what I was envisioning, only prettier!

I thought I would just update the model a bit, to solidify the back and then add different face heights for my orange and white layers. Easy, right?

Well….

It’s been kicking my ass. And it’s not Liz’s model– her work is perfect, water-tight, non-manifold. I’ve been introducing issues to it when I add and extrude new faces. Gah. I will be victorious… just not tonight. : (

Print Diary – July 27th – The Baltimore Oriole and USB Mobius Strip Holder

Today was an eventful day with the printing. I had no slicing or modeling challenges or obstacles. Just straight up printing.

With switching out the filament during the print, I got to see my Baltimore Oriole come to life!

3D Printed Birds - Oriole in Action - After White Layer, the Black is Just Starting

3D Printed Bird - Oriole

And then for a “mindless” print so I can get my day job done, I reprinted my USB Mobius Strip. The only real adjustment I made from the first print was not putting supports with in the USB slots. LOVE. Now hopefully I won’t use my USB keys as frequently. (There are only two pictured because…well… I can only locate two of my USB keys, emphasizing WHY I need this in the first place).

3D Printing - Mobius Strip USB Holder

Print Diary – July 24, 2015 – Fun with Sharkz!

My intent when I woke up in the morning was to do my reprint of the Mobius Strip USB Holder. As I perused reddit over my morning coffee, however, I found a delightful little tangent– Sharkz from Thingiverse user Murray Clark. It’s a small object, so it is a fast print. It prints without supports and it moves. It can function as a little bag clip…or clothes hangers…or I even saw one maker using them as clip on earrings.

Sharkz - Thingiverse Screenshot

I have a four year old and a two year old and imaging their faces playing with the Sharkz was just too tempting to resist. The four year old in particular. He’s a Sharknado fan. : )

Simplify3D Settings
My print settings were really straight forward. Nothing fancy at all. In fact, I pretty much stole everything from the Thingiverse Instructions tab. They recommended 4 perimeters and an Infill of 60% to give the Sharkz a sturdy bite. They also recommended a layer height of 0.2 mm. Easy peasy.

  • Under the Layer tab:
    • Layer Height: 0.20
    • Infill: 60%
    • Outline/Perimeter Shells: 4

    Sharkz - Simplify3D Layer Settings

  • Under the Other tab:
    For my bridge speed, I used some tried and true settings I originally got from Ed Nisley’s blog when he printed the Bridge Calibration test.

    • Bridging Speed Multiplier – 125% (This should come out to 6000 mm/min which is 100mm/second)

    Sharkz - Simplify3D Bridge Settings

Confirming Bridging Settings
Since bridging was going to be key to the Sharkz’s jaw movement, I used my little hack to make sure my bridge settings were going to take effect. I temporary set my Bridging Speed Multiplier to 600%. I did a preview. The preview color codes by the print speed, so that made my bridge areas bright red. I changed it back to 125% and printed away.

Simplify3D - Bridge Hack on Sharkz

Sharkz = Fun
The bridges worked well and our little sharks do have quite a bite. They proved to be fun for the whole family, including my 69-year old mother.

3D Printing - Sagan and Sharkz 3D Printing - Dyson and Sharkz


3D Printing - Anne and Sharkz

A fun, quick little tangent.

Print Diary – July 23, 2015 – The Orphaned Swans and the Lost Mobius Strip

One of the things I started designing this summer was for my cousin’s wedding. Like me, he is a computer programmer and like my husband and I, his nuptials also celebrated geek culture. Need proof? Final Fantasy was part of his wedding music and he wore Star Wars crocs during the ceremony.

I had tossed around numerous projects. His wedding was in held in The National Aviary. I love “Hearts in Nature” and have seen stunning photographs of two swans making a heart. It seemed like a perfect thing. I pulled up my Blender and started modeling my swans. My process was very similar to what you would find in
Jjannaway3D’s Modeling A Velociraptor in Blender Series.

3D Modeling - Swan

And then… I had a tough question… “Okay, now what do I make out of these swans?” Napkin rings (and the swans did look great curved)? Napkin holder? Hook for oven mitts?

Then I thought, “Oh, he’s into computers, how about I make them into a USB/Sandisk holder.” But then I closed my eyes and really tried to picture my cousin with these swans on his desk. I just couldn’t see it. I loved the swans– I was happy with where they were going, but they no longer seemed to be a good fit.

What *did* seem to be a good fit was a Möbius Strip. And how cool would that be? A Möbius Strip USB holder! *I* want one! My process of modelling the strip itself was very similar to John Malcolm’s Modeling a Mobius Strip Pendant In Blender 2.73. My cross section was a little more stylized (instead of a straight square). After I applied the Bend Simple Distort, I made placeholder cubes for my USB slots (I did that afterwards as I wanted them to retain their measurements and not get distorted during the bend) and voila! I had my model!!!

All along I intended this to be a Shapeways order, but I decided to give it a go on the MakerGear M2. I printed with 0.25 layers and 30% infill in my fabulous new Mint Turquoise Filament from ColorFabb (via PrintedSolid).

Six hours later, I had my print.

I was really digging the print lines on the top. I thought they were neat and added an additional pattern to the mix.

Holy crap, I thought, Maybe this isn’t a Shapeways order!

Mobius USB Holder- Top

Then I turned it over, removed the supports, and looked at where the supports were.

Yikes— Maybe it *is* a Shapeways order

Mobius USB Holder - Bottom (Before Sanding)

Some quick sanding with 120 grit paper, however, changed my mind completely. I didn’t even get to the 220 or 400 grit. After just that first sanding, my husband and I had to concentrate to figure out which was the top and which was the bottom. AMAZING.

“Where are the ‘after’ pictures,” you may ask. “Document your claim!” You may say.

Well, there aren’t any.

I let my kids play with it… outside…in the yard… where there is all this green shrubbery.

They lost it. Three adults scoured the yard and that Mint Turquoise filament has done an excellent job of concealing itself. Interrogations of the two year old and the four year old, “Do you know where Mommy’s green toy is?” was just as much of a dead end. I suspect it’ll be winter before I find it again.

A reprint is in my future (an advantage of 3D printing– you can always print another one). Regarding the reprint, ColorFabb has an amusing suggestion:

Print Diary – July 19th – July 22nd

Quick order of business– in my print diary posts, settings and strategies are not necessary solid conclusions, just a documentation of what I tried and my observed results.

My programming day job was going to be exceptional busy, so I needed some more hands-off experiments. One of the things I covet with my new hoarding tendencies is a rock tumbler to polish my bronzeFill.

“But we have a rock tumbler,” my husband said. He pointed to a free one we got from our neighbor a few years ago. The one sitting on a book shelf in behind a commemorative Star Trek plate collecting dust. The thing is– it’s for kids and not at all like the fancy rock tumbler in the Barnacules Nerdgasm video. And the barrel is tiny!

But I did just splurge on a whole lot of filament. There was no harm in experimenting with this free, tiny rock tumbler. I did have a project that would fit in the barrel. The Elements of Harmony Di.

I designed it for my favorite Brony‘s birthday this past January. It looks amazing in Shapeways’ Stainless Steel.

Elements of Harmony Die - All Faces

Back in April when I first got the MakerGear M2 I had run through several runs and iterations perfecting the Di in Black PLA. I did end with something I was satisfied with. But I wanted to resurrect the experiments with a couple of changes:

  1. Back then I was concerned with the shininess of the bottom layer and how it looked so different from the rest of the die. I ended up using a raft to give it a similiar texture and feel. Don’t need that anymore. If I’m printing in bronzeFill, it’s all going to shine up. This was also back in the day before I discovered how amazing hairspray and the gluestick is. Another reason I can ditch the raft.
  2. Back then I was using Slic3r. I tend to user Simplify3d nowadays. In my experience, I’ve had better results with bridging with Slic3r than with Simplify3d. So my experiments were an ongoing effort to try to improve my bridging in Simplify3d.

Some odds and ends of the past couple of days.

New Slic3r is Beautiful!
I went ahead and used this as an excuse to download and use the new 1.2.9 version. My impression is positive. The new 3D View is lovely, but I’m most pleased to see the new “Layer” and “Preview” views. The Preview view is of particular interest to me as I like to scrutinize print lines and patterns.

New Slic3r

New Slic3r - Preview

Now, I did end up crashing new Slic3r three or four times. My hypothesis is that I was changing multiple settings in a row while it was trying to regenerate it’s previews. That’s not a conclusion– just a hunch.

Cooling, You Idiot!
I mentioned I have had better luck bridging (and sometimes overhangs) in Slic3r than Simplify3d. A few months ago, I opened both and started scrutinized settings and trying to get my Simplify3d to match my Slic3r results. Because I’m anal, I took screenshots and made notes of the changes and why I tried them. Well, I pulled up Cooling and I made NO changes and I wrote down that I had made no changes.

SlicerSimplify3D-8

Back then, I hadn’t realized the extent cooling played a role, specifically in overhangs. I would learn that when I mastered the 3D Hubs Marvin.

I went ahead and made some changes in the Cooling tab:

  • Under Speed Overrides changed Adjust printing speed for layers below from 15 seconds to 30 seconds
  • Under Fan Overrides, I checked Increase fan speed for layers below and changed the seconds from 45 to 60
  • Under Fan Overrides, I checked Bridging fan speed override.

Note– Since my Fan Speed is already 100 for everything after the first layer, I do not expect any change from my Fan Overrides section. (But the settings are in place should I tweak fan settings at a later date).

I have a feeling the Speed Override alone would have made my 3D Hubs Marvin endeavor a whole lot easier. The jury is still out on that, however, as I haven’t tested him out. : )

Simplify3D Bridging Hack
I also have a new version of Simplify3d which I had been hoping would fix a perimeter bridging issue I had noted. Quick tip, if you ever want to see where the Bridging Settings are taking effect set your Bridging Speed SUPER high– like 600%.

Simplify3D - Setting the Bridging Speed Multiplier Super High to See Where It's Taking Effect

Then when you preview your layers, those items are color coded in red and orange. Unfortunately, that revealed that my bridging settings were still not taking effect where I wanted them.

In the case of my dice, I had a lucky workaround. My perimeters of the bottom face were doing okay. It was the infill that was drooping and sagging. There were only two places on the dice considered “Solid Infill”. So I changed my Solid Infill speed to match what I wanted for the Bridging Speed.
Simplify3D - Setting Solid Infill to What I Want the Bridging Speed to Be

And I could see that bottom layer was going to print at a faster “bridge” speed.

Simplify3D - Tricking the Infill Into Bridge Speeds

This doesn’t help with things like the Bridging Extrusion Multiplier, but guess what– in the case of my dice, it was enough! I got my satisfactory results.

P.S. I could have always gone with supports. I was just being stubborn.

So at the end of these experiments– I have a handful of dice to run through our el cheapo rock tumbler. Wish me luck!

Elements of Harmony Dice - BronzeFill Dice and Rock Tumbler

Print Diary – July 15, 2015

Amateur Hour
My morning print could be aptly described as “amateur hour”. I decided to make another stab at my two color cardinal. I had a busy workday, so the print wasn’t my top priority and I did note my filament had come uncoiled as I put it on the machine, but I didn’t think much of it. I got the print started, confirmed the first layer was going well and then I directed my attention to some programming projects.

All of a sudden I noticed the infill of the cardinal, which is usually quite smooth, was very much NOT so.

3D Printing Cardinal Amateur Hour - What's Up With That Infill

It was shortly there after, I noticed that all those loose coils had worked themselves in a nice, extruding-thwarting, knot.

3D Printed Cardinal Amateur Hour - Knot in my Filament

I was able to undo the knot and the print resumed. Now, I have seen first hand how the quality and quantity of the infill can impact your top layer.

I was printing at 0.10 mm layers and at this point, I knew I had enough layers for my bird to recover. I felt that he would still end up with a smooth body and head. And I was right! Sure enough, layer by layer, the surface smoothed out and was looking rather fine.

But then…. ANOTHER KNOT.

Seriously! I let the exact same thing happen AGAIN. You would never guess that I spent 10 years working on Quality Control Software. You would never guess that I have heard of phrases like “corrective and preventative action”. : )

Anyway, at that point, I was just two layers away from one of my visible surfaces. I knew the bird would not recover.

But I let the print continue.

Failures in life (and 3D Printing) can also be “Learning Opportunities”. In this case, I wanted to see how my wing detail later in the print would look. It didn’t matter how shabby the rest of the bird looked. I would still be able to assess whether my “peeks of black” were going to be effective in the wing. The overall print would be a fail, but I would still gain some knowledge.

Experiments with Wing Detail
Later in the afternoon, I decided to give the cardinal another whirl. This time I made sure I wasn’t sloppy with my filament. And to keep the learning going with the print, I decided to play with the print lines in the wing.

I remembered seeing the “Owliver Belt Buckle” by Shapeways Designer Michael Mueller in Grey Polished Steel a while back. One of the things that really struck me about the design is how amazingly the print lines added to the feather effect.

Although I was working in plastic, it occurred to me that perhaps my feather detail could also benefit from some changes in the print lines. Perhaps instead of the straight lines on the wing, something like concentric lines that followed the contour of the feather/wing would look nice. But I wanted to keep the body-as in. I wanted to keep the diagonal straight lines there.

This experiment was easy to set up in Simplify3d. For more detail instructions, I suggest referring to their Different Setting for Different Regions of the Model Tutorial.

Quick synopsis – You use the Cross Section View to determine the actual height of where you want to make setting changes. Then you set up multiple processes (aka Settings). In the Advanced tab you can define the scope of the settings– where they should begin and end.

MultiProcess-FindingTheHeight MultiProcess-StopHeight

Quick note– I didn’t test it out in Simplify3d v3.0.0, but in v2.2.2 I had to be careful to turn my fan on for the first layer in my second batch of settings (because it isn’t actually a first layer– it just thinks it is)

Another multiprocess note- I have seen a bug with these multi-processes and rafts. I have not tested to see if it is corrected in v3.0.0

With my wing settings, under the Infill tab, I changed my External Fill Pattern to Concentric.

MultiProcess-ExternalFillPattern

When the print was done, I was able to decide which External Fill Pattern I liked best in the wing.

Rectilinear
Playing with Print Lines - Rectilinear
3D Printed Cardinal Amateur Hour - Rectilinear Wing Infill
Concentric
Playing with Print Lines - Concentretic
3D Printed Cardinal - Amateur Hour - Concentric Wing Infill

Conclusion: The original! I liked the original rectilinear better. Does that mean I wasted my time? Nah… at least now I know*. : )

*I’m paraphrasing Barnacules Nerdgasm here (from his BronzeFill polishing experiments).

Print Diary – July 14, 2015

M2 Lubrication
Today I did something scary (for me). My comfort level is more in the modeling and the software side, but the MakerGear M2 was due for some monthly maintenance. According to the documentation I received with the printer, I needed to:

Clean the X and Y linear rails, and the Z leadscrew, of grease, then apply a fresh coat to each – a dot of white lithium grease in each of the long grooves on the X and Y rails, and a dot in four consecutive troughs of the Z leadscrew; once applied, move that axis through its full travel multiple times to spread the grease.

Okay. So first step. I needed to confirm what I thought was the X and Y rails and the Z leadscrew was accurate. With that, I did some poking in the M2 Assembly Instructions. My conclusion seemed accurate (I’m happy to consider evidence to the contrary).

M2 Lubrication - Rails and Leadscrew

The M2 What’s in the Box manual that shipped with my printer helpfully had pictures of the Lithium Grease and the Applicator, so I knew exactly what supplies to use.

M2 Lubrication - Supplies

I did my dabbing.

M2 Lubrication - Z Leadscrew M2 Lubrication - Y Axis

Then I opened my Simplify3D, went to Tools->Machine Control Panel and then clicked on the Jog Controls tab. I used the various X, Y, and Z movements to move the printer around to spread the grease.

M2 Lubicration Process Via Simplify3D

It turned out to be pretty easy and not very scary at all.

Cardinal Progress
I did a test run of my two-color Cardinal. With a item like this, the point of focus is going to be on the top, so when I slice in Simplify3d, I give some scrutiny to the my top level (As opposed to say a 3D scan of a person– there the top of the object isn’t the center of focus). I noted with my cardinal there was an oddity in the top.

Top Layer - Cardinal - Why This Section

Even though that section was going to be all red, I didn’t want that odd texture in the mix. I wanted a nice, smooth surface for viewing pleasure. I’ve seen this issue before and I knew what I was up against– I didn’t have a completely flat surface where I wanted one.

I opened my modeling software back up (Blender) and the issue was I had a number of vertices that weren’t exactly the same as the others of that level. In the example below -0.00933 instead of 0. This caused the surface to not be exactly flat and when it came to slicing time, the printer has to translate that into layers. To adjust for the non-flat surface, part of the cardinal’s chest did not go as high as everything else.

Top Layer - Vertices

I adjusted my vertices to make them exact and make a nice flat surface. When I sliced again you can see the difference.

Top Layer - Much Better

My test print is coming along. The cardinal is cute, though this doesn’t represent my vision. He’s supposed to have red on his wing with just snippets of black poking through. I had a lapse of concentration during the last filament change to red and ended up mucking up the exchange by going the wrong way on the Z axis.

3D Printed Birds - Chickadee Has a Pal
The Chickadee and His Friend

Live and learn! Tomorrow is another day and another print. : )

Print Diary – July 13, 2015

Today in my printing adventures. Most of my endeavors were focused on printing multiple colors on the single extruder machine.

Victory Pictures of VT Logo
My first practice run was right before the July 4th holiday, I made a quick VT medallion in OpenSCAD using GlennLo’s awesome Virginia Tech Logo model. A couple of my Facebook friends commented positively on the item so I mailed a few out over the weekend.

Today, my friends were kind enough to post pictures of their new arrivals. It made me smile to see.

VT Arrivals

Modelling a Cardinal
Another multi color project I took on was making myself a chickadee. It was simple and cute and I’m smitten with it (I do have a version with legs that I printed last Thursday).

Now that I know how to do multicolor prints on our MakerGear M2, I'm plotting ways to make myself a chickadee (I'm thinking 3 colors - white, black and grey) #3DPrinting #3DModeling My 3 Color Chickadee Experiment on the MakerGear M2- Take 1.  My silver filament is a little translucent so I think I need to add some extra layers there.  Overall, pleased!  #3DPrinting

My Chickadee– Three Colors on the MakerGear M2

I decided I need some other birds to keep it company. I have aspirations of making a variety of species and maybe making a wreath. Over the weekend, I went through my Mom’s bird book and I have a bunch I’m eyeing. Since last week, I just got a shipment from PrintedSolid of new filament and one of the colors is Traffic Red, the cardinal seemed like a good option. It’s not the most intricate modeling, so I squeezed a little of bit of Blender work in here and there while the code for my day job compiled.

I’m excited about the wing detail. I’ve carved out some feather detail to show a peek of the black underneath. I think it’s going to look mighty fine.

Work in Progress - Cardinal