Two New Events

I just added two more events to my event’s calendar for this spring.

First, I’m excited to be participating in the Printed Solid Grand Opening and Maker Festival.  Printed Solid is my go-to for filament and they have been so very supportive of me, even back when I didn’t even own a 3D Printer of my own.  I am thrilled to help them celebrate their new digs.  And my son is thrilled to meet his favorite YouTube star, Joel Telling!

Sunday May 15th, 2016 – Printed Solid Grand Opening!
10 AM – 4 PM
2850 Ogletown Rd
Newark, DE

Secondly, my husband and I will be representing 3D Printing to the masses at this years’ Occoquan Arts and Crafts Show.  I will have the printer(s) running and will be happy to answer any question.

June 4th and 5th, 2016 – Occoquan Arts and Crafts Show
Occoquan, Virginia
We’ll be near Occoquan Vapor Shop at 304 Mill Street

Resuming a Print (After Turning Off and Moving the Machine)

axieses

As the Nova Mini Maker Faire came to a close, my demonstration print was far from done. I stopped the print, turned off and unplugged the machine, loaded the machine up into the trunk of my car, drove the 26 miles home (with a strategic stop by Burger King for some yummy yummy Chicken Fries), and set the machine back up at home. A week later, I was ready to start printing again and I wanted to start where I left off. I was able to do so with my trusy MakerGear M2 and Simplify3D. Here’s how!

Homing the Axes
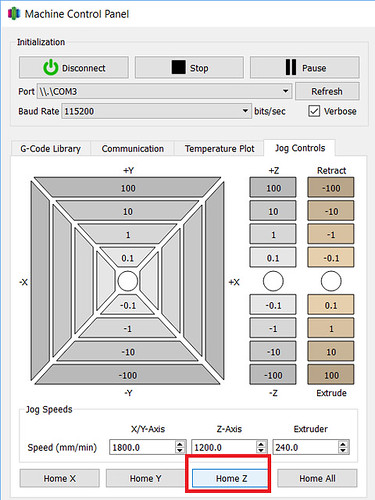
Before I could resume printing, I needed to rehome all my axes so my nozzle had all its bearings, particularly the tricky Z axis. In this case, my print was not very high, so under the Machine Control Panel in Simplify3D, I was able to move the bed around to a good spot for me to hit Home Z without my print hitting the nozzle or the X axis support bar.

Restarting a Print - HomeZ

Homing the Z axis can be trickier with taller prints. Since the MakerGear M2 set its Z-Endstop with a bolt on the side of the bed and it has a removable glass bed, I do have a little “hack”. When resuming taller prints, I remove the glass bed, home all the axes and then replace the bed. Sometimes there is a slight variation with the positioning of the print, but so far it has not been very noticeable in my final prints.

Where to Restart
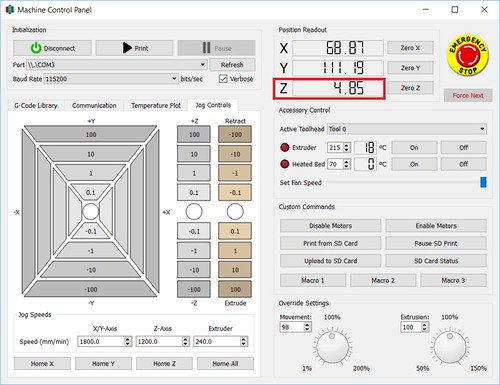
I know, I know. There are downsides to printing via the USB cable. An upside though– in Simplify3D, you have a continuous update of exactly where the nozzle is, most notably how high it is in the Z axis. In the case of my Maker Faire print, I was the one that stopped the print, so I was able to note and record the exact Z position I stopped off at. That meant I knew exactly what height I wanted to restart the print at.

Restarting a Print - Noting Stopping Point

Sometimes I don’t have that kind of information at my disposal. The other week, I had a filament tangle. I returned to my print to find the printer had been printing nothing for who knows how long. In those cases, I use the Jog Controls tab in the Machine Control Panel to do some sleuthing:

I start with my nozzle way above the print and I lower the Z position until I get close. The closer I get, the smaller the increments I move down, until I am using the -0.1 Z button. When I feel I am pretty much there, I pick an inconspicuous spot on the print and move the nozzle on top of it to make sure the nozzle is just barely above my print. I have found that sometimes touch is easier than sight, so I use a handy dandy business card to gauge the distance. Once I’m satisfied, I only have to refer to the positioning information in Simplify3D to get my Z startng point.

Resuming the Print
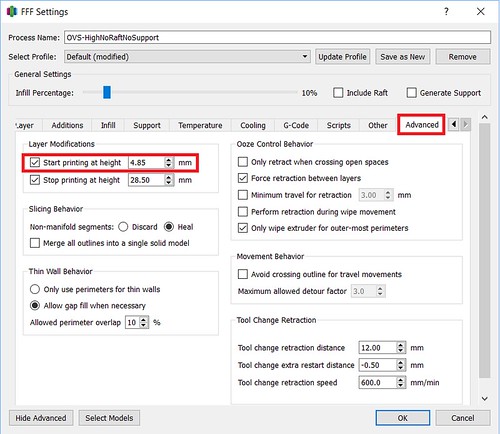
Next I tell Simplify3D where it needs to start printing. I do that under the Advanced tab and setting the Start Printing At Height setting.

Restarting a Print - Advanced Tab - Start Printing Height

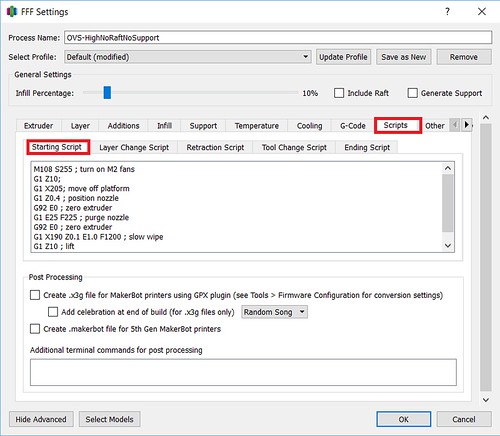
Finally, I need to give attention to my Starting Script in the Scripts tab. There are steps in the normal start up script I do not want to run. For example, I don’t want to home my axes (G28;)– I already did that manually.  And depending on the object and its positioning on the bed, I may opt to alter other steps that may cause the nozzle to collide with my print. In the case of my Maker Faire print, I made some slight adjustments to the script that has the nozzle go off to the side of the bed to ooze some filament before beginning. I still wanted to do that, but I wanted to make sure the nozzle lifted up high enough (G1 Z10;) to safely cross over my object.

Restarting a Print - Advanced Tab - Custom Scripts

My normal Starting Script went from:

M108 S255 ; turn on M2 fans
G28 ; home all axes
G1 Y50 Z0.3 F9600 ; move forward to avoid binder clips
G1 X205 Z10 ; move off platform
G1 Z0.4 ; position nozzle
G92 E0 ; zero extruder
G1 E25 F225 ; purge nozzle
G92 E0 ; zero extruder
G1 X190 Z0.1 E1.0 F1200 ; slow wipe
G1 X180 Z0.25 ; lift

To

M108 S255 ; turn on M2 fans
G1 Z10;
G1 X205; move off platform
G1 Z0.4 ; position nozzle
G92 E0 ; zero extruder
G1 E25 F225 ; purge nozzle
G92 E0 ; zero extruder
G1 X190 Z0.1 E1.0 F1200 ; slow wipe
G1 Z10 ; lift


Of course, your mileage may vary, but hopefully some of this information translates or inspires a technique that works with your printer and slicer. Happy Printing!

Fixing a KidKraft Deluxe Garage Playset with Tinkercad!


Watch or Listen to This Blog Post Above

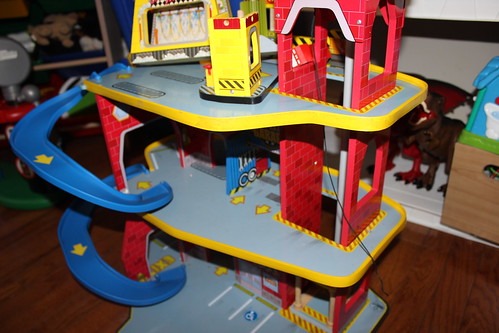
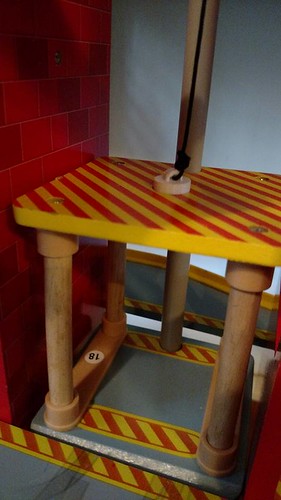
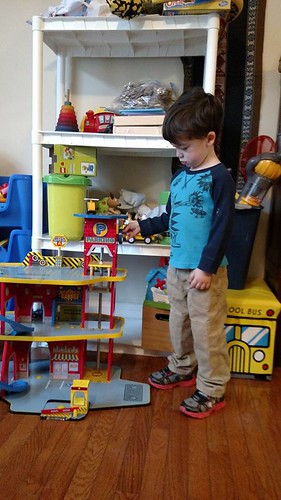
For Christmas, we got a hand-me-down KidKraft Deluxe Garage Playset.

3D Printing - Elevator Fix - KidKraft Deluxe Garage Playset

Wonderful! There was only one minor issue– it was missing some kind of piece at the top of the elevator. As a result, the elevator did not go up and down. This caused some discontent for my two year old. At first, I would tie a toothpick at the end of the string and that would allow him to raise and lower the elevator for a while… but it frequently came undone. I thought, “Hey. I have a 3D Printer. I had TinkerCAD. I can do a lot better than a toothpick.”

One Saturday morning, the kids and I did just that. Our first step – calipers, which both children love to play with.

3D Printing - Elevator Fix - Calipers

I…uh…. I retook all the measurements for myself after they were done.

Then we pulled up the free and web-based TinkerCAD. As you may know, I do a great deal of modeling in Blender. I have found the colorful interface of TinkerCAD to be much more conducive to “keeping the attention of my kids.” In this case, they sat in my lap and we modeled it together.

The Model
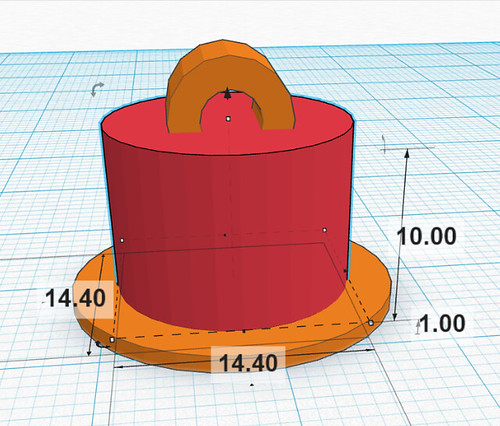
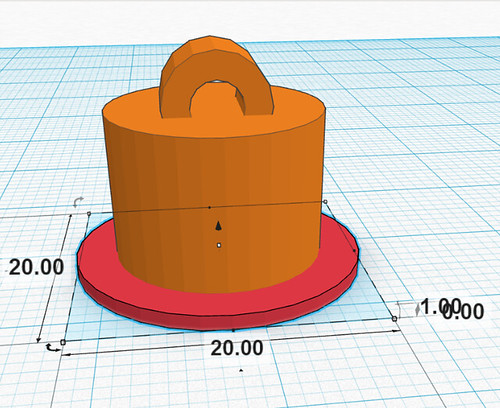
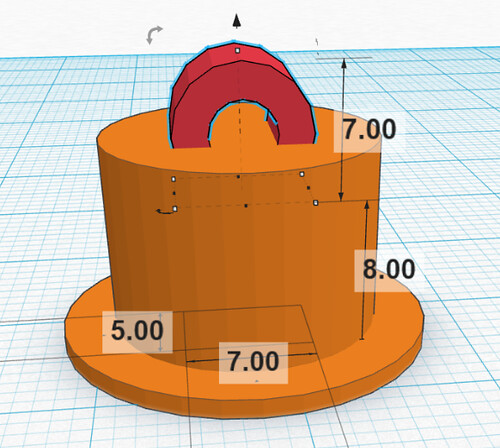
This was a very simple design. We just had three pieces:

  1. A cylinder that I sized to the exact width of the hole we measured in the playset. Usually I put in 0.5mm clearances, but for this, I wanted a snug fit. It would even be okay if I had to force the part in.
    MainBarrell
  2. There was also a second flat cylinder in the bottom. This was to make sure we couldn’t just pull or push the part all the way through the hole.

    StopperCylinder

  3. At the top, I used a tube. I used the Rotate handles (the little arrow icons) to rotate the tube 90 degrees.

    Tip– If you hold down the Shift key while you rotate, you can rotate at 45 degree intervals.

    Hook

Tip: Since I was working with exact measurements, I dragged a Ruler object to my Workplane which allows me to type in the dimensions of my parts.

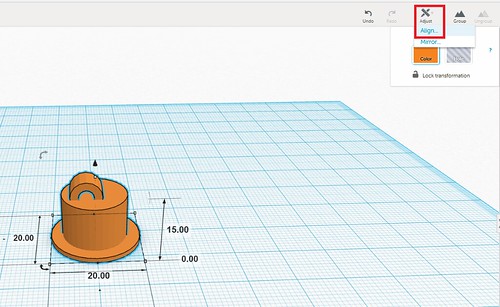
Once I had all the parts on my workplane, I selected them all and went to Adjust->Align…

Adjust Align

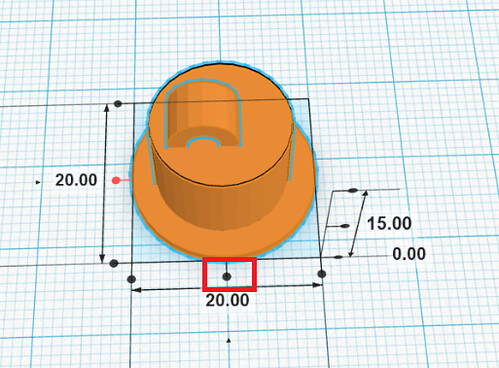
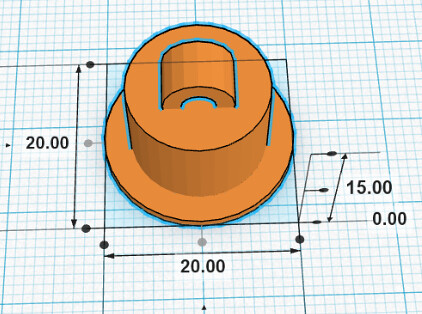
This allowed me to center them all with each other.

Aligning

AlignAfter

Moment of Truth
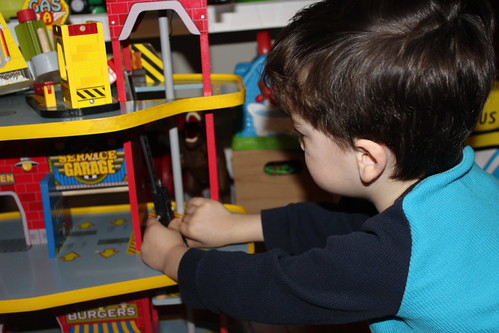
We made pancakes while the part printed and then we had a moment of truth. I was happy to discover our calipers did not lead us astray, the part fit AND the elevator worked.

InstalledPiece

SaganUsingElevator

Between the pancakes and this toy fix, it was a very productive Saturday morning. My Mom self esteem was at an all time high. Don’t worry– I was back to normal by the afternoon (after unsavory Mom tasks like “saying No” and “wiping butts”). : )

P.S. If you happen to have a KidKraft Deluxe Garage Playset in the need of the same part, it is free for download and use on TinkerCAD!

Embedding Mirrors Into Prints with Simplify3D

My sister turned 40 this month and get this– I have never, ever, ever printed her anything. I printed something for her husband, but not her. Bad Vicky! That definitely needed to change. Her house is a very visually stimulating house. They have a variety of lighting and effects– think blacklights, giant flatscreens with screensavers dancing to the music, lasers making patterns on the walls, lava lamps. I wanted my design to fit in and interact with the lighting in her house. I wanted something with mirrors.

Designing
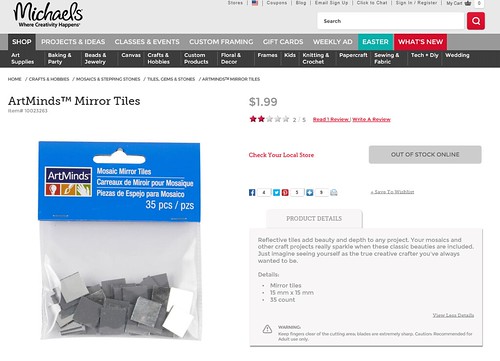
At Michael’s I bought little mosaic mirrors– 35 of them for $1.99.

3D Printing Mosiac Mirror Tiles

Then I got out the trusty calipers. There was some variance in the measurements, but the mirrors were pretty much 15 millimeters by 15 millimeters and 1.75 thick. I designed in cavities into my model for the placement of the mirrors. I used 0.5 millimeter clearance– which meant my “hole” came out to 16 x 16 millimeters and 2.25 thick.

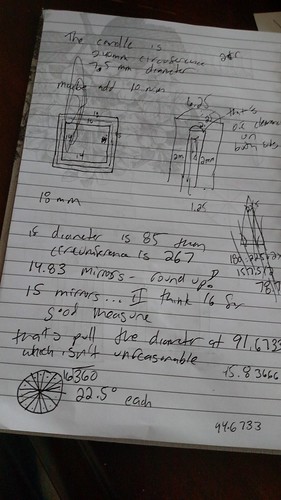
All my design work was in Blender. I decided my design was going to built out of a series of 18 x 18 millimeters squares– each ready to hold a mirror. I used some simple math to figure out how many mirrors I would need to be a good stand for a 3″ pillar LED candle and the ultimate radius of my final product.

3D Printing - MATH!

I made one template square and put in the proper placement of where it would be in the final holder. Another simple math equation told me how many degrees I would have to angle each piece.

360 degrees / # of Mirrors

So for example, in a design with 15 mirrors, each piece would be angled 24 degrees from the previous one. If I did 14 mirrors, each piece would be angled 25.714 from each other.

In Blender, when you rotate items, you are rotating around the Point of Origin of that object (where the little yellow dot appears when you select the Object).

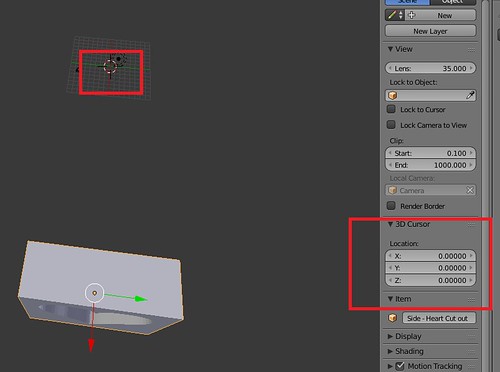
Usually this is the Center of Mass of the object, but guess what! You can control it and the origin doesn’t have to be in the object itself. Once I had my template square in its proper position in the final candle holder, I placed my 3D Cursor at 0,0,0.

Blender - Setting 3D Cursor

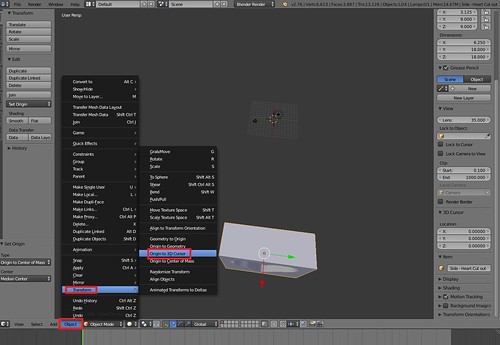
I went to Object->Transform->Origin to 3D Cursor.

Blender - Origin to 3D Cursor

This meant the origin was right smack in the middle of my candle holder. It also meant, when I rotate, I rotate around that point.

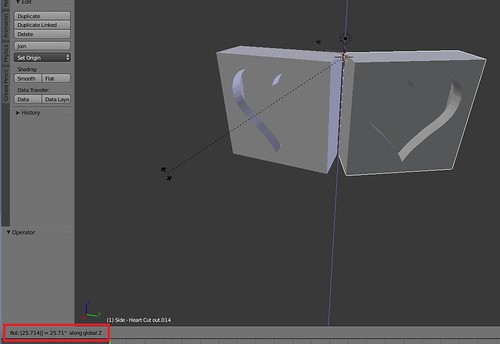
So I proceeded to Duplicate the square, hit R (for Rotate), hit Z (for around the Z axis) and then type in my angle (25.714).

Blender - Rotate 25.714 along Z Axis

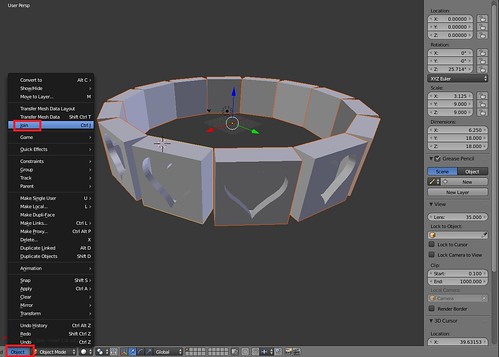
I would then Duplicate that square and Rotate it and so on until I had my entire ring. I did Object->Join to merge all my panel pieces into a single object.

Blender - Object Join

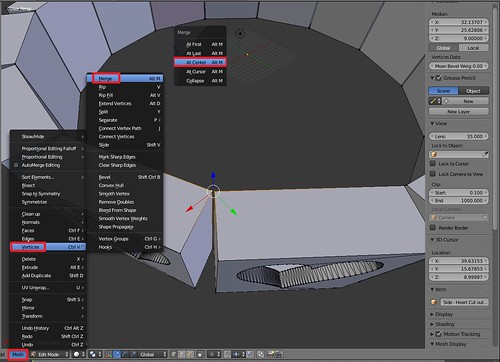
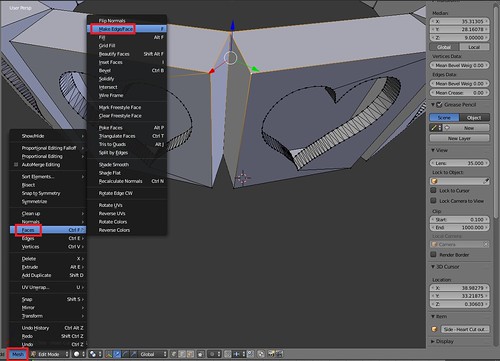
I switched to Edit mode and did some cleanup. I Merged Vertices that were close together and then added in new Faces to fill in the gap.

Blender - Vertices Cleanup

Blender - Filler Faces

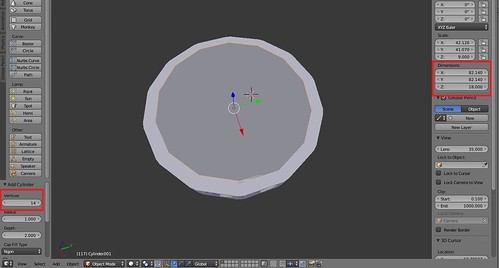
The inside of the candle holder is a 14-sided Cylinder. When you add a new Cylinder, you can specify the Number of Sides. I made it match the number of mirrors.

Blender - Inside Cylinder - 14 Sides

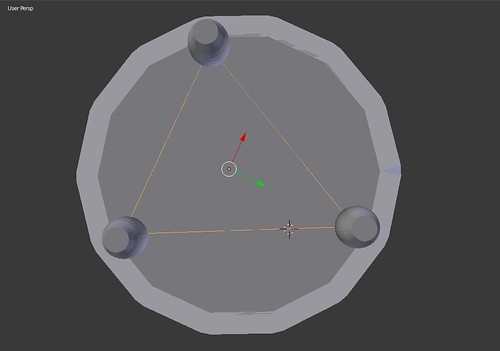
I cheated with the placement of the three feet. I added a 3-sided Circle and used that to help me determine where the place my feet.

Blender - 3D Sided Circle To Help with Foot Placement

Under Modifiers I did a Boolean Union on my panel piece, my inside cylinder and my feet and voila– I had a model!

Slicing – Simplify3D
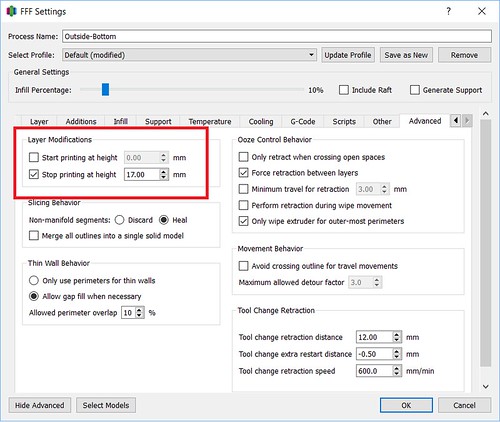
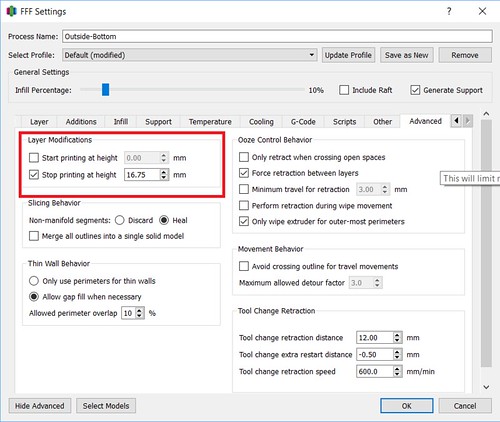
In Simplify3D, I set up two separate processes. The first process ran from the 0.00mm – 17.00mm (You can set that up in the Advanced tab under Layer Modifications). That is the point right before my mirror cavities would get sealed up.

3D Printing with Mirrors - Simplify 3D - Layer Modification Settings for the Bottom

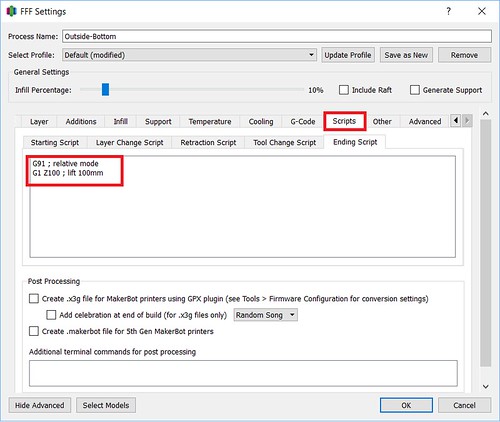
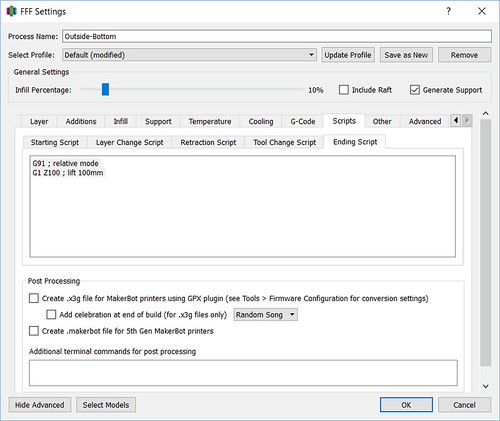
Usually when a process finishes, it’ll run a default ending process– turning off the extruder and disabling the motors, completely dropping the bed. I didn’t want that to happen. In this case, I just wanted the bed to drop down enough for me to put those mirrors in without burning myself and more importantly, get that hot nozzle off my print so it isn’t melting and deforming it and making it hard for me to slide my mirrors in. I went under Scripts and customized my Ending Script. Instead of the usual process, I did two simple steps:

1) I changed it to Relative mode, so my next instruction would use the nozzle’s current position as it’s starting point
2) I told it to move the nozzle up 100mm.

G91 ; relative mode
G1 Z100 ; lift 100mm

3D Printing with Mirrors - Simplify 3D - Ending Script for Bottom

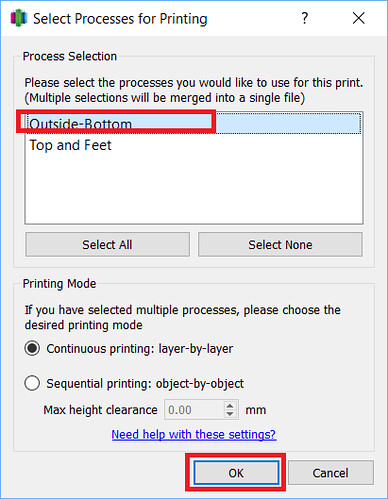
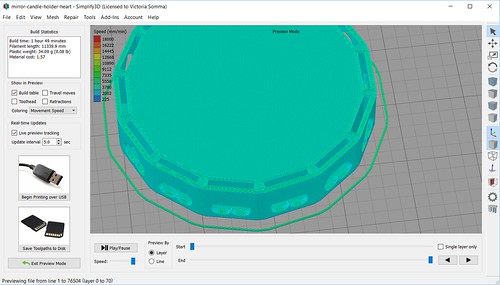
When I prepared just that process for printing, you could see how it was going to stop while I still had openings for my mirrors.

3D Printing with Mirrors - Simplify 3D - Selecting the First Process

3D Printing with Mirrors - Simplify 3D - Preview of First Process

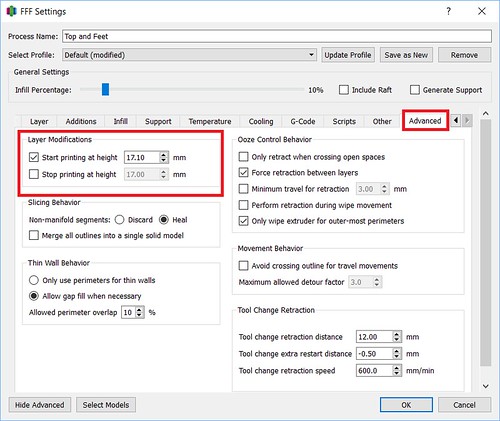
My second process was set up to run from 17.10mm on (again under the Advanced tab)
3D Printing with Mirrors - Simplify 3D - Layer Modification Settings for the Second Process

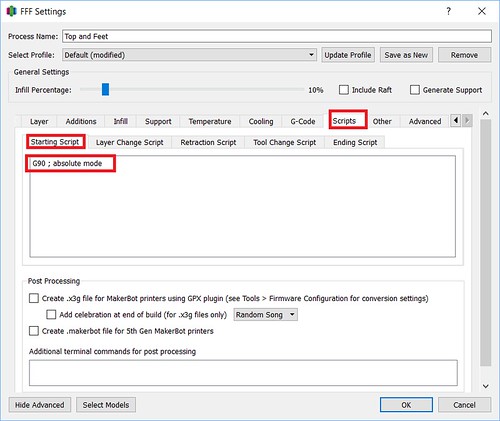
When a process begins, there are a number of things the printer typically does at the beginning such as turning on the extruder, turning on the fans, homing the axis’s, running off the side of the bed and oozing some filament. I didn’t want to do this for my second process. My axis’s are already homed, my extruder is already heated up, my filament is already flowing. All I had to do was set my printer back to Absolute mode and go. So for this second process, I went under Scripts and customized the Starting Script.

G90 ; absolute mode

3D Printing with Mirrors - Simplify 3D - Starting Script for Second Process

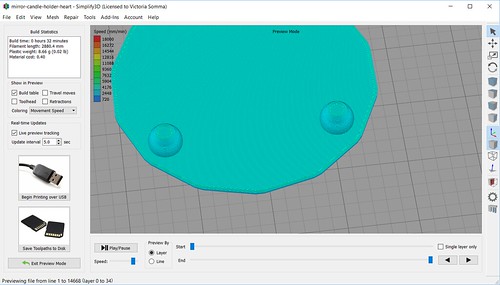
A preview of the second process, illustrates how the mirrors will get sealed in by the print.

3D Printing with Mirrors - Simplify 3D - Preview of Second Process

The process worked out fantastically (Watch it in Action in the YouTube video above– starting at about 7 minutes in).

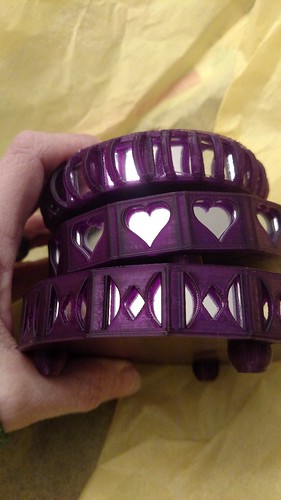
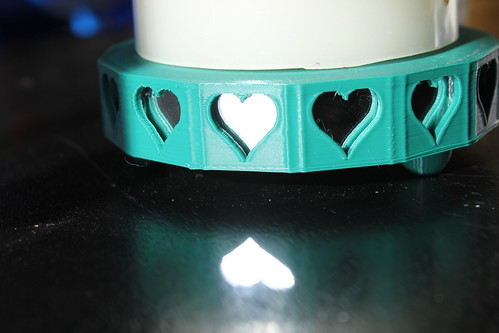
All in all I did three different designs for my sister.

3D Printing - Embedding Mirrors in Prints

I loved the final product so much I had to make another for myself.

3D Printing with Embedded Mirrors - Heart and Reflection

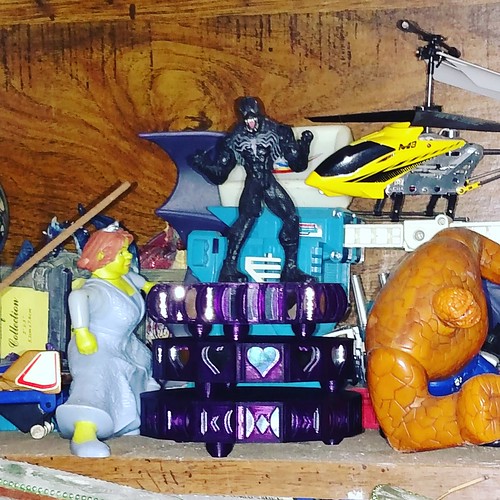
They ended up looking fantastic stacked. My sister used them as a platform for her Venom action figure. : )

3D Printing - Venon is Victorious on the Mirrored Candle Holders

How To: Avoiding Supports By Using Simplify3D to Cut The Model in Half

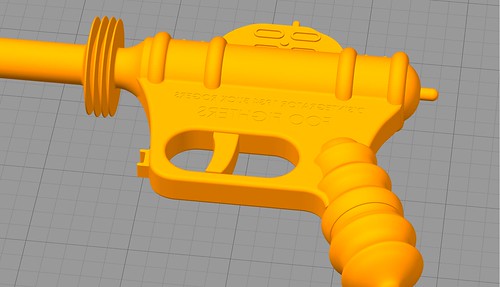
After a recent trip the Air and Space Museum’s Udvar-Hazy Center, my husband had a 3D Printing request for me. He wanted a 1934 Buck Rogers Disintegrator Gun.

The Model
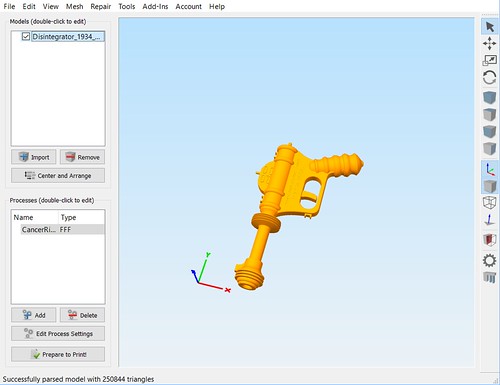
Thanks to the great community up on Thingiverse, I didn’t have to do any modeling. I had THREE Buck Rogers Guns to choose from. The one that caught my eye and seemed to most resemble what my husband wanted was “Disintegrator 1934 Buck Rogers Gun” by user bluesroq.

The designer recommended printing the model with supports and there is indeed a lot of overhangs with how the gun is positioning now.

Avoiding Supports
Even though Simplify3D has top notch supports that are easy to remove and easy to control, I wanted to try to avoid supports in this case for a few reasons:

  1. As great as Simplify3D supports are, they would still leave some scarring or souvenirs on the faces– in this case– an entire side of my gun would be subject to that and not look as pretty and finished as the other side.
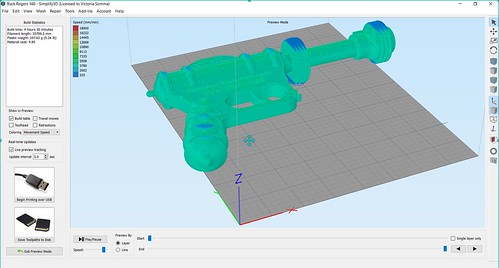
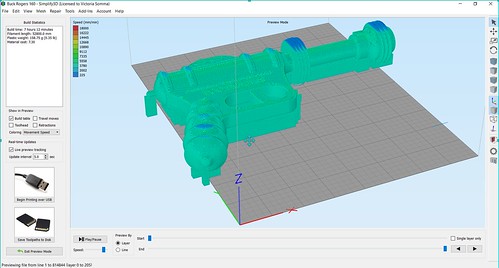
  2. Supports increase your printing time AND your material usage. In the case of an adult-sized Buck Rogers gun, the print time would have gone from 4 hours 30 minutes to 7 hours 12 minutes!

    Without Supports

    With Supprots

  3. If it were in half, this particular model would be an easy, straight forward print without any troubling overhangs.

Looking over the Buck Rogers Gun, the model itself was very symmetrical. It would be a great model to print in two halves and glue together. As a 3D Modeler, I could easily pull this model into something like Blender and break in half that way. But, I could also save time and just do it through my slicer! : )

Cutting in Half – Simplify3D
In Simplify3D, anything that is below your build plate will get ignored by the printer. So in the case of this gun, I would want to lower it down so half of it is above the build plate and half is below. The steps would be:

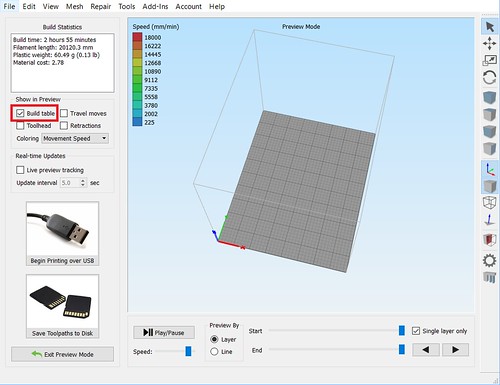
  1. First off, it is helpful to see the build plate while you are working. If yours is not displaying in your Simplify3D, click on Prepare to Print and check the Build Table under Show In Preview.
    Simplify3D - Build Plate Not Displayed

    Simplify3D - Show Build Plate

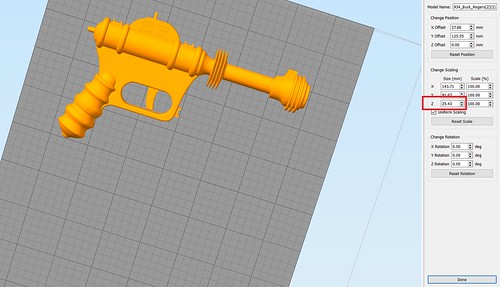
  2. Next we need to figure out how far we want to lower our model. Simplify3D makes that easy for us as well. Double click on your model and in the information panel under the Change Scaling section, we will get a reference of the exact measurements. In this case, we are interested in the height of the model, the Z value.
    Noting the Size
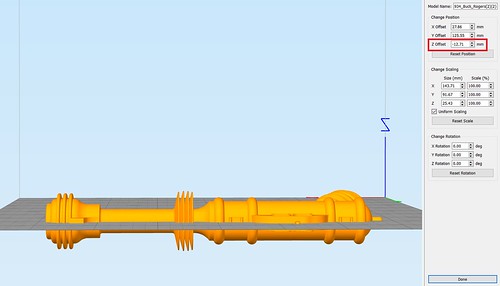
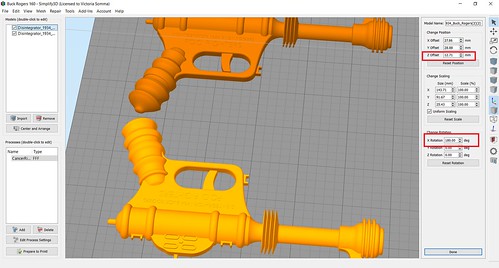
  3. Now we have some simple math. We want to lower the model so only half of it is above the print bed. That means we want to divide the height by 2. In this example– 25.43 divided by 2 is 12.71. In our Change Position section, we want to change the Z offset to -12.71 (aka Lower the model 12.71 mm).
    Positioned Half Under Build Bed
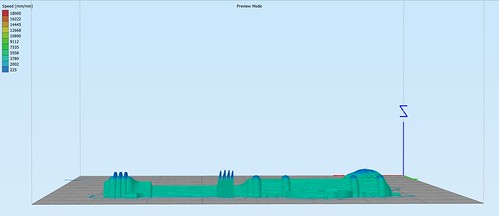
  4. At this point, half of our model is under the print bed! If we click on Prepare to Print, you’ll see that only half of the model is going to be printed.
    Everything Under Build Bed Ignored

Getting the Second Half – Simplify3D
To make a whole gun, we obviously want to print two halves of the gun.

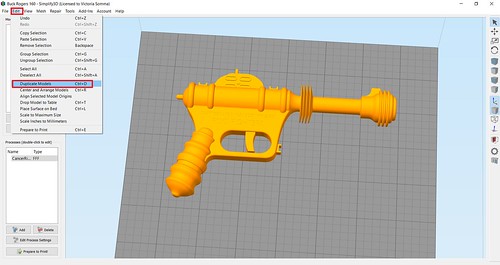
  1. Click on your model to select it and then go to Edit->Duplicate Models and make one more copy. You may have to move it around to a better spot on the build plate. (You can also click on the Center and Arrange— but you’ll have to reset your Z Offset again for the original model).
    Duplicate Models
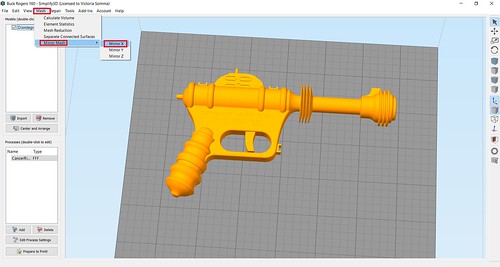
  2. Now we have to flip our new part. Gotcha– Watch Out for Mirroring! My first inclination was to go Mesh->Mirror Mesh and mirror my second half over the X or the Y axis. That could work for some models, but in the case where there is text on your model (like this), then that also mirrors your text and it too would be backwards. Mirroring should also be avoided if your model isn’t exactly symmetrical and has different detailings on each side.
    Mirror Menus

    Text Backward Mirrored
    D’oh – Backwards Text

    In lieu of mirroring, you can rotate it! Double click the object and then in the Change Rotation section, rotate the model 180 over the X or Y axis. Don’t be alarmed if your object suddenly “disappears”. It’s actually underneath your print bed. You just have to adjust the Z Offset now to move the new one 12.71 above the print bed.

    Rotated 180

Slic3r
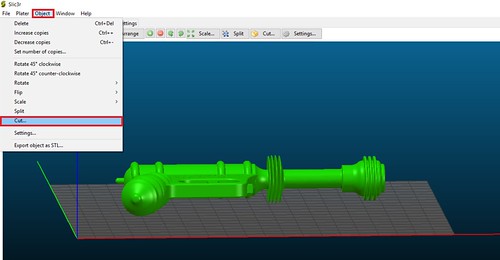
I have found Simplify3D to be absolutely 100% worth my money, but if it is not for you or your budget, you are not out of luck. You may be able to do the same thing in your slicer. As an example in open-sourced (and free) Slic3r, once you had your object on your plater, you would go to Object->Cut…

Slic3r - Object CUt

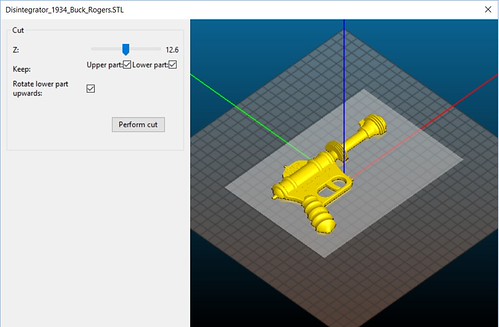
And you can pick the cutting height (and you have options to get both sides and rotate one)
Slic3r Cut in Action

And there you go, you can break your model up without modeling software like Blender. This technique’s applications are not limited to merely cutting objects in half. You can use it anytime you want to isolate out a particular section of a model to print. Say you got a 3D Hubs order and you are worried about a tricky section near the top. You don’t have to waste the time and material to run the whole print to find out that section is going to fail. Instead, you can lower your object down and do a quick print on just the troublesome section to see how it performs.

Personalized Glowing Valentines for Kids

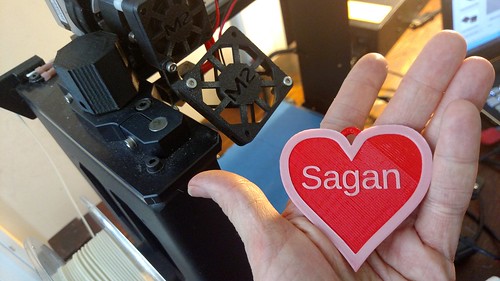
My son is named Sagan, after Carl Sagan.  Over here in the U.S., that’s a unique name.  As a result, he won’t be going into gas stations or souvenir shops and finding mass produced keychains and trinkets with his name on it.

Luckily, I have the MakerGear M2. I am not bound to get what someone else has decided to design and make.  I can make it myself!

3D Printing Valentines - Sagan

In my son’s pre-K class, a vast majority of the students are in the same boat– most of them have unique names. This seemed like a great use for the flexibility of a 3D Printer.

The Design
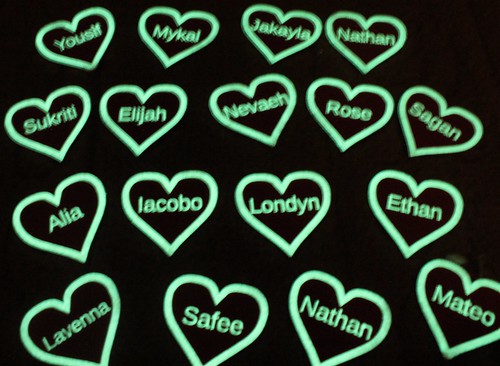
The design is not especially ground breaking. Hey, it’s a little heart pendant/medallion with a name on it. I printed most of it in ColorFabb Traffic Red PLA/PHA (duh) and then the detailing and the name are in GlowFill. One thing I have noticed with my kids is they LOVE glowing things. They love taking it into the bathroom and turning off the lights to see it glow.

Glowing Valentines

Modeling – Blender
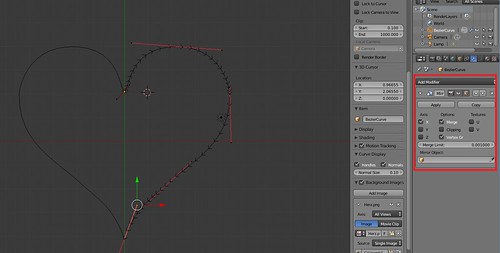
The base model I did in Blender. I started with a Bezier Curve. I used the Mirror modifier to make it symmetrical.

Modeling a Heart - Bezier Curve - Mirror

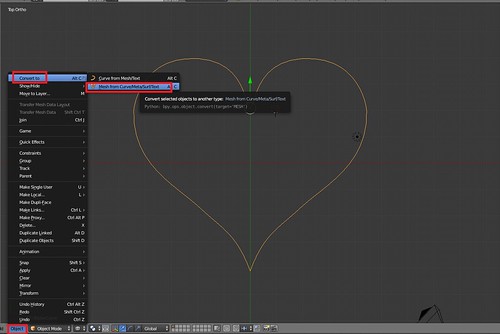
I converted the curve to a Mesh. Modeling a Heart - Convert to Object

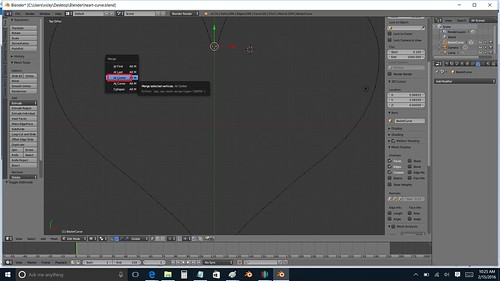
I did a little cleanup of the Vertices, by Merging a couple of oddly mirrored vertices to the center.
Modeling a Heart - Merge Vertices at Center

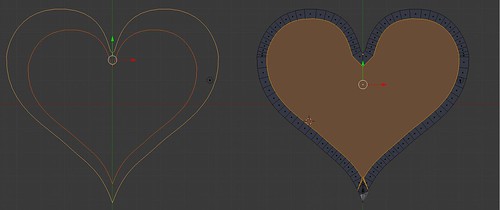
The detailing of my design, I wanted an outline of a heart in GlowFill. I’ve worked with hearts in the past and I knew that just scaling another heart down wasn’t going to do the trick. Inset is key to that!
MOdeling a Heart - Scale VersusInset
Scaling Versus Inset – Inset Will Give You Consistent Widths

I did an Inset of my face and did some manual cleanup of the vertices.

After that, it was just straight Extrusion to the heights I wanted.

The hook was just a cylinder subtracted from another cylinder (courtesy of the Boolean Modifier). I decided to keep the hook separate in case anyone wanted to print just straight up hearts.

At the end of my Blender session– I had two .STL files — my heart and my hook to make it a medallion.

Modeling – OpenSCAD
Although I had experimented with Python scripting for Blender roughly a year ago, OpenSCAD seemed easier and quicker for me. There is an Import command in OpenSCAD where you can pull in STL files. I went ahead and brought my Blender STL files into my OpenSCAD project and set a variable name for the “Child’s Name”. I was then able to rapidly run through and create 17 models for all my son’s classmates.

child_name = "Adela";
font_size=10;
y_offset=-4;

union()
{
 translate([30,10,0])
   import("heart.stl", convexity=10);

  
 translate([30,10,0])
  import("hook.stl", convexity=10);  


translate([30,y_offset,2])
linear_extrude(height=0.7)
    text(child_name, halign="center", size=font_size);
}


Slicing and Printing – Simplify3D and MakerGear M2
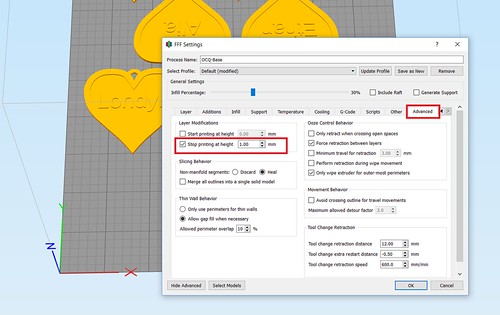
I printed on my trusty MakerGear M2. Since I have a single extruder machine, I used Simplify3D to set up two processes to print my heart:

Red
From 0.0 – 1.0mm, I printed in ColorFabb Traffic Red PLA/PHA. I printed in 0.25mm layer heights.
Slicing a Heart - First Process in Simplify3D

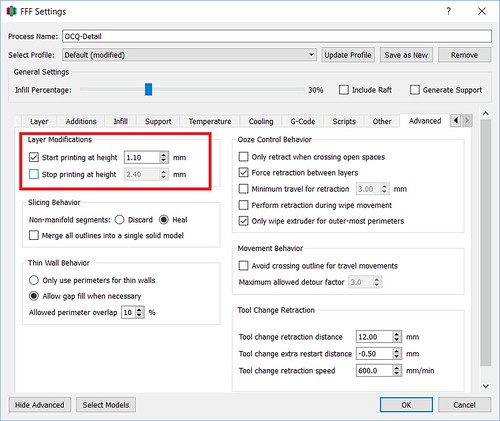
GlowFill
From 1.1 – 1.7mm, I printed in ColorFabb GlowFill. I printed those in 0.10mm heights. Usually I have found with detailing 3 or 4 layers were sufficient. In this case, because the GlowFill was a little translucent, going up to 6 and 7 layers made sure the text appeared more crisp and white. (It also gave me a little more leeway to recover if an edge came unstuck from the build plate).
Slicing a Heart - Second Process in Simplify3D

Quick Tip
And a quick tip. Sometimes parenting is harder than 3D Printing. When I printed my first batch of hearts, I was quite pleased. I showed my son and was ready for a positive response. It did not go well. I..uh… I kinda didn’t include his name in the first batch of hearts. He can read and he was quite miffed when he did not see his name. Luckily, I started an emergency print and was able to get back on his good side. But you can avoid such drama. Make sure to print your kids’ in the first batch. : )

Forgiven

On Thingiverse!
If you covet a heart for Valentine’s Day or a special occasion, I was able to make a Customizer on Thingiverse. Feel free to make your own.

Tour of my Simplify3D Settings – As Of January 2016

Another post inspired by a Twitter conversation!

Here’s a quick tour of my Slicer Settings for the MakerGear M2 (v3b Hot End) for my PLA/PHA.

Hat Tip – A lot of my settings, especially my speed settings, all stem from Ed Nisley’s Settings for the Bridge Calibration Tool. His settings are for Slic3r.  I did my best interpretation to convert them over when I started using Simplify3D.  My notes and screenshots of trying to match things up are on Flickr at:  https://www.flickr.com/photos/tgaw/albums/72157656224789835

Okay without further ado.

Extruder Tab
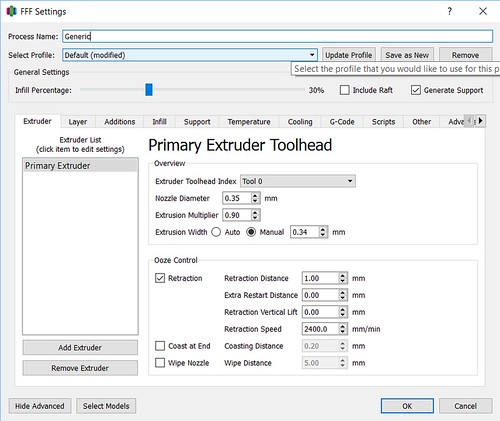
Simplify3D Settings - Extruder

Nozzle Diameter
0.35 – To match my current nozzle.

Extrusion Width
Typically– 0.35.   I have used the “Auto” which sets to  0.42 without issue.

Exception– In the case of super thin details I have decreased that to 0.34 so the printer will pick them up.  An example is a Les Paul Slash Guitar I was working on.  At 0.35, the strings were not picked up, but when I changed the Extrusion Width to 0.34, it picked them up.
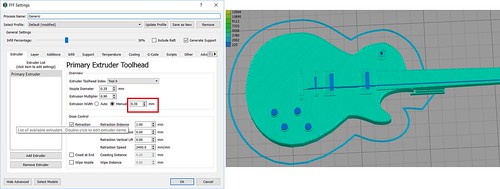
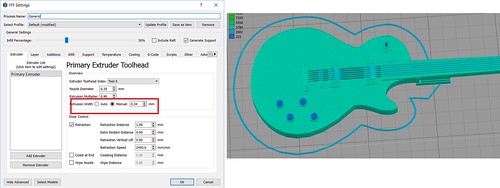
Extrusion Width - 0.35
Extrusion Width - 0.34

Ooze Control
I have not actually played with those settings a lot.  They are likely the stock settings from the MakerGear M2 profile for Simplify3D

Layer Tab
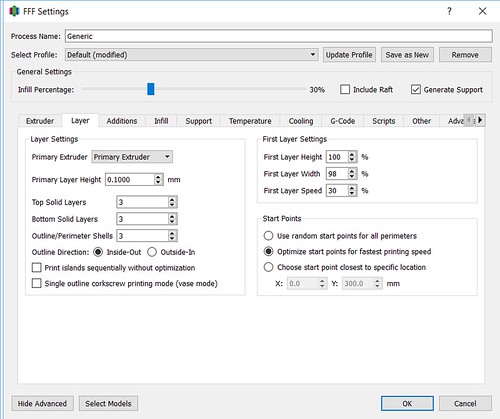
Simplify3D Settings - Layer

Primary Layer Height 
I print anywhere from 0.10 to 0.25.  It depends on the projects.  Stuff like Cork Kitties, I’m good at 0.25.  My multi-colored birds, I want the details to be as close to the base bird as I can, so I print those at 0.10.

Top Solid Layers
I usually keep this at 3.

Exception- If I’m working on a piece where the primary focus of it is going to be on the very top (such as the Les Paul Slash Guitar), I will up the Top Solid Layers, sometimes up to 10 (so 1mm at 0.10mm layer heights).  This is particularly important if I am using low or no infill. An overkill example is below, but you can see how the combination of Top Solid Layers and Infill can have an impact.

Bottom Solid Layers
I usually keep this at 3

Exception – I have Standing Cancer Ribbon that I print with extra solid layers at the bottom in an attempt to weigh the legs down more.  (I have no evidence that is necessary- it worked the first time so I kept doing it)
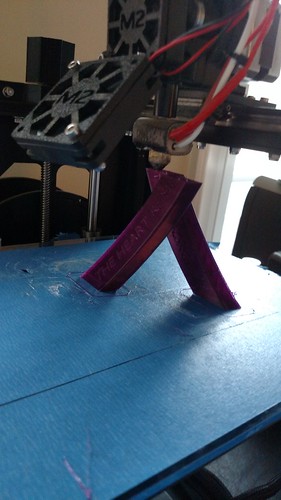
3D Printing - Standing Cancer Ribbon on the M2

Outline Perimeter Shells
Typically I keep this at 3.

Exception – If I’m doing something with bronzeFill that I expect to do extra sanding, I up this to 5.  (Hat Tip, Barnacles Nerdgasm)

Exception – If I have engraved Text at the top of my piece, I will sometimes lower the perimeters to 1 as it makes the text more crisp.
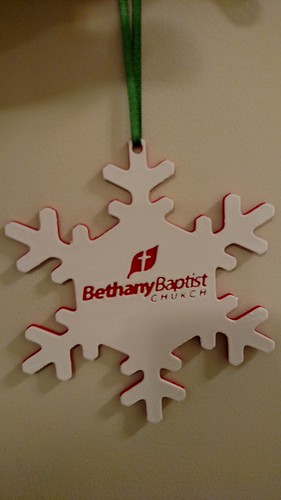
3D Printing - Snowflake Ornament for Bethany Baptist

Outline Direction

Inside-Out  – I believe this is the default and it helps with overhangs quite a bit.  Because it is starting from the inside, you are more likely to have something underneath it from the layer before to support your new layer.  So if it prints inside out, it has a good base before getting to the overhang areas.  An example is the 3D Hubs Marvin. If you look at the curvature on his butt. If the first perimeter is printing on the inside, there is definitely something there for it to print on top of.
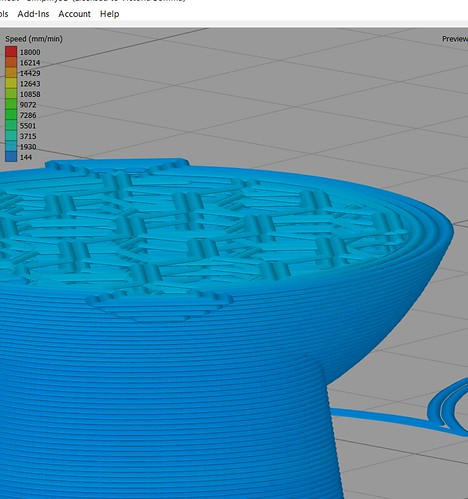
Inside Out

First Layer Height
With right now how my bed and Z-End Stop is setup, I am having great results with a First Layer Height of 0.10. So this percentage is all determined by my Primary Layer Height.
If I’m printing at 0.10 layers, I use 100%
If I’m printing at 0.20 layers, I use 50%
If I’m printing at 0.25 layers, I use 40%, etc.

First Layer Width
Converting Ed Nisley’s Settings from Slic3r, I came up with 93%.

First Layer Speed
This I keep at 30%. I believe that also stemmed from my Slic3r settings.

Start Points
I use Optimize Starting Points for Fastest Printing Speed. This I stumbled upon trying to get rid of some pimples and oozing on some prints. Once I checked this, my problems disappeared. I suspect this could also be addressed with Retraction Settings but right now, this solution is working great for me.

My #3DPrinting Victory of the day – finding the right settings to get rid of these retraction blobs. Success!

A photo posted by Vicky Somma (@vickytgaw) on

Temperatures
Simplify3D Settings - Temperature

Primary Extruder
I use 210 for all my ColorFabb PLA/PHA

For my MakerGear PLA (my White, Orange, Silver, Black, Purple), I will often use 215, but will sometimes drop that down to 210 if I’m doing something with a lot of overhangs.

BronzeFill and GlowFill I typically use 210.

Heated Bed
Get this. I’m in love with printing on a cool bed on painters tape (And I have that luxury with the materials I have been working with). So I have that set to 0.

Cooling
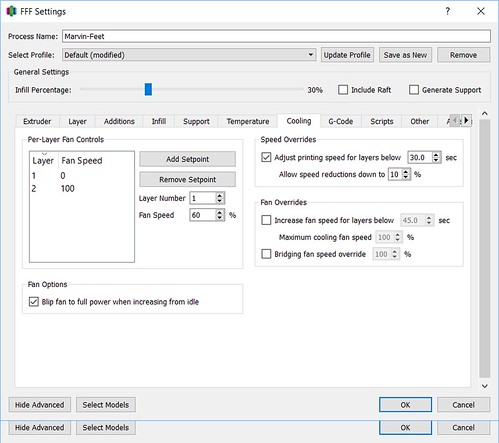
Simplify3D Settings - Cooling

Speed Overrides
When I was trying to print 3D Benchy, I noted my results in Simplify3D were not as good as my original prints in Slic3r. I went back and reviewed my Slic3r settings and found a whole section I had skipped over because it looked waaay too intimidating.

Now if I am working with a print with lots of overhangs or small details that will need to cool, I will check “Adjust printing speed for layers below” and I set it to 30 (down from 60). I also give it way more leeway with how slow it can go– I set that to 10%.

I often will uncheck this setting if my printer is really flat and straight forward and really doesn’t need extra time to cool before starting the next layer.

Other
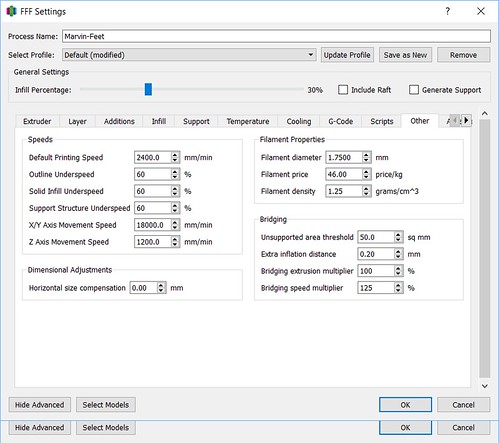
Simplify3D Settings - Other

For my printing speeds, it is all my calculations of my old Slic3r settings that I based off of Ed Nisley.
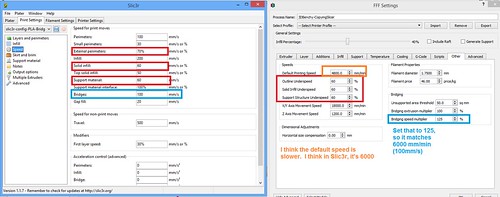
SlicerSimplify3D-11

Default Printing Speed
4800.00 mm/min (which is 80mm/sec)

Bridge Speed Multiplier
I set to 125% to get it up to 100mm/sec.

Conclusion
And there you have it. A tour of my settings. Areas where I think there can be some improvement– I do have a model that is subject to some stringing, so I may want to play with lower printing speeds.
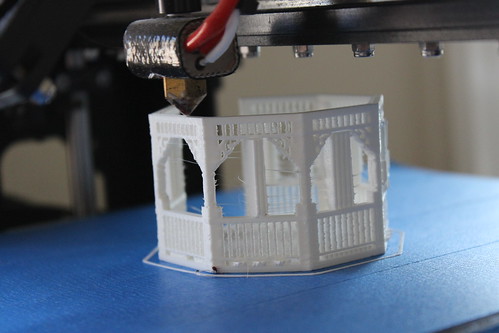
3D Printing - Mamie Davis Ornament - First Prototype Printing
Stringing In the Gazebo

And it is possible I can improve my retraction settings, but like I said above, with my Starting Point settings, that issue has not been bothering me.

Quickie Tutorial – Getting the Extruder To Run Some Filament Before a Print

I butted into a conversation in Twitter today (That’s socially acceptable right?  I hear it’s the cocktail party of the Internet) and the question came up how to get the Maker Gear M2 to run some filament before the print.

Well, since I do a lot of material changes within  prints, that is something I do know how to do.

Simplify3D – Jog Controls
You can tell your printer to do all sorts of things in the Machine Control Panel section of Simplify3D.  For that, you would:

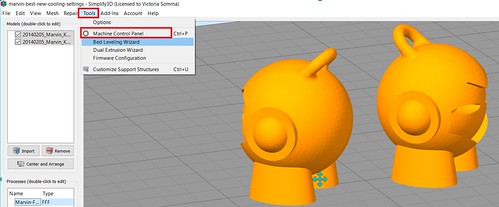
  1. Click on Tools->Machine Control Panel.Extruding Filament Before a Print
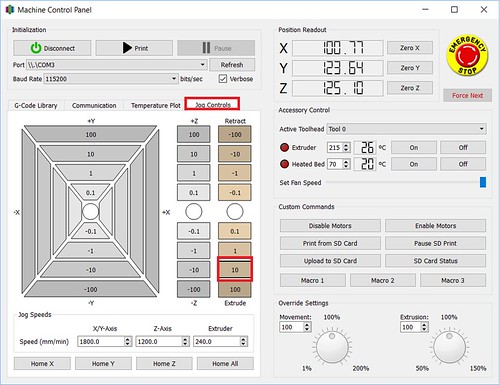
  2. And then you can go to the Jog Controls Tab.
  3. There is an Extrude section, where you can tell the printer to extrude out 0.1mm (tiny, tiny!), 1mm, 10mm, 100mm. I am typically using the 10 or the 100 button.

Extruding a Filament Before a Print - Jog Controls

Tip: If you already have a print on the bed, I put a piece of paper over it so it doesn’t get messed up with the extruded filament.

Gotcha: The printer has some built in safeguards– it won’t do a “Cold Extrude”.  It won’t extrude unless the nozzle is heated up.  If you are hitting those Extrude buttons and the printer is not listening to you, it may be that it isn’t heated up yet. (The G-Code command M302 supposedly turns off the Cold Extrude safeguard, but I have never tried it)

Simplify3D – Custom Starting Script G-Code

Simplify3D allows you to set up custom code for various stages of your print, including the start up.   To edit those, you would:

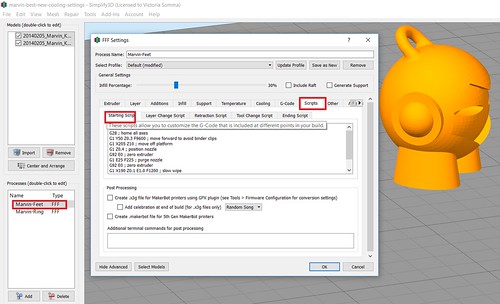
  1. Double click on your setting profile in the bottom left hand corner
  2. Click on the Scripts tab
  3. Click on the Starting Script tab

Extruding Filament Before a Print - gCode

For all my simple prints, I use the stock Starting Scripts that came with the Simplify3D Default Profile for the MakerGear M2 (24V vb3 Hot End) (I do customizations for my multistep prints)

M108 S255 ; turn on M2 fans
G28 ; home all axes
G1 Y50 Z0.3 F9600 ; move forward to avoid binder clips
G1 X205 Z10 ; move off platform
G1 Z0.4 ; position nozzle
G92 E0 ; zero extruder
G1 E25 F225 ; purge nozzle
G92 E0 ; zero extruder
G1 X190 Z0.1 E1.0 F1200 ; slow wipe
G1 X180 Z0.25 ; lift

Simplify3D -G-Code Via Communication Tab
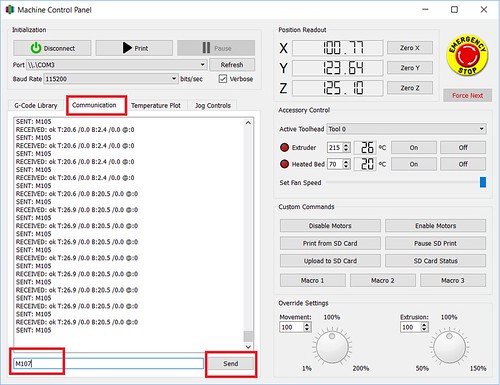
Want to be a little more hard code than the Machine Control Panel tab, but don’t want to commit to a change to your Starting Script?  You can also send direct G-Code commands to your printer by:

  1. Going to Tools->Machine Control Panel
  2. Clicking on the Communication tab
  3. Typing stuff in the text box in the bottom and hit Send.

Sending Commands Through the Communication Window

Tip: A good reference for G-Code syntax is at: http://reprap.org/wiki/G-code

Gotcha: The commands are CASE sensitive.  m107, for example will not turn off my cooling fan, but M107 will.  : )


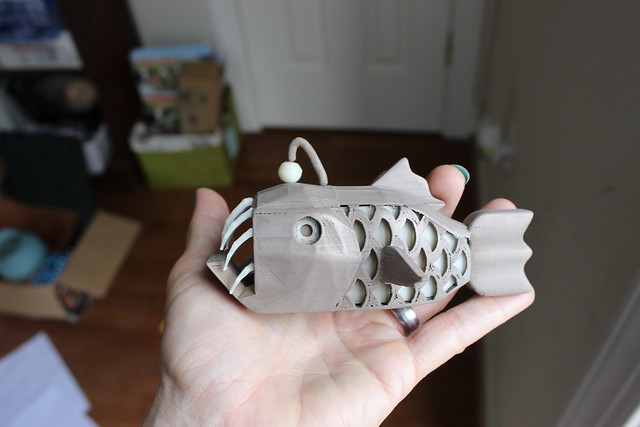
Print Diary – Anglerfish in colorFabb BronzeFill and GlowFill

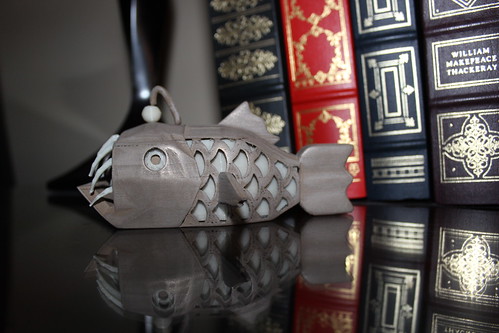
After months of craft shows and custom orders, my very last design and print for 2015 was something for me! As soon as I received my first spool of ColorFabb GlowFill, I wanted to do an anglerfish. I’m almost done with that roll, so this seemed to be the time. And as luck would have it, PrintedSolid and reddit were running a mixed material use contest. Destiny! I designed and printed my anglerfish in BronzeFill and GlowFill on my MakerGear M2. The GlowFill parts were actually inserted into the fish and sealed in as the BronzeFill printed.
3D Printing - Anglerfish - From Side By Books
Tada! Anglerfish!

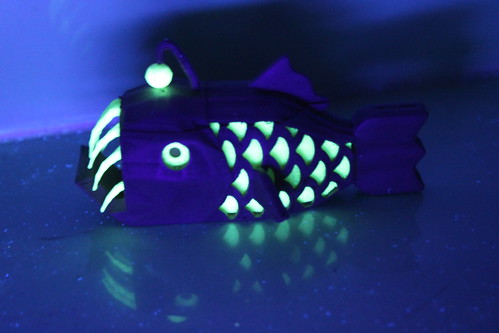
As you may expect, the GlowFill parts glow in the dark and the blacklight.

3D Printing - Anglerfish - Glowing in Blacklight 2
Glowing Anglerfish

Material Choices
I chose two materials for my anglerfish, both were mainly selected for aesthetic reasons:

  • colorFabb BronzeFill – The bulk of my print was in bronzeFill. To me, bronzeFill elevates designs. It’s heavy, so it feels expensive. It gets a sheen with sanding so it also looks expensive. I have found it to be a forgiving material as it is so easy to sand afterwards and redeem. I only had time for one print of my design before leaving for vacation. I needed a forgiving material. : ) I’ve also seen it bridge and do overhangs well, so I knew it was a good fit for my fish.
    Semantics also play a little bit of a role. Bronze pulls with it connotations of the Bronze Age– gladiators and warriors. Bronze is a material of badasses. Anglerfish withstand immense pressures down there at the bottom of the ocean. They warrant a badass material.

  • colorFabb GlowFill – And GlowFill was a no brainer. To really do justice to an anglerfish, I needed him to glow. : )

Design
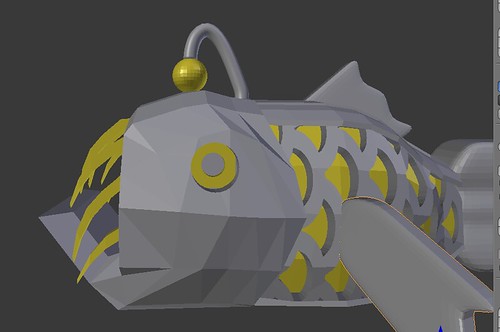
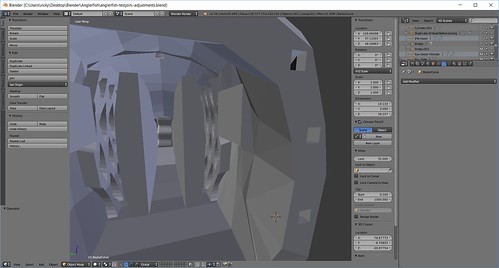
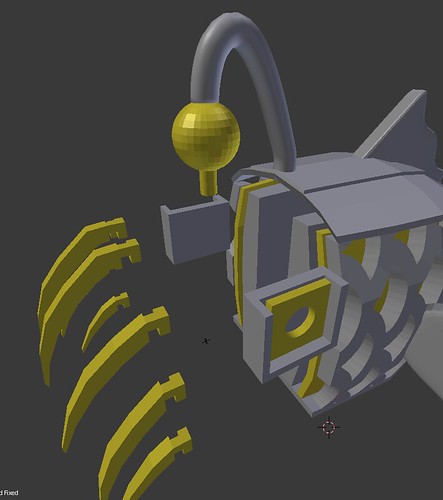
I designed my angerfish in Blender. I designed cavities and supports inside the fish to hold our GlowFill pieces. That way, I could insert the pieces and let the rest of the print seal them in.

3D Printing - Anglerfish - Laying Out Both Colors in Blender
Model in Blender

3D Printing - Anglerfish - Visual of the Innards in Blender
Cavities Inside the Fish to Hold GlowFill Details.

So for example, the glowing eye detail. Inside the head of the fish, I have a little rectangular holder to keep that detail in place. I wanted the pupil of the eyes to remain dark, however, so that glowing eye detail had a circle cut out so the BronzeFill behind it could show through.

3D Printing - Anglerfish - Illustration of the Glowfill Part Placement in Blender
A View To Show the Relationship of How the GlowFill Eye Would Be Supported

Printing – GlowFill
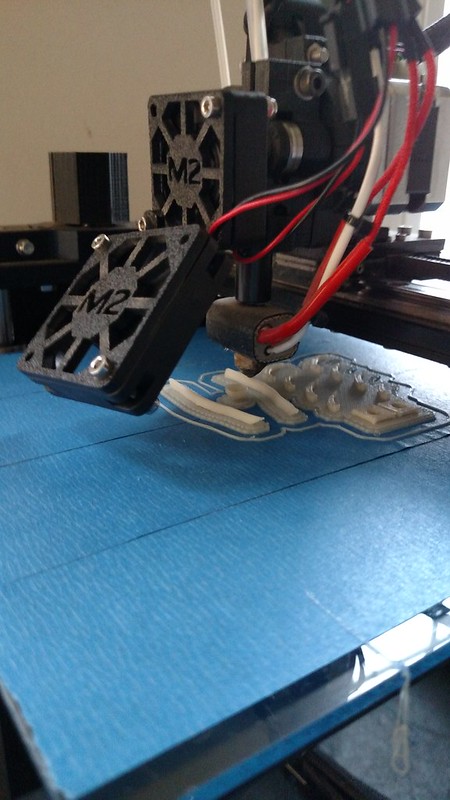
I printed all the GlowFill pieces first. Very straight forward– 0.25mm layers, nothing super special.

Anglerfish - GlowFill Parts

Printing – BronzeFill
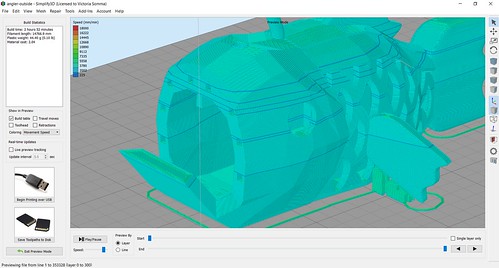
BronzeFill is where the thinking came in. I still printed at 0.25mm layers. Using Simplify3D, I set up nine separate processes for the BronzeFill. At the end of each process, the print would stop, the Z bed would drop 100mm allowing me to insert in the appropriate GlowFill piece(s) before starting the next process.

3D Printing - Anglerfish - Different Starting Points in Simplify3d
Preview in Simplify3D, the Blue Lines Illustrate Stopping Points

3D Printing - Anglerfish - Layer Modifications in Simplify3d
Using Layer Modifications in Simplify3D

3D Printing - Anglerfish - Custom Ending Script in Simplify3D
Custom Ending Script in Simplify3D to Just Drop My Bed At the End of the Process

3D Printing - Anglerfish - Printing After Eye Inserts
After Eye Detail Was Inserted

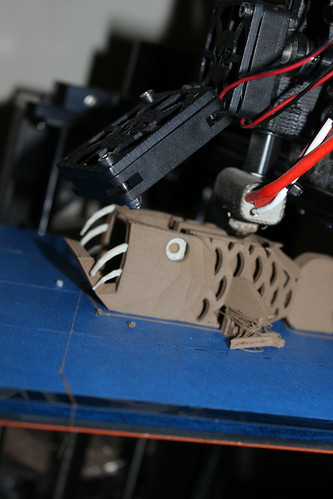
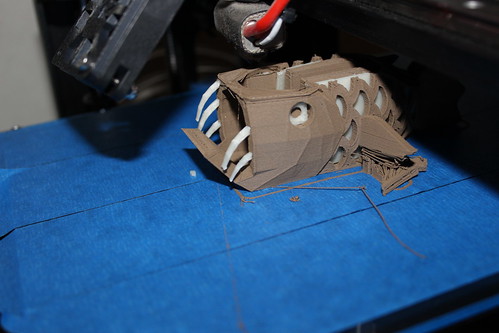
I did have a bobble. When I inserted my side panels, I noticed they were a little higher than the BronzeFill layers around it. I thought it would be safe… but it knocked my nozzle and offset the X a bit. The seam you see in the pictures is the product of that shift. Lesson learned — better safe than sorry. : )

3D Printing - Anglerfish - Side Inserts
The Bobble

I did also end up printing the little dangly do-dad on the top of the fish separately. That was unplanned, but serendipitous as the fish would have been a pain to sand with that delicate detail in the way.

Finishing
I sanded the fish with three separate grades of sand paper and I finished him off with super fine steel wool.

Lessons
I only had time for one print and I do have adjustments I would make for my next run. First off– the teeth are not worth installing during the print. It was a lot of stops in the print to insert the teeth and the sanding. My gawd, the sanding. Those teeth were just a nuisance during sanding. I did get a little thrill each time I installed a tooth and had the print seal it in, but it wasn’t worth it. Next time, I’m just going to glue the teeth in after the fact.

Secondly, I learned to decrease the height of those side GlowFill panels slightly so I don’t get my nozzle knocked. : )

Even with my little bobble, I am thrilled with my anglerfish. Love!

3D Printing - Anglerfish - In Hand
I Did It!

More photos of my Anglerfish and its process can be found on my Flickr site.

Event Recap – Occoquan River Communities’ Winterfest

Greetings All! It’s been a busy fall, full of custom design orders and events. My last event for 2015 was the Holiday Arts Market at Tackett’s Mill. It was part of a large Winterfest organized by the Occoquan River Communities.

Lesson: It Doesn’t Hurt to Ask
By the time I heard about the Holiday Arts Market, it was well past their submission date. I went ahead and sent an email to the organizer to see if they still happened to have openings and guess what– they did. Not only that, the booth fee was free. And on top of that, the Holiday Arts Market was in the same building as Santa Claus would be after the parade. I am very thankful they let me into the show so late.

IMG_20151212_114422224_HDR
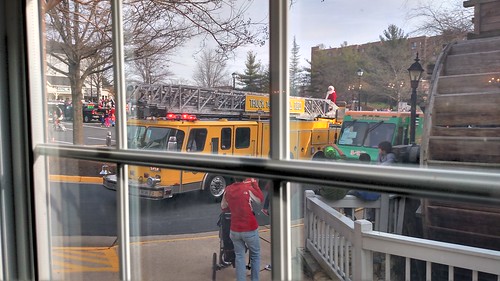
Santa Arrives

Setup
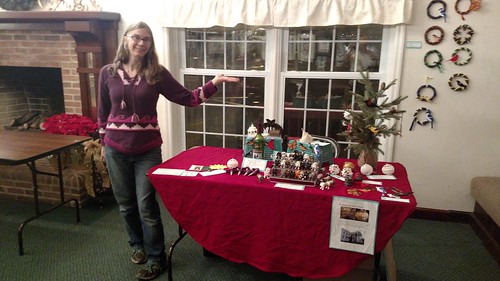
For this show, they did have electricity, so I brought the printer along. They also allowed people to hang things on the wall, so I put all my wreaths and magnets on the wall behind me, allowing me to squish everything else into a single table. I did not show any of my jewelry this show for two reasons– 1) Lack of space and 2) I sold all out of my Helix Heart Pendants the weekend before.

It was refreshing to be in an indoor venue for a change and I didn’t have to tack all my signs down.

The other artists were amazing. I loved their work and even though they have been doing this for so much longer than I, they were all very supportive of me and my work. They made me feel very welcome.

IMG_20151211_172227841
My Setup the Night Before

Big Start
The first half hour of the show was crazy busy. Crazy busy. 67% of all my sales occurred in the first 30 minutes of the show. At one point in time, there was a queue of people lined up waiting to pay.

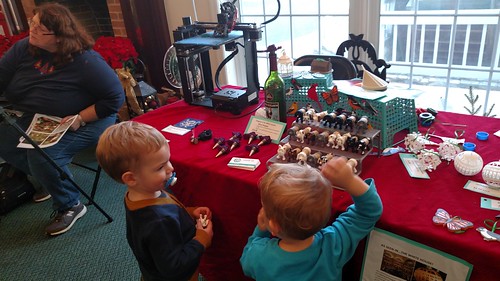
After that, it did slow down immensely. It gave me a chance to visit with the other artists and my children. As a bonus surprise, my two year old nephew and his parents stopped by for a visit.

IMG_20151212_135056884
My Nephew and My Youngest Son At The Booth

Winners
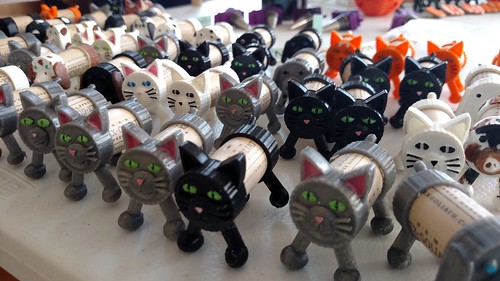
For this show, the biggest winner was the Cork Kitty! All but one lonely white cat sold.

3D Printing - Amry of Cork Kitties
Cork Kitties – SOLD!

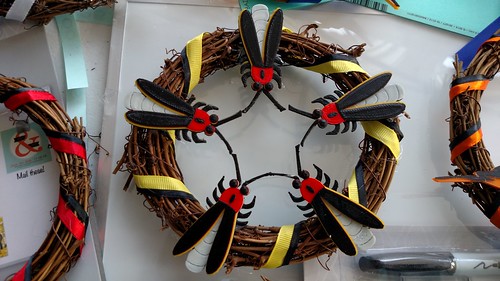
The five Firefly wreath that I secretly hoped no one would buy did get purchased. The fireflies butts glow in the dark and the way they were positioned on the wreath, the glowing makes a star. I will have to make another one.

3D Printing - Firefly Wreath
Firefly Wreath – SOLD!

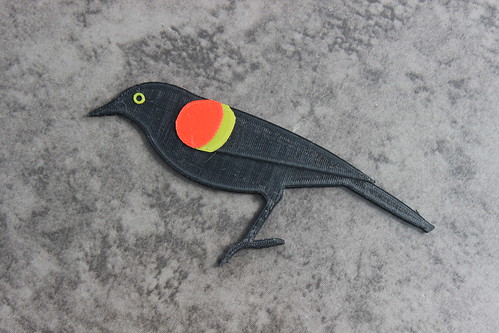
Cardinals continued to have a strong showing. Hummingbirds and Goldfinches made sales and a big congratulations to the Red-Winged Blackbird who got his real first sale!

3D Printing - Redwing Blackbird
First Sale! Red-Winged Blackbird

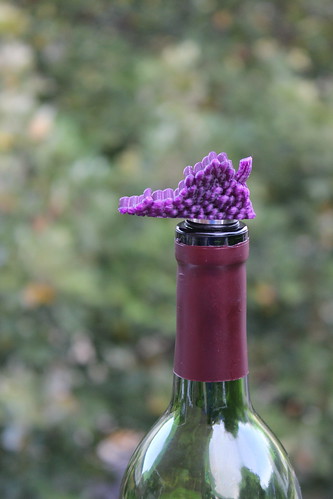
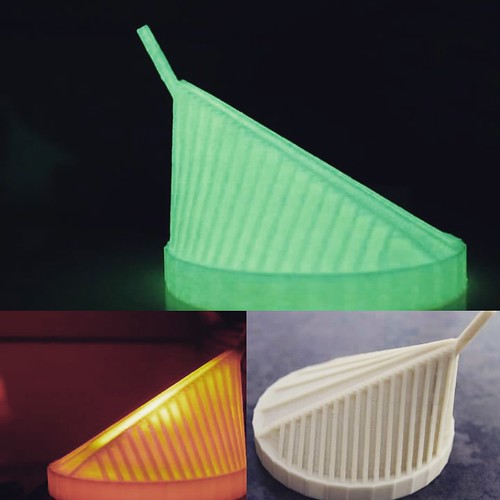
Virginia is for Wine Lovers bottle stoppers did well as usual as did that Glowing Cthulhu Coaster. Every single show– I sell Glowing Cthulhu Coasters (often to the point of selling out). It still amazes me how well they do.

3D Printing - Virginia is for Wine Lovers Stopper

The Glowing Marine Corps Museum (which I have yet to blog about) did well. The great thing about that product is just two sales covers an entire roll of GlowFill!

3D Printing - Glowing Museum of the Marine Corps
My Glowing Ode to The National Museum of the Marine Corps

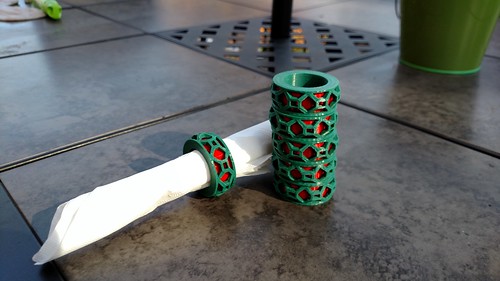
My two-color holiday napkin rings (another thing I need to blog about) got their first “Craft Show” sell as well.

IMG_20151108_103416835
Napkin Rings – SOLD!

Phew. It was a good day, but at the end of it, I was thankful that was my last show in 2015. The next show on my docket right now isn’t until March. I’m hoping to catch up on my blogging in Q1 2016… and launch my 3D Printing YouTube Channel!

Blogging the trials and successes of 3D Modeling, 3D Printing…and trying to make a business out of the whole thing. : )