Occoquan Arts and Craft Show – September 26th and 27th!
First off, I’m in! My application to the Fall Occoquan Arts and Crafts Show has been accepted (with multiple explanation marks from the show director). It’s official– TGAW 3D is the show’s very first 3D Printing Booth! Hopefully, we’ll be setting a trend for future shows.
Even better news– our booth is going to be adjacent to my brother’s shop, which means we’ll have access to power. Weather permitting, Ryan and I will be bringing the MakerGear M2 down and have it running. We’ll also have our Kinect on hand in case anyone wants to get themselves scanned. 🙂
If you are in the area, stop by and see us!

Automating Pumpkins
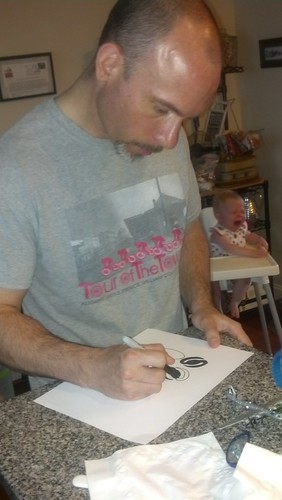
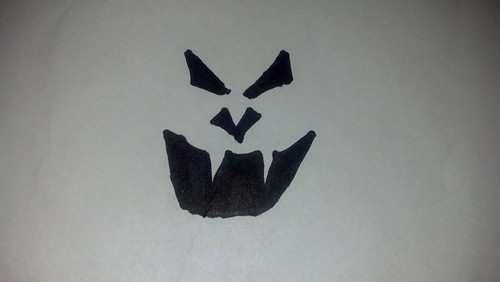
My ultimate game plan with the Glowing Pumpkin Pendants is to take advantage of one of the great perks of 3D printing– customization. I want people to draw/design their own pumpkin faces. I have my base pumpkin model. I would just need to make their face into a model and subtract it from my pumpkin. Thinking ahead, I did some experiments. I grabbed a Sharpie, drew a face and scanned it as a black and white image.
Now what?
OpenSCAD?
Looking over the OpenSCAD documentation, it looked like I might be able to use the Surface feature to achieve my goal. It uses the greyscale values of an image to determine the various heights of a surface. Since my image was Black and White, it should give me a template to carve out of my pumpkin.
It did make my face surface as planned… but it had a bottom plane underneath it. No worries, I rotated it 180 degrees. At this point, all I would need to do is position it, size it, and subtract it from my pre-existing pumpkin template.
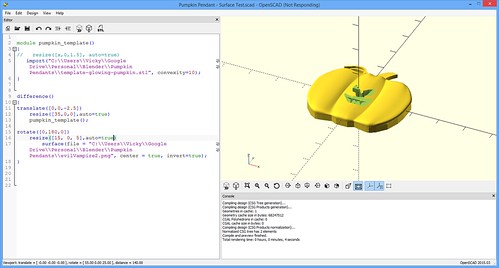
I got it carved out, albeit a lot smaller than I wanted. At this point, I had to abort. I do truly believe OpenSCAD could be a viable option. But the rendering times were sooooo long. And then anytime I wanted to scroll or examine my object, I would have to wait again.
Disclaimer- It very well could be my old laptop from 2010 that has dwindling harddrive space…courtesy of all my 3D modeling.
If you’d like to explore this option further, my OpenSCAD code is below for reference and you may also want to refer to CubeHero’s Emboss and Impress Images onto a Surface in OpenSCAD article.
[js]
module pumpkin_template()
{
//This is me importing in my base pumpkin template
//what I want to carve the face out of.
import(“C:\Users\Vicky\Google Drive\Personal\Blender\Pumpkin Pendants\template-glowing-pumpkin.stl”, convexity=10);
}
//This difference command is me subtracting my
//face surface from my base pumpkin .STL
difference()
{
translate([0,0,-2.5])
resize([37.275,0,0],auto=true)
pumpkin_template();
//This is me making my surface file based on my PNG
//of my face. I rotate it 180 degrees so the solid
//plane base is on top (and out of the scope of my carving
rotate([0,180,0])
resize([30, 0, 5],auto=true)
surface(file = “C:\Users\Vicky\Google Drive\Personal\Blender\Pumpkin Pendants\evilVampire2.png”, center = true, invert=true);
}
[/js]
InkScape?
Inkscape seems to be a very powerful way of turning images, logos, and patterns into scalable vector graphic images that you can import into Blender or other modeling software. I’ve seen many people having success with it on the Internet.
One of those people just isn’t me. : (
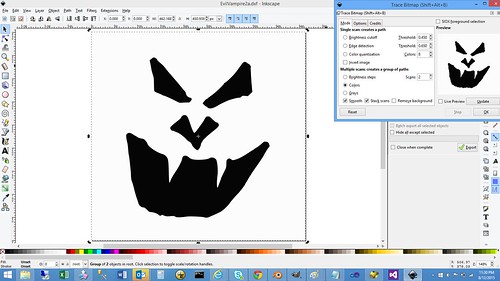
I’ve tried using it for three different projects over the last 18 months. Each time, I’ve ended up with a model that is cumbersome to edit and full of mismatched face normals. It just seems like I have an awful lot of cleanup to do. And not fun, “I’m learning more about 3D modeling” cleanup– tedious, demoralizing cleanup (“What– now I have even MORE non-manifold edges? #@(*&$I*!”)
Disclaimer- This could end up being user error– something like I should export to a different SVG format instead of the Inkscape SVG.
ShapeJS
Interestingly enough, the tool I found I liked the most is Shapeway’s JavaScript-based library, ShapeJS. Just like OpenSCAD’s surface, you can upload an image and the colors in that image is used to make your model.
I stole code from their Absinthe Spoon example, uploaded my Black and White image and very quickly I had a model.
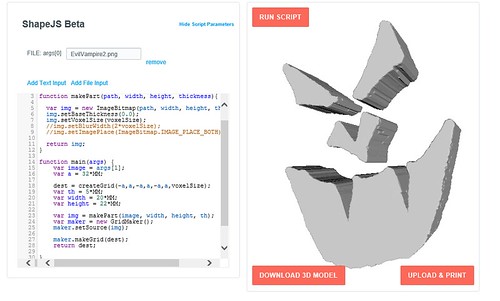
They have a Download 3D Model button, but I couldn’t seem to get that to work in Internet Explorer or Chrome.
My workaround was:
- Click on Upload & Print button.
- When the new Model details came up, I clicked on the Download button near the top and saved the file to my desktop.
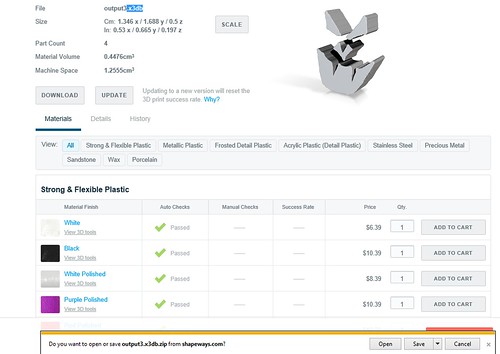
- This downloaded a zip file, so I extracted the inside
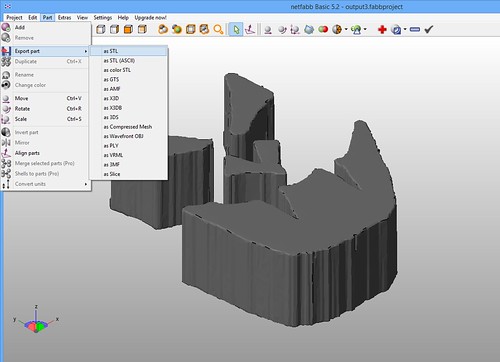
- D’oh. This file was in x3db format. I wanted .STL. I had the free version of NetFabb Basic on my machine. I opened that up, added my x3db part and then went to Part->Export Part->as STL. (Hat Tip, StackOverflow!)
- Yay! I had my .STL
Yes– that is indeed a lot of steps. But guess what– I found it still better than Inkscape cleanup. : )
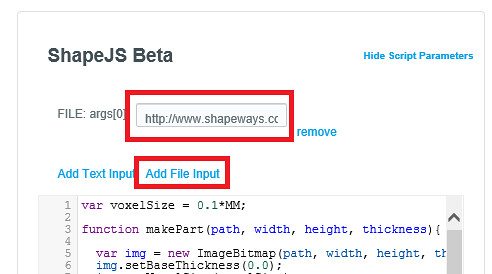
If you wish to follow in my footsteps, here’s my ShapeJS code. To compliment the code, you’ll want to click on Add File Input at the top of the code editor and then upload the file you wish to use.
[js]
var voxelSize = 0.1*MM;
function makePart(path, width, height, thickness){
var img = new ImageBitmap(path, width, height, thickness);
img.setBaseThickness(0.0);
img.setVoxelSize(voxelSize);
return img;
}
function main(args) {
//This argument (arg[0]) is our PNG file.
//I add by clicking on the “Add File Input”
//and then I upload the file I want to use
var image = args[0];
var a = 32*MM;
dest = createGrid(-a,a,-a,a,-a,a,voxelSize);
var th = 5*MM;
var width = 20*MM;
var height = 22*MM;
var img = makePart(image, width, height, th);
var maker = new GridMaker();
maker.setSource(img);
maker.makeGrid(dest);
return dest;
}
[/js]

Other Options
There are most definitely other options out there. I’m sure my learning and experimenting will continue. Last night, for example, I was just reading an article by Chris Gerty about using Online-Convert to do the same thing. H.G. Dietz’s Trace2SCAD looks interesting as well.
But for now, the ShapeJS method has served me well. My husband drew me two new faces that we were able to model and print quickly this past weekend.