Embedded Magnetron Tubes by RJ Make

Not a project or video of mine, but I just love this example of an embedded object by RJ Make. He shows us how to extra Magnetron Tubes and then uses Simplify 3D to embed it in a print.

RJ uses a different Simplify 3D technique than I do. I tend to rely on Multiple Processes with custom Starting and Ending Scripts. RJ takes advantage of another section of that Scripts tab. In the Additional terminal commands for post processing, you can set up special code that runs against the G-Code Simplify3D makes to print your object.

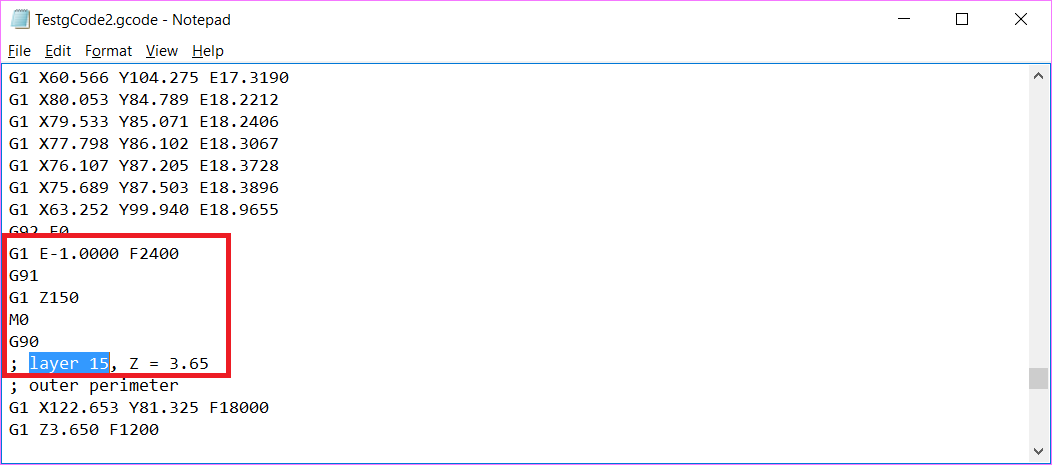
If you pull up your G-Codeinto a text editor like Notepad, you can see that each layer is prefixed with a comment in the G-Code.  In the screenshot below, the text “; layer 15,” indicates the very start of my Layer #15.

Layer15

This gives you a nice place mark and opportunity to do a search and  replace . You use \n for your Carriage Returns. Other than that, everything is normal G-Code.

In RJ’s case, he told Simplify 3D to find the spot in his gCode where Layer 54 is about to begin and he replaced it with:

G91 (putting the machine in relative mode)
G1 Z150 (telling the machine to move the nozzle up 150mm
M0 (the pause command for RJ’s printer)
G90 (putting the nozzle back into absolute mode so it has its bearings when RJ resumes the print).

{REPLACE "; layer 54," "G91\nG1 Z150\nM0\nG90\n; layer 54,"}

I tried it out in my Simplify 3D (for a much smaller print at Layer 15)

Additional Terminal Commands

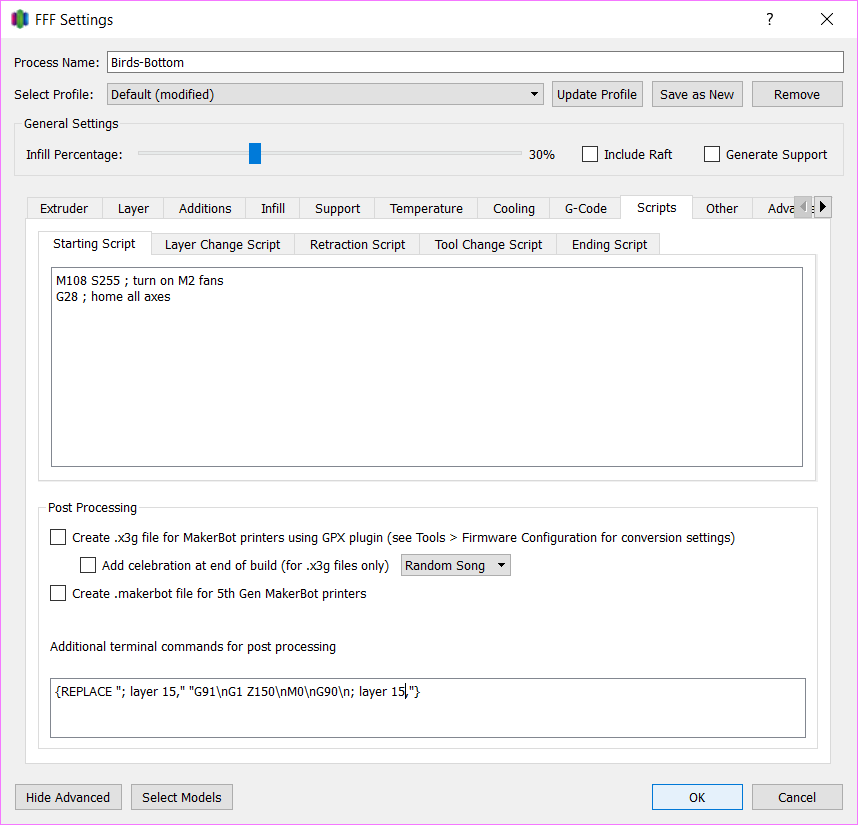
Simplify 3D compiled the G-Code and ran the Search and Replace, so the additional commands were at the very right spot, right before my Layer 15.

Layer15AfterREplace

One thing that intrigues me about this technique is what I call my “sealing” layers, the layers that will be sealing my object in.  Often these are the very first layer of a brand new process, so they are picking up my First Layer Settings (which I do adjust accordingly).  When you use this technique, the sealing layer would be picking up the bridging settings.

I look forward to giving RJ’s technique a try!

Wanna Learn More?
Documentation on this Simplify3D Feature can be found at: Tip of the Day 8 – Scripts Tab, G-Code


Spool Holder Switch on The Wanhao

Ha! I have had not one but TWO YouTube commenters point out that my Spool Holder on the Wanhao was backwards. I did a Google Image search and sure enough– it appeared I was the only person in the entire world that had mine pointing towards the outside of the machine.

I felt a little relieved when I looked at the Quick Start Guide. At first glance the image made it look like I wasn’t a complete trail blazer. When I looked at the picture, I saw the spool holder pointing outwards…. like mine.

3D Printing - Wanhao Spool Holder Mystery

But when my husband looked at the picture, he saw it differently. It’s the angle of the image. It is pointing to “outside” of the machine— but the other side. So it is still pointing to the center like the rest of the Wanhao User Base.

When I decided the Wanhao was going to be accompanying me to the Maker Faire Nova, I decided it was time to make a correction. First thing in the morning, I got out an allen wrench and made the switch.

I am now assimilated! 🙂

(And I think my filament is going to thank me for it)

Painters Tape for the Wanhao!

The last full printing day before Maker Faire Nova, I went to start a print on the Wanhao and the whole machine shut down.  The LCD Panel went black, the steppers turned off, the works.

Anomaly?

I turned the machine off and on and tried again– same result.

I turned the machine off and on and then went to Quick Settings->Preheat PLA— same result, the machine died.

I figured the worse, but I did a quick Google search and the very first link I pulled up was a discussion on Thingiverse about how the motherboard can’t always handle the load of the heated bed.

Hmm….  Worth an experiment.

I turned the machine back on and I tried just heating up the Extruder.  The machine kept running.

Well if the 3D Printing Dieties were trying to stop me from printing on that Wanhao, there is something they don’t know:

I actually kinda like printing on Painter’s Tape!  🙂

I know, I know.  I’m in the vast minority.

  • I fancy how fast I can start and remove prints (not waiting for the bed to heat up and cool down).
  • I also like how if my first layer is a little too close and the print wants to  be stubborn coming off, I have the freedom of just using the BuildTak Spatula to rip the tape to remove my object.
  • Finally, for things were I want the top layer and bottom layer to be similar in appearance (like dice or spinning PokeStops), I find the Painter’s Tape to have a better match than the shiny gloss that comes with a heated bed— particularly a glass heated bed.

The things I wanted to print didn’t need a heated bed, so I resliced with no heat and the show went on!
3D Printing - Painter's Tape on the Wanhao

What I Have in the Works for #MakerFaireNova

At the time of publishing this video, I have about 8 days left until Maker Faire Nova on March 19, 2017. More information about the event and tickets can be purchased at http://nova.makerfaire.com/

For my third time participating, I am focusing on 3D prints with embedded elements. With the help of my MakerGear M2, the Wanhao Duplicator i3, and my ever trusty Simplify3D, here’s what I got brewing:

Embedded Prints Within Prints

  • Glowing Anglerfish
  • Multi-colored Gyro Cube
  • Giant Spinning PokeStop*

*I may have attached it differently had I seen Joel Telling’s 200mm bridge first over at 3D Printing Nerd https://www.youtube.com/watch?v=nL0nWJ__PNM : )

Embedded Mirrors

  • The mirrored candleholder
  • A mirrored vase*

*The mirrored vase can also be seen on A Pyro Design’s channel at https://www.youtube.com/watch?v=-IL3q7-osqE

Embedded Nuts

  • Taphandles (as seen in my last video)
  • WIP – Rhododendron Drawer Pulls

Embedded Sand!

  • Standing Cancer Ribbons
  • A dramatic 131 gram difference with Rockledge Mansion Christmas Ornaments

Embedded Split Rings

  • Work In Progress – A long chain of “Kinetic Houndstooth”. What I’m doing with that…. Phew, to be determined.

Embedded Corks

  • A Wine Holder…Made of Old Wine Corks! : )

Embedded Magnets