axieses
As the Nova Mini Maker Faire came to a close, my demonstration print was far from done. I stopped the print, turned off and unplugged the machine, loaded the machine up into the trunk of my car, drove the 26 miles home (with a strategic stop by Burger King for some yummy yummy Chicken Fries), and set the machine back up at home. A week later, I was ready to start printing again and I wanted to start where I left off. I was able to do so with my trusy MakerGear M2 and Simplify3D. Here’s how!
Homing the Axes
Before I could resume printing, I needed to rehome all my axes so my nozzle had all its bearings, particularly the tricky Z axis. In this case, my print was not very high, so under the Machine Control Panel in Simplify3D, I was able to move the bed around to a good spot for me to hit Home Z without my print hitting the nozzle or the X axis support bar.
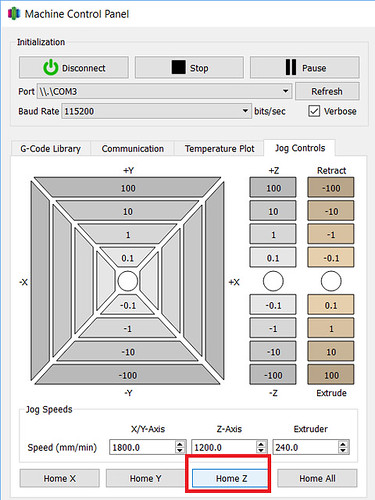
Homing the Z axis can be trickier with taller prints. Since the MakerGear M2 set its Z-Endstop with a bolt on the side of the bed and it has a removable glass bed, I do have a little “hack”. When resuming taller prints, I remove the glass bed, home all the axes and then replace the bed. Sometimes there is a slight variation with the positioning of the print, but so far it has not been very noticeable in my final prints.
Where to Restart
I know, I know. There are downsides to printing via the USB cable. An upside though– in Simplify3D, you have a continuous update of exactly where the nozzle is, most notably how high it is in the Z axis. In the case of my Maker Faire print, I was the one that stopped the print, so I was able to note and record the exact Z position I stopped off at. That meant I knew exactly what height I wanted to restart the print at.
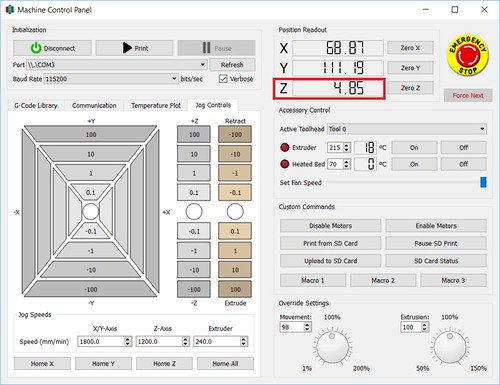
Sometimes I don’t have that kind of information at my disposal. The other week, I had a filament tangle. I returned to my print to find the printer had been printing nothing for who knows how long. In those cases, I use the Jog Controls tab in the Machine Control Panel to do some sleuthing:
I start with my nozzle way above the print and I lower the Z position until I get close. The closer I get, the smaller the increments I move down, until I am using the -0.1 Z button. When I feel I am pretty much there, I pick an inconspicuous spot on the print and move the nozzle on top of it to make sure the nozzle is just barely above my print. I have found that sometimes touch is easier than sight, so I use a handy dandy business card to gauge the distance. Once I’m satisfied, I only have to refer to the positioning information in Simplify3D to get my Z startng point.
Resuming the Print
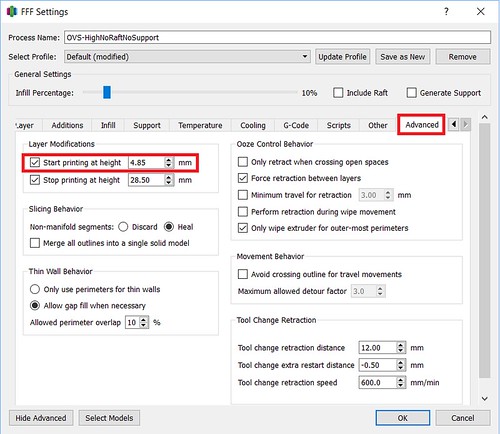
Next I tell Simplify3D where it needs to start printing. I do that under the Advanced tab and setting the Start Printing At Height setting.
Finally, I need to give attention to my Starting Script in the Scripts tab. There are steps in the normal start up script I do not want to run. For example, I don’t want to home my axes (G28;)– I already did that manually. And depending on the object and its positioning on the bed, I may opt to alter other steps that may cause the nozzle to collide with my print. In the case of my Maker Faire print, I made some slight adjustments to the script that has the nozzle go off to the side of the bed to ooze some filament before beginning. I still wanted to do that, but I wanted to make sure the nozzle lifted up high enough (G1 Z10;) to safely cross over my object.
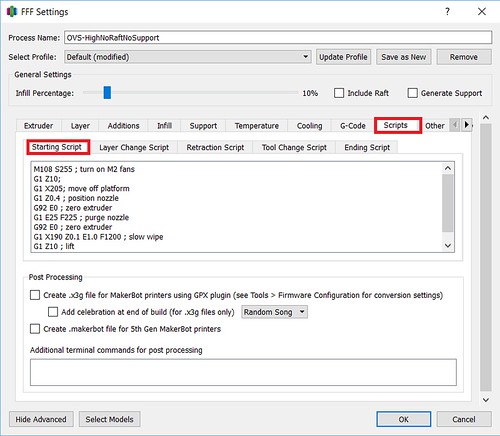
My normal Starting Script went from:
M108 S255 ; turn on M2 fans
G28 ; home all axes
G1 Y50 Z0.3 F9600 ; move forward to avoid binder clips
G1 X205 Z10 ; move off platform
G1 Z0.4 ; position nozzle
G92 E0 ; zero extruder
G1 E25 F225 ; purge nozzle
G92 E0 ; zero extruder
G1 X190 Z0.1 E1.0 F1200 ; slow wipe
G1 X180 Z0.25 ; lift
To
M108 S255 ; turn on M2 fans
G1 Z10;
G1 X205; move off platform
G1 Z0.4 ; position nozzle
G92 E0 ; zero extruder
G1 E25 F225 ; purge nozzle
G92 E0 ; zero extruder
G1 X190 Z0.1 E1.0 F1200 ; slow wipe
G1 Z10 ; lift
Of course, your mileage may vary, but hopefully some of this information translates or inspires a technique that works with your printer and slicer. Happy Printing!