First Thingiverse Remix!

Last week, thinking about how much I have gained from the generous licensing of Thingiverse designers (such as RosieCampbell, Liz Havlin, EHM), I decided to pay it back a little bit and I made my Glowing Pumpkin Pendant/Pin available on Thingiverse. I even marked it as good for Remix and Commercial use.

3D Printing - Glowing Pumpkin Pendant - Face Options

A week later, my design has its first Remix! A gentleman from the Ukraine adapted it into a keychain! And interestingly enough, he printed it in a single color… and it looks fantastic!

Ukraine Pumpkin

Just like the Mill House Museum Ornament, I’m glad to see my colored design translates well to a single color! : )

P.S. If you don’t have a printer, I do have prints of the original Glowing Pumpkin Pendant/Pin listed on Etsy.

Modeling Diary – Occoquan’s Mill House Museum

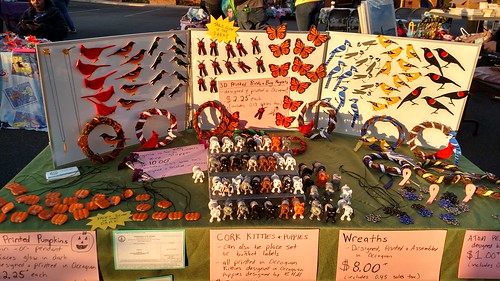
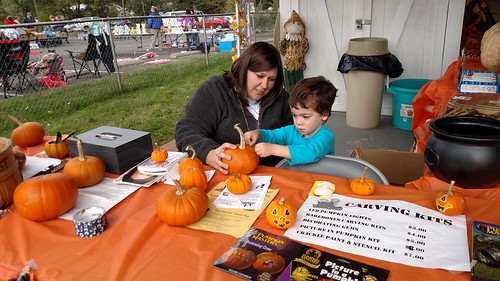
After the Occoquan Arts and Craft Fair, I was approached by the Occoquan Business Guild. This holiday season the Virginia Governor’s Mansion is celebrating Virginia’s localities. They invited counties, cities, and towns throughout the state to design an ornament for tree. I was asked to design the Christmas Ornament representing Occoquan!

Originally we discussed a replica of the old Ellicott Mill which was the very first automated mill in Virginia. But, the Mill looked to be particularly ambitious in the timeframe (end of October). So we ultimately decided to do an ornament based on the Mill House, which is a structure that still stands today and is home to Occoquan’s Mill House Museum. The Mill House’s shape seemed like it would aesthetically make a better ornament.

This structure also has an emotional connection to me and my family. My maternal grandmother worked at the Mill House Museum for many years.

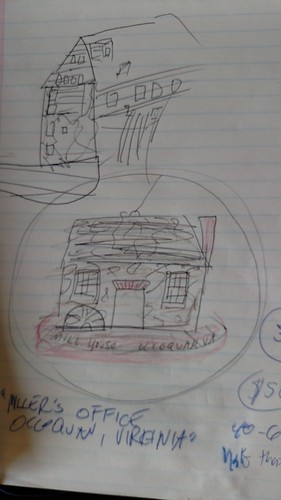
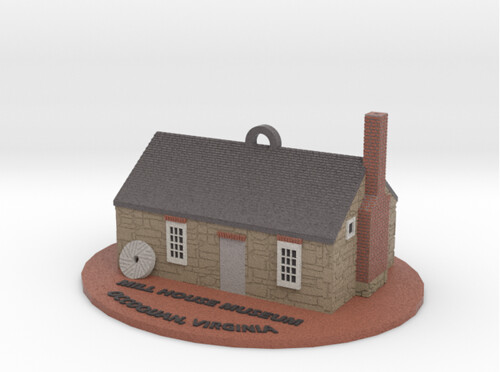
I did some sketches and settled on a pretty literal translation of the Mill House. Since the Mill House is a stone structure, I recommended the final print be in Shapeways’ Full Color Sandstone. I felt its stone-like finish would be perfect for the ornament.

3D Printing - Mill House Museum  Original Sketch

Modeling – Base Structure and Details
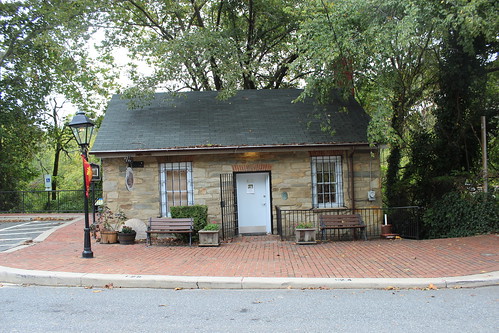
For modeling, I used some reference photos I took of the building.

Mill House Reference - Front

Mill House Reference - Mill Side

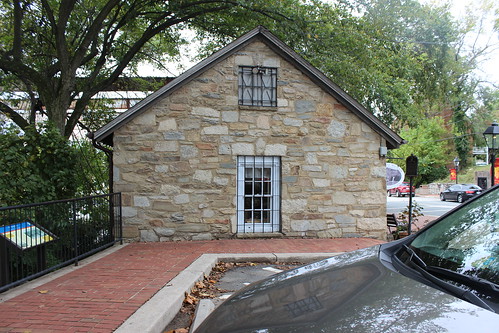
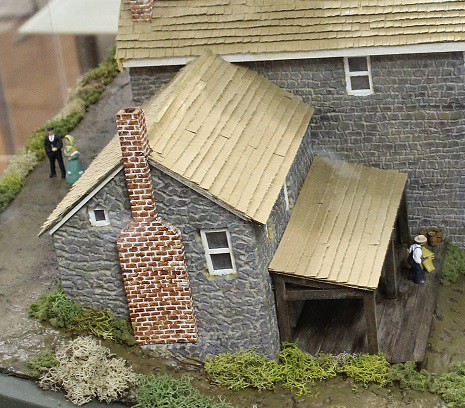
The side of the mill with the chimney was tight for me to get pictures, so for that side I also used a reference photo I took of a model by former Council Member Dr. Walbert.

SMALL Mill House - Chimney Referene

One of the key features I wanted on the ornament was an old Mill Stone laying on the building. For that, I referred to good ole Wikipedia and its article on millstones!

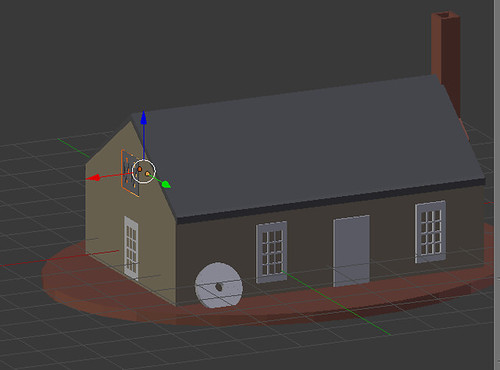
Modeling – Mill House
I did all my work in the free modeling software Blender. The base model, the windows, the door, the brick trim above the windows and the chimney shape all went quickly and were pretty much done with cubes and basic mesh modeling.

3D Printing - Occoquan Mill House Museum -Mill House Start

Modeling – Physical Textures
And then I had the tricky part. The stone work and the brick work. Now, because we were planning on Full Color Sandstone, I did have the option of doing a UV Map and doing that details just through the colors. But I decided, I really wanted those textures to be actual textures. If we wanted to print the model in bronzeFill or plastic, I wanted the details to translate. I briefly researched Displacement Maps, but with the time clock ticking, I went with an approach I was more comfortable with. (One day I may look back and think, “Dude- you did this the HARD way!”)

All my physical textures I went with a height of 0.5mm. I have found 0.5mm details look good on my MakerGear M2– it’s big enough for the detail to be distinctive, but small enough that the printer doesn’t struggle with overhangs.
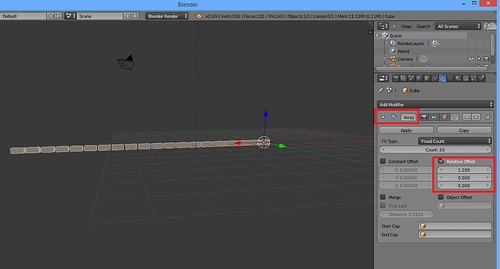
Modeling – Bricks
Bricks– I made a small cube as a brick and then used the Array Modifier to make a line of evenly spaced bricks.

3D Printing - Occoquan Mill House Museum -Screenshot - Brickwork

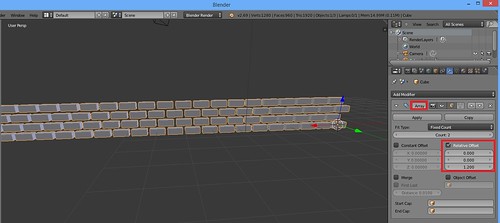
After I applied that Array Modifier, I did another! I made one row and offset it a little bit to get the stratified effect of two rows of bricks.

3D Printing - Occoquan Mill House Museum -Screenshot - Brickwork 2

Finally I used the Array Modifier one more time to make a big sheet of bricks!
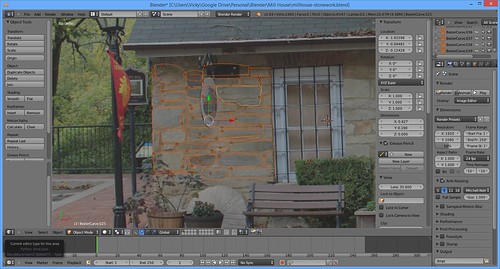
3D Printing - Occoquan Mill House Museum -Screenshot - Brickwork 3

Modeling – Stones
For the stone work, I was partially a purist. I pulled up a new Blender project and traced out some of the real stones of the Mill House in Bezier Curves. And once I had a good selection, I used that mini sheet of stones to make bigger sheets.

3D Printing - Occoquan Mill House Museum -Screenshot - Stone Work

Modeling – Fitting the Brick and Stonework
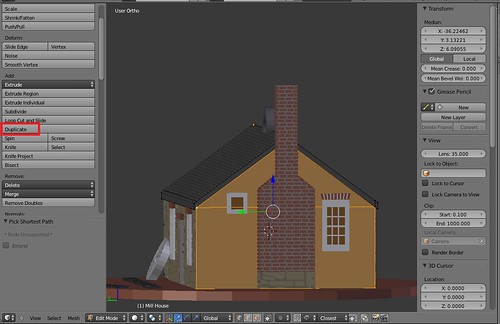
To fit my stonework and brick work to the actual Mill House, I made little templates of the sides I wanted to work with. I started by making a template of the side I wanted the texture for. This would include window and detail cut outs where I did not want stone or brick. This took me a while to find a process I liked. I finally ended up with ended duplicating any pertinent vertices.

3D Printing - Mill House - Duplicate Vertices

Then I separated them into their own object by going to Mesh->Vertices->Separate->Selection.

3D Printing - Mill House - Seperate Vertices

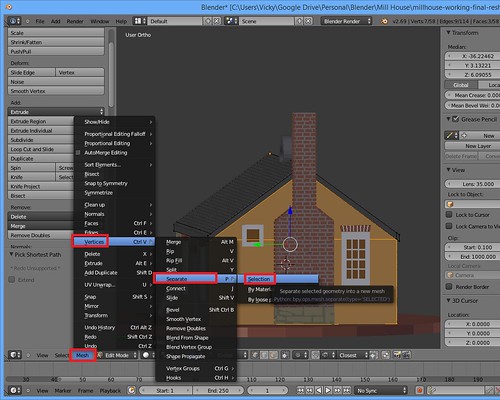
I sometimes had to repeat with other objects (such as windows).

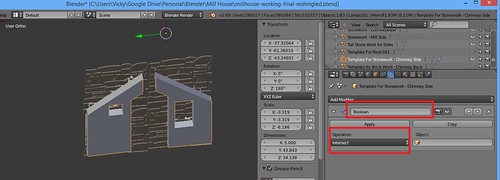
Once I had all the relevant vertices, I made a new face of what I wanted stonework for. From there, I used the Boolean Modifier and Intersection to cut my sheet of stonework into…a specifically shaped sheet of stonework.

3D Printing - Occoquan Mill House Museum -Screenshot - Intersection

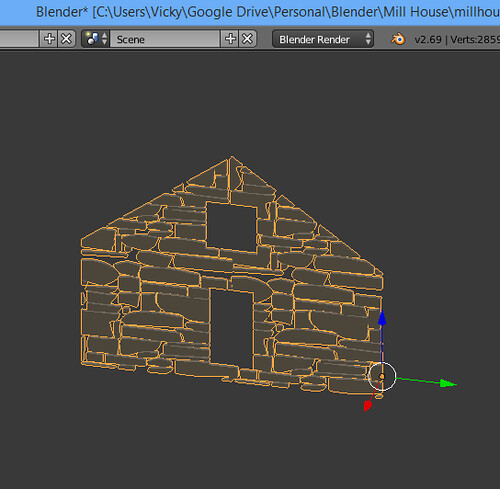
And I ended up with my final textured piece that I could overlay over my Mill House.
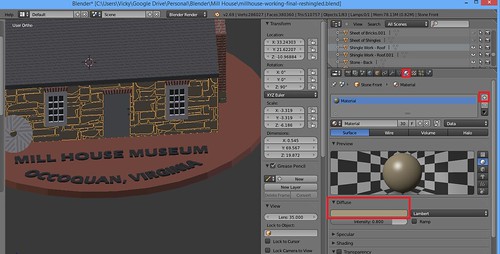
3D Printing - Occoquan Mill House Museum -Screenshot - Intersection Aftermath

Modeling – Colors
With the Mill House, I didn’t have to create a UV Map for my coloring. I was able to do it all by the Materials tab for my objects.

3D Printing - Occoquan Mill House Museum -Colors

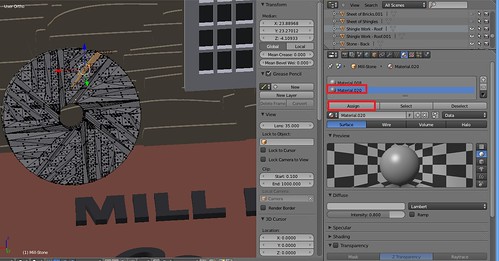
In a couple of spots, I assigned a different material to specific faces (like grooves in the Mill Stone)

3D Printing - Occoquan Mill House Museum -Color Faces

Modeling – Hollowing
To save on material cost I did hollow out my Mill House. It was an easy process– I Inset the bottom face and Extruded up.

Renders and Rework
Originally I did my shingles with an Subdivide, Inset and Extrude technique. It looked fabulous in my Mamie Davis Gazebo Ornament, but I did not like it in my Mill House renders.

3D Printing - Occoquan Mill House Museum - Sandstone Render

I went back and redid the shingles the way I did the bricks (so they were staggered).

3D Printing - Occoquan Mill House Museum - Sandstone Render - New Shingles

I met with my contacts and gave them a tour of the model and the renders and they loved it! The only tweak they had was to add a doorknob.

“That’s it!” I yelled enthusiastically!

The door had been bothering me all week. It just did not look right. As soon as they said doorknob– I knew that was it. That was the missing piece.
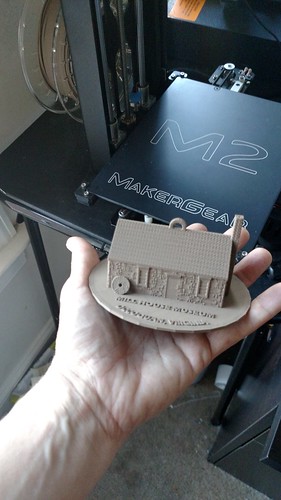
3D Printing - Occoquan Mill House Museum - Reshingled - Final

Test Prints
One of my concerns was the balance of the ornament would be off or that once printed, I wouldn’t be fond of the size I chose. So I did a test print on the Maker Gear M2. And….. I was in love. Even though my printer did not pick up the window panes and I noticed a few minor issues, I was impressed at how great all the detailing came out on my printer. I am so glad I went to the trouble to make that stonework and brick work physical details instead of just colors. As for balance– it balanced perfectly!

3D Printing - Occoquan's Mill House Museum - Test Print in White - It Balances

And for fun, I also did a version for myself in ColorFabb bronzeFill.

3D Printing - BronzeFill Mill House Museum From the M2

Final Print
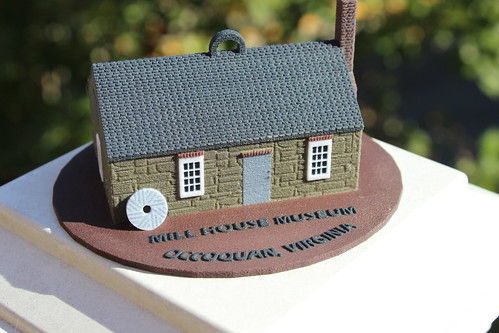
My final print came out a little darker than I expected, but still very identifable as the Mill House. The most important part– the “customer” was thrilled! Phew!

Mill House - Top

And Now…
And now the ornament makes it way to the Virginia Governor’s Mansion! Exciting!

St. Paul UMC Fall Fair – Recap

On Saturday, I did a little “mini” show at a nearby church for four hours.  Since the booth fee was only $10, that gave me the luxury to do some experimenting with lower prices– particularly with the Cork Kitties and the Cork Puppies!  My experiment for this show as setting them up at $2.25 (that’s including the sales tax).

I left my more expensive products at home and only set up one 5′ table.  TGAW 3D “Lite”, if you will.

St. Paul UMC Fall Fair -  "Lite" Booth

Now, the foot traffic at this show was pretty minimal– I think most of the people there were other vendors, but I still managed regular sales.  My sample size is small, but I’m feeling like there was more conversion from admiration to actual purchase.  🙂  Oh, and I sold my very first Standing Cancer Ribbons.  Yay!

Cancer Ribbon - Pink

Other misc observations:

  • All the sales this time around were cash (At the Occoquan Craft show it was about 60% cash, 40% credit).
  • If I keep up with the magnet boards, I need a better way to brace them– it flew over in the wind!
  • Not all glue is equal.  I’m still filtering out bird magnets whose magnets are loose. : (

Finally, I discovered there is a perk to a slow show.  I got to sneak in some quality time with my boys and it was a fun place to do so.  They had a moon bounce, a pumpkin patch… and the local fire station even brought over a fire truck and an ambulance for the kids to explore.

St. Paul UMC Fall Fair - Dyson on Moon Bounce

St. Paul UMC Fall Fair - Dyson with Pumpkin Patch

St. Paul UMC Fall Fair - Amy and Sagan Decorate Pumpkin

St. Paul UMC Fall Fair - Sagan Drives Firetruck

As for grown up stuff, I got to visit with an old classmate from elementary school.  We had a lot to catch up on.

It wasn’t an especially lucrative show, but I had a most fabulous time.

Two New Fall Events

I have two additional events to add to my Events page. They are both in Prince William County, Virginia:

Saturday October 17th, 2015 – Community Yard Sale
8 AM – 12 PM
St. Paul United Methodist Church
1400 G Street (Off Occoquan Road)
Woodbridge, VA

Saturday November 14th – 4th Annual Fall Fair
10 AM – 4 PM
Post 28 Quantico Buck Keyes American Legion
17934 Liming Lane
Triangle, VA 22172

I mentioned in my follow up to the Occoquan Fall Arts and Craft Show that I felt I may have mispriced some of my items, particularly items geared for children. I’m going to experiment with lower prices at both of these events. Gather up more data for me to learn about pricing and sales.

As I tell my four year old, you gotta practice to get good. : )

More Proof 3D Printing is Hands-On

When I was preparing for Occoquan Arts and Craft Fair, behind the scenes I was somewhat worried the organizers wouldn’t perceive my work as handmade. I had these preemptive unspoken arguments queuing up in my head. I collected up examples (and photos) of all the hands-on work– the modeling, the trial and error, the bed prep, the filament changes, the sanding (my gazebo ornament– I have to sand in between each and every slat in the railing- 70 in total), the painting, the sealing, adding split rings and keychains. I had a point all lined up at how Etsy considers 3D printing handmade.

This whole process was quite similar to all the practice arguments and the State Code passage I memorized in case anyone ever gave me flak about breastfeeding. In both cases, I never had any hassle (which doesn’t mean people aren’t hassled).

But should the tide ever turn, I had thought the giant gash in my thumb would be another good testament to the hands-on nature of 3D Printing.

3D Printing - Injury

If it wasn’t hands-on, how did I get that injury, huh? Huh? Huh? : )

And this tweet from PrintedSolid shows that I’m not an anomaly. Heads up– his picture includes the blood.

Horrors of #3dprinting #ouch #thefilamentbitme pic.twitter.com/FWN9k3y0a2

— Printed Solid (@PrintedSolid) October 4, 2015

3D Printing is most definitely a hands-on craft… and apparently dangerous for thumbs. : )

Hobbies Collide – Geocaching and 3D Printing

Long before I even heard of 3D Printing, one of my hobbies was geocaching! Admittedly, I haven’t done it much recently (we did do a couple caches with the boys last summer), but it is still near and dear to my heart.

Last week at the Fall Occoquan Arts and Craft Show, I met a much more active geocacher (like “5,992 caches found” active) – DePhogration. Using one of the prints of Rosie Campbell’s Science-Themed Necklace, he set up a brand new Travel Bug. Even if I’m not actively geocaching… I (and you!) can follow its adventures. The goal– visit as many science-themed caches as possible. : )

Geocaching and 3D Printing - TGAW Orbiting

Get TGAW 3D Halloween Designs….with FREE Shipping

Shapeways Free Shipping

Shapeways is offering FREE shipping this weekend (October 3rd and 4th, 2015). Know what that means? You can get my Glowing Cthulhu Jack-O-Lantern or my moving part Dial-O-Lantern (pick between 27 face combinations) in time for Halloween… and with FREE shipping.

Cthulhu Pumpkin - Glowing Orange
Glowing Cthulhu Pumpkin

3D Printing - Dial O Lantern - Example Face
Moving Part – Dial-O-Lantern

Happy Shopping! : )

Print Diary – Curiosity Rover

Over the summer, NASA released a FREE 3D Printable model of the Curiosity Rover. Now that the Fall Occoquan Arts and Craft Show is behind me, I had time to do a “fun” print. NASA had two versions to choose from – detailed version estimated to take 11 hours and a Simplified version, estimated to take 2 1/2 hours. I chose to go with the “Simplified” version.

Fun Print - Curiosity Rover

I decided to break the print up into two prints. I did most of the parts in MakerGear Silver PLA filament (I did have to rotate some of the parts in Simplify3d before printing) and then I did the six tires in MakerGear Black PLA Filament. I printed at 0.25 layer height with 20% infill.

The final rover came out FANTASTIC! An easy print with easy assembly. NASA even put in their own rafts and supports which worked wonderfully. I am impressed how easy it was. Great job, NASA!

3D Printing - Curiosity Rover

P.S. Curiosity isn’t the only free NASA model out there. They have an entire 3D Printing section!