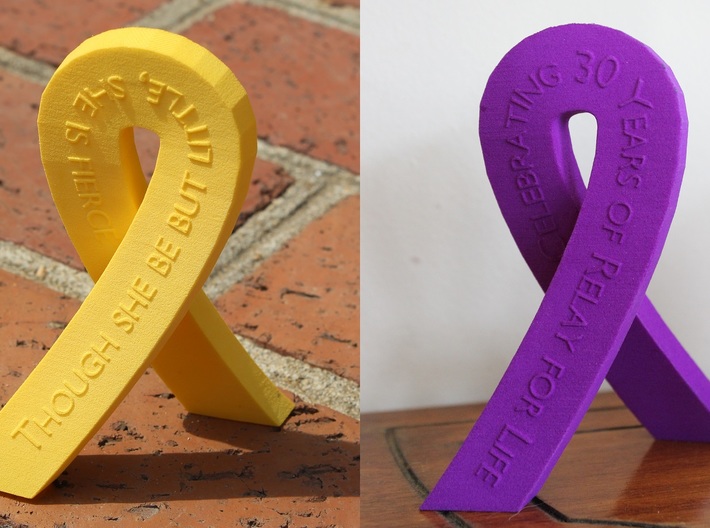
My Standing Cancer Ribbon (available at Shapeways) made a cameo on 3DStartPoint’s collection of 3D Prints for Breast Cancer Support and Awareness. All the models are great– it’s flattering to be included!

My Standing Cancer Ribbon (available at Shapeways) made a cameo on 3DStartPoint’s collection of 3D Prints for Breast Cancer Support and Awareness. All the models are great– it’s flattering to be included!

Shapeways is offering FREE shipping this weekend (October 3rd and 4th, 2015). Know what that means? You can get my Glowing Cthulhu Jack-O-Lantern or my moving part Dial-O-Lantern (pick between 27 face combinations) in time for Halloween… and with FREE shipping.

Glowing Cthulhu Pumpkin
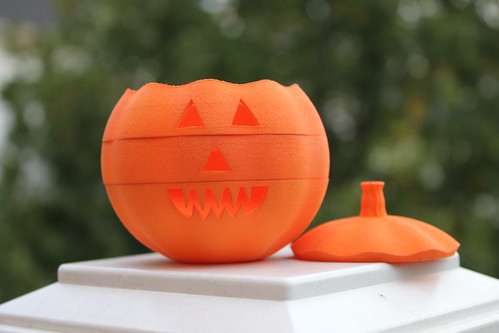
Moving Part – Dial-O-Lantern
Happy Shopping! : )
Occoquan Arts and Craft Show – September 26th and 27th!
First off, I’m in! My application to the Fall Occoquan Arts and Crafts Show has been accepted (with multiple explanation marks from the show director). It’s official– TGAW 3D is the show’s very first 3D Printing Booth! Hopefully, we’ll be setting a trend for future shows.
Even better news– our booth is going to be adjacent to my brother’s shop, which means we’ll have access to power. Weather permitting, Ryan and I will be bringing the MakerGear M2 down and have it running. We’ll also have our Kinect on hand in case anyone wants to get themselves scanned. 🙂
If you are in the area, stop by and see us!

Automating Pumpkins
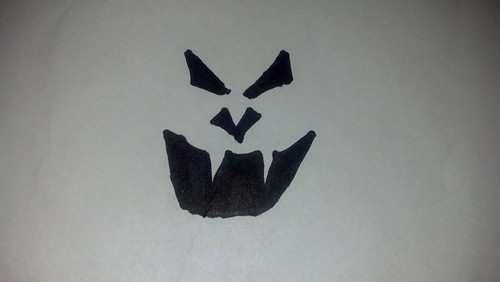
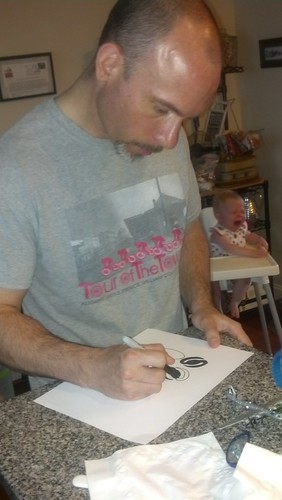
My ultimate game plan with the Glowing Pumpkin Pendants is to take advantage of one of the great perks of 3D printing– customization. I want people to draw/design their own pumpkin faces. I have my base pumpkin model. I would just need to make their face into a model and subtract it from my pumpkin. Thinking ahead, I did some experiments. I grabbed a Sharpie, drew a face and scanned it as a black and white image.
Now what?
OpenSCAD?
Looking over the OpenSCAD documentation, it looked like I might be able to use the Surface feature to achieve my goal. It uses the greyscale values of an image to determine the various heights of a surface. Since my image was Black and White, it should give me a template to carve out of my pumpkin.
It did make my face surface as planned… but it had a bottom plane underneath it. No worries, I rotated it 180 degrees. At this point, all I would need to do is position it, size it, and subtract it from my pre-existing pumpkin template.
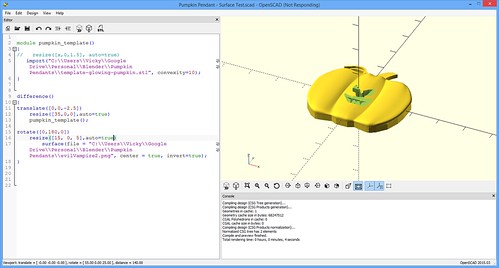
I got it carved out, albeit a lot smaller than I wanted. At this point, I had to abort. I do truly believe OpenSCAD could be a viable option. But the rendering times were sooooo long. And then anytime I wanted to scroll or examine my object, I would have to wait again.
Disclaimer- It very well could be my old laptop from 2010 that has dwindling harddrive space…courtesy of all my 3D modeling.
If you’d like to explore this option further, my OpenSCAD code is below for reference and you may also want to refer to CubeHero’s Emboss and Impress Images onto a Surface in OpenSCAD article.
[js]
module pumpkin_template()
{
//This is me importing in my base pumpkin template
//what I want to carve the face out of.
import(“C:\Users\Vicky\Google Drive\Personal\Blender\Pumpkin Pendants\template-glowing-pumpkin.stl”, convexity=10);
}
//This difference command is me subtracting my
//face surface from my base pumpkin .STL
difference()
{
translate([0,0,-2.5])
resize([37.275,0,0],auto=true)
pumpkin_template();
//This is me making my surface file based on my PNG
//of my face. I rotate it 180 degrees so the solid
//plane base is on top (and out of the scope of my carving
rotate([0,180,0])
resize([30, 0, 5],auto=true)
surface(file = “C:\Users\Vicky\Google Drive\Personal\Blender\Pumpkin Pendants\evilVampire2.png”, center = true, invert=true);
}
[/js]
InkScape?
Inkscape seems to be a very powerful way of turning images, logos, and patterns into scalable vector graphic images that you can import into Blender or other modeling software. I’ve seen many people having success with it on the Internet.
One of those people just isn’t me. : (
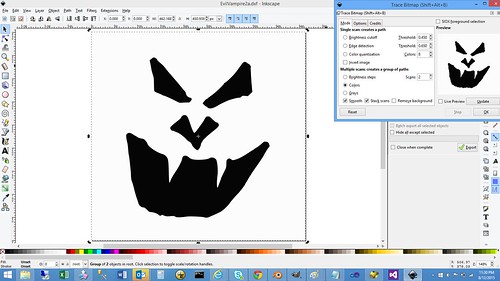
I’ve tried using it for three different projects over the last 18 months. Each time, I’ve ended up with a model that is cumbersome to edit and full of mismatched face normals. It just seems like I have an awful lot of cleanup to do. And not fun, “I’m learning more about 3D modeling” cleanup– tedious, demoralizing cleanup (“What– now I have even MORE non-manifold edges? #@(*&$I*!”)
Disclaimer- This could end up being user error– something like I should export to a different SVG format instead of the Inkscape SVG.
ShapeJS
Interestingly enough, the tool I found I liked the most is Shapeway’s JavaScript-based library, ShapeJS. Just like OpenSCAD’s surface, you can upload an image and the colors in that image is used to make your model.
I stole code from their Absinthe Spoon example, uploaded my Black and White image and very quickly I had a model.
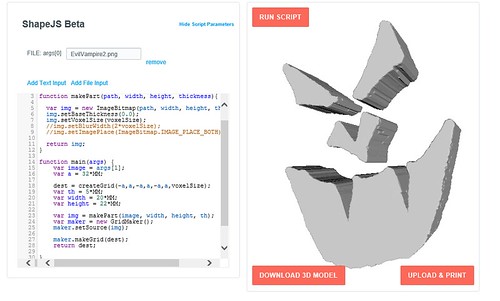
They have a Download 3D Model button, but I couldn’t seem to get that to work in Internet Explorer or Chrome.
My workaround was:
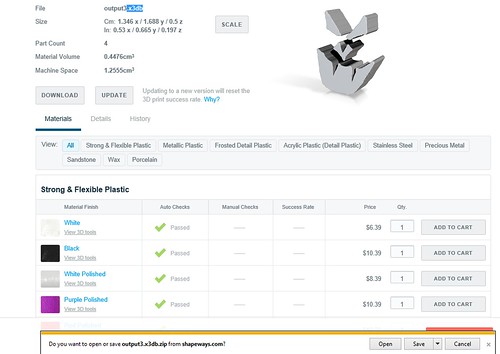
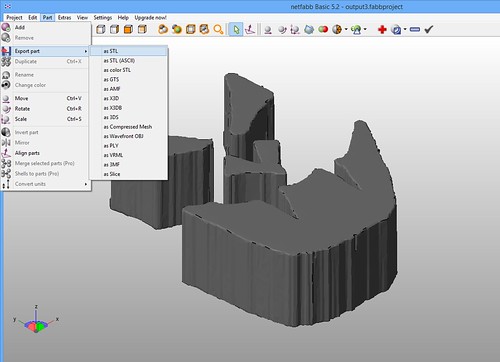
Yes– that is indeed a lot of steps. But guess what– I found it still better than Inkscape cleanup. : )
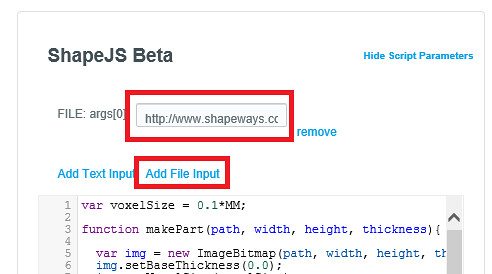
If you wish to follow in my footsteps, here’s my ShapeJS code. To compliment the code, you’ll want to click on Add File Input at the top of the code editor and then upload the file you wish to use.
[js]
var voxelSize = 0.1*MM;
function makePart(path, width, height, thickness){
var img = new ImageBitmap(path, width, height, thickness);
img.setBaseThickness(0.0);
img.setVoxelSize(voxelSize);
return img;
}
function main(args) {
//This argument (arg[0]) is our PNG file.
//I add by clicking on the “Add File Input”
//and then I upload the file I want to use
var image = args[0];
var a = 32*MM;
dest = createGrid(-a,a,-a,a,-a,a,voxelSize);
var th = 5*MM;
var width = 20*MM;
var height = 22*MM;
var img = makePart(image, width, height, th);
var maker = new GridMaker();
maker.setSource(img);
maker.makeGrid(dest);
return dest;
}
[/js]

Other Options
There are most definitely other options out there. I’m sure my learning and experimenting will continue. Last night, for example, I was just reading an article by Chris Gerty about using Online-Convert to do the same thing. H.G. Dietz’s Trace2SCAD looks interesting as well.
But for now, the ShapeJS method has served me well. My husband drew me two new faces that we were able to model and print quickly this past weekend.
Shapeways Labs has a 3D Viewer Embed Tool where you can generate the embed code for your blog or website. Unfortunately it looks like one of the site upgrades may have broken that tool. When I tried it out this morning, I noted that I was getting an error in the preview. When I took a closer look at the embed code, I could see there isn’t a model number listed.
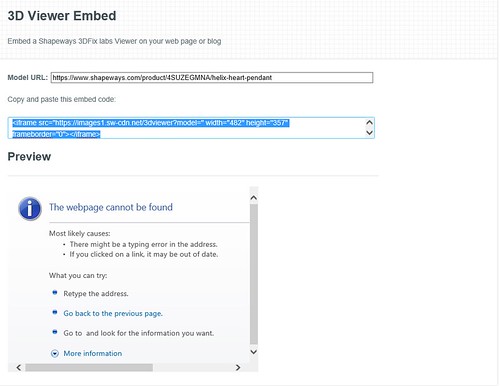
Until they get it fixed, if you covet a Shapeways 3D Viewer in your blog, the steps are as follows.

Your embed code will look something like:
<iframe src=”https://images3.sw-cdn.net/3dviewer?model=3299708&v=1&key=235bd7d3726bd3a78577cda213f465cc” width=”482″ height=”357″ frameborder=”0″></iframe>
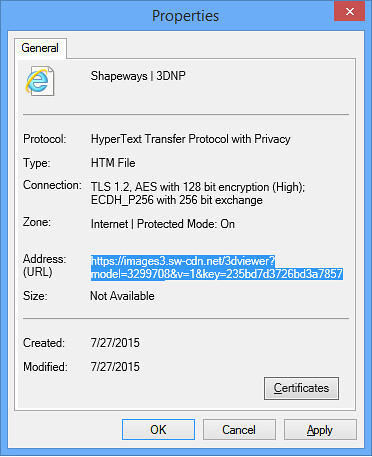
Where the bolded area is the Address (URL) you copied in Step 3 above.
To test it out– the render of my Helix Heart Pendant because it looks so super neat as it spins.
A faux pas I sometimes make is I value my own designs based on how I perceive their complexity. I am continually surprised at how many people delight in the breastfeeding pendant. Now, it did take me months to make, but that was because I was tending to an infant and learning Blender. : ) It’s probably my simplest design… and the one that is purchased most on Shapeways.
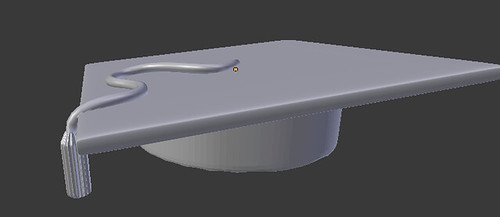
This past May, I may have undervalued another design. With graduation season coming up, my Mom suggested we print some little graduation caps for some family friends. I wasn’t too enthused by the items on Thingiverse, so I spent about an hour one Sunday designing my own. I added a little bit of personalization to each cap by adding the graduate’s name on the top. In my mind– pretty simple. Hey, I did it AND ate a waffle at the same time. I didn’t even consider uploading it anywhere.
But it turned out the little caps were well received, particularly with one high school graduate…whose friends suddenly wanted their own (two days before graduation). I just did not anticipate such a simple design would provoke such interest.
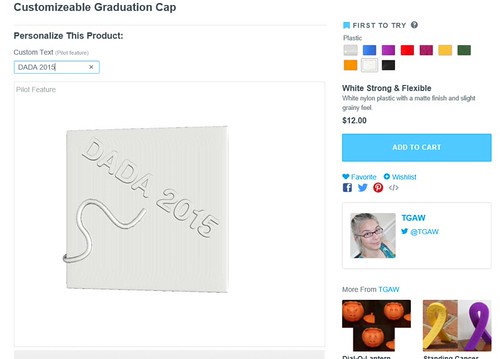
Last week, Shapeways announced a new pilot feature– the CustomMaker. I had set up personalized products before with Shapeways (School Bus Wine Stopper, Cancer Ribbon, Woven Heart Ornament). Previously, it was a fairly involved process where you would set up what variables you wanted to prompt the customer for. The customer would submit those details with the order. You’d manually make the model and upload it back up to fulfill the order.
CustomMaker automates that process– it modifies the model for you. Not only that, it’s much easier to setup and gives the buyer instant previews of how the product will look!
And I had just the model to test out the new feature! So this past Sunday (after eating waffles, it’s our Sunday tradition), I tried my hand at setting it up. It was super easy.
You can add a Text Box and/or an Image Box (where the customer can upload an image) to your model. You get to drag and drop and resize as needed, pick whether you want it engraved or embossed, and you get to pick the size of that detail (I went with 0.5 mm)
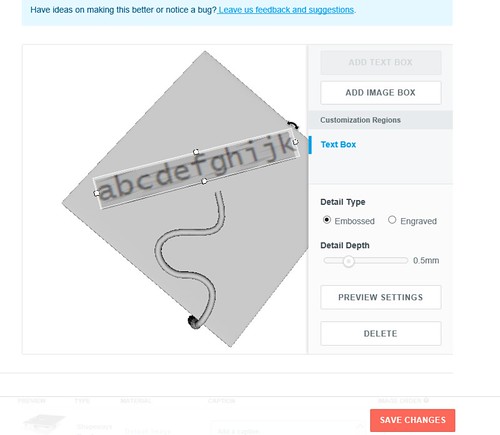
If you have a hard time visualizing or decided between engraving and embossing, you can click on Preview Settings.
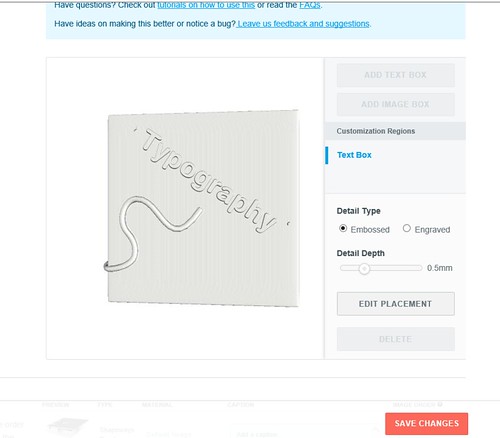
The top of my graduation cap is angled. I was curious to see what the text would do about that. I was delighted to see the feature was smart enough to angle the text so it was flush with the top of the cap.
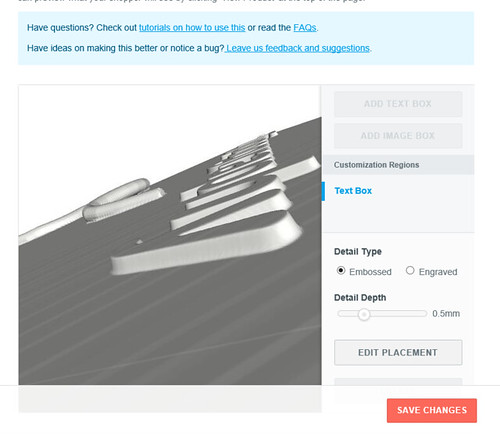
Then you simply Save Changes are you are ready! When the customer comes to my graduation cap page, he/she can fill in the text and the preview on the screen refreshes right away. With CustomMaker, the guess work is eliminated. The customer has an immediate feel for what he/she is ordering.
I went ahead and ordered one to try it out. It turns out, there was one very special grad I overlooked in June. I owe him a gift card… and a little cap to boot.
Wanna Learn More?
Check out Shapeways’ Getting Started with Custom Maker Tool Tutorial
So I’m not much of a shopper. I rarely buy clothes. I’m typically at the mercy of whatever garments various relatives give me as gifts. Luckily, I have found they tend to have better taste than I. All my nice clothes come from other people.
When I started 3D modeling and 3D printing, there was a bit of a paradigm shift. Suddenly I had things I coveted– prints from Shapeways… of my own design. And now that we have the MakerGear M2, there is a new phylum of purchases in the mix.
Filament.
I’m really into filament at the moment. At the National Maker Faire, I was helping out the Shapeways booth and it just so happened Printed Solid was nearby with the bronzeFill I had been coveting…on sale…with no shipping fees. I bought it, just in time to print a bust of my father-in-law for Father’s Day. I was instantly in love with the material.
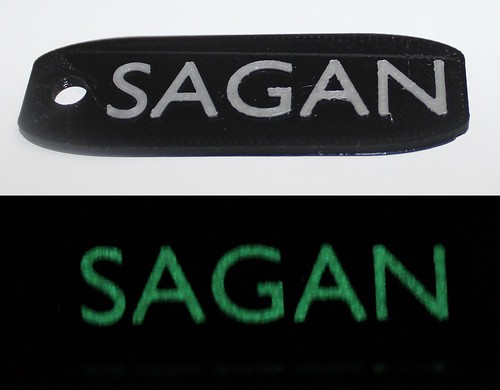
My fate was further sealed when I learned to do two colored prints on our single extruder machine.
Achievement Unlocked – A Two Color Print (I switched filaments at the end). #3DPrinting #VirginiaTech P.S. This test print free to a good home. It’d make a good magnet. A photo posted by Vicky Somma (@vickytgaw) on
Well now I wanted MORE colors for the ideas brewing in my head. And as luck would have it, Printed Solid had a big sale to celebrate their new website. Well I couldn’t just let that pass me by. “Oh I’ll just order one,” I thought to myself. I decided to get the GlowFill my son and I had tried out the week before. Just like bronzeFill. Instant love.
I placed an order for GlowFill. And then like five minutes later, I placed another order. That’s how fast I found more things (4 more things to be exact) that I coveted. That shipment has arrived, but I still yearn for NinjaFlex, WoodFill, a wider nozzle to better work with WoodFill, hdGlass, green PLA, purple PLA, on and on. 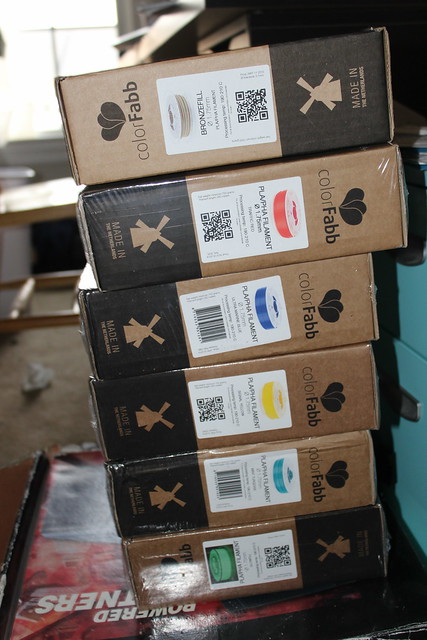
The comedian Amy Schumer aptly described how she eats popcorn— the progression from “oh, I’ll just have a little” to “Gah!” and shoveling it in your mouth en masse.
That can easily become me and filament. : )
Amateur Hour
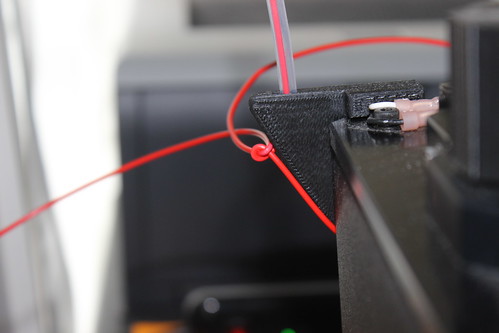
My morning print could be aptly described as “amateur hour”. I decided to make another stab at my two color cardinal. I had a busy workday, so the print wasn’t my top priority and I did note my filament had come uncoiled as I put it on the machine, but I didn’t think much of it. I got the print started, confirmed the first layer was going well and then I directed my attention to some programming projects.
All of a sudden I noticed the infill of the cardinal, which is usually quite smooth, was very much NOT so.

It was shortly there after, I noticed that all those loose coils had worked themselves in a nice, extruding-thwarting, knot.
I was able to undo the knot and the print resumed. Now, I have seen first hand how the quality and quantity of the infill can impact your top layer.
I was printing at 0.10 mm layers and at this point, I knew I had enough layers for my bird to recover. I felt that he would still end up with a smooth body and head. And I was right! Sure enough, layer by layer, the surface smoothed out and was looking rather fine.
But then…. ANOTHER KNOT.
Seriously! I let the exact same thing happen AGAIN. You would never guess that I spent 10 years working on Quality Control Software. You would never guess that I have heard of phrases like “corrective and preventative action”. : )
Anyway, at that point, I was just two layers away from one of my visible surfaces. I knew the bird would not recover.
But I let the print continue.
Failures in life (and 3D Printing) can also be “Learning Opportunities”. In this case, I wanted to see how my wing detail later in the print would look. It didn’t matter how shabby the rest of the bird looked. I would still be able to assess whether my “peeks of black” were going to be effective in the wing. The overall print would be a fail, but I would still gain some knowledge.
Experiments with Wing Detail
Later in the afternoon, I decided to give the cardinal another whirl. This time I made sure I wasn’t sloppy with my filament. And to keep the learning going with the print, I decided to play with the print lines in the wing.
I remembered seeing the “Owliver Belt Buckle” by Shapeways Designer Michael Mueller in Grey Polished Steel a while back. One of the things that really struck me about the design is how amazingly the print lines added to the feather effect.
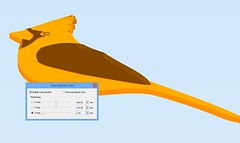
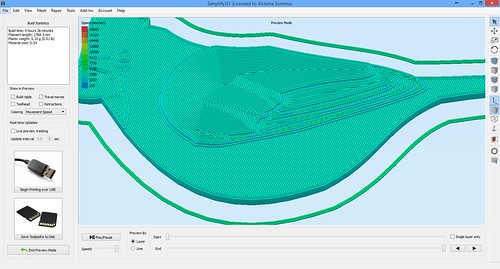
Although I was working in plastic, it occurred to me that perhaps my feather detail could also benefit from some changes in the print lines. Perhaps instead of the straight lines on the wing, something like concentric lines that followed the contour of the feather/wing would look nice. But I wanted to keep the body-as in. I wanted to keep the diagonal straight lines there.
This experiment was easy to set up in Simplify3d. For more detail instructions, I suggest referring to their Different Setting for Different Regions of the Model Tutorial.
Quick synopsis – You use the Cross Section View to determine the actual height of where you want to make setting changes. Then you set up multiple processes (aka Settings). In the Advanced tab you can define the scope of the settings– where they should begin and end.
|
|
Quick note– I didn’t test it out in Simplify3d v3.0.0, but in v2.2.2 I had to be careful to turn my fan on for the first layer in my second batch of settings (because it isn’t actually a first layer– it just thinks it is)
Another multiprocess note- I have seen a bug with these multi-processes and rafts. I have not tested to see if it is corrected in v3.0.0
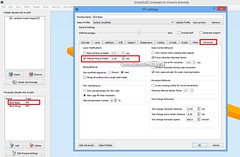
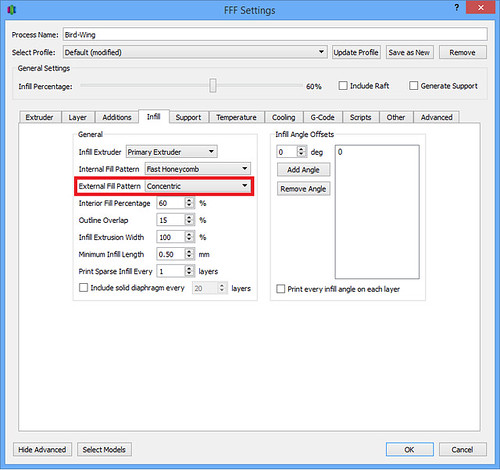
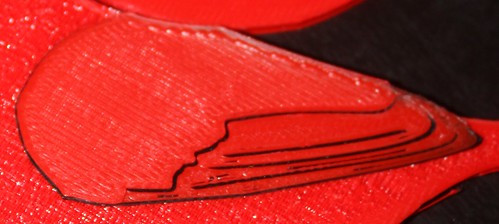
With my wing settings, under the Infill tab, I changed my External Fill Pattern to Concentric.
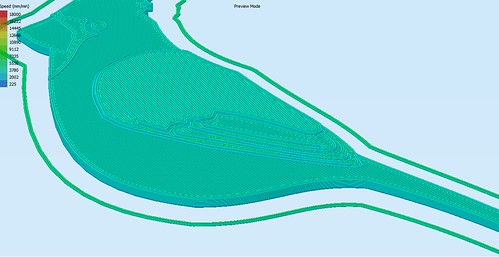
When the print was done, I was able to decide which External Fill Pattern I liked best in the wing.
| Rectilinear |
|---|
 |
|
| Concentric |
|---|
|
 |
Conclusion: The original! I liked the original rectilinear better. Does that mean I wasted my time? Nah… at least now I know*. : )
*I’m paraphrasing Barnacules Nerdgasm here (from his BronzeFill polishing experiments).