Another post inspired by a Twitter conversation!
Here’s a quick tour of my Slicer Settings for the MakerGear M2 (v3b Hot End) for my PLA/PHA.
Hat Tip – A lot of my settings, especially my speed settings, all stem from Ed Nisley’s Settings for the Bridge Calibration Tool. His settings are for Slic3r. I did my best interpretation to convert them over when I started using Simplify3D. My notes and screenshots of trying to match things up are on Flickr at: https://www.flickr.com/photos/tgaw/albums/72157656224789835
Okay without further ado.
Extruder Tab
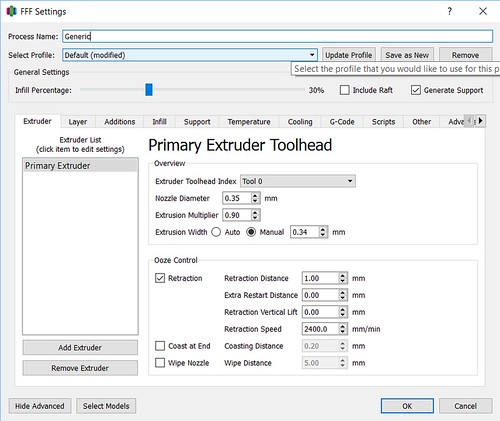
Nozzle Diameter
0.35 – To match my current nozzle.
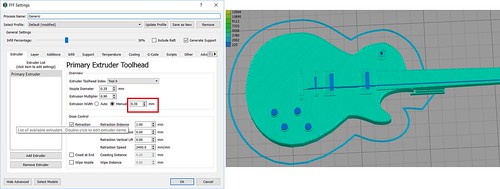
Extrusion Width
Typically– 0.35. I have used the “Auto” which sets to 0.42 without issue.
Exception– In the case of super thin details I have decreased that to 0.34 so the printer will pick them up. An example is a Les Paul Slash Guitar I was working on. At 0.35, the strings were not picked up, but when I changed the Extrusion Width to 0.34, it picked them up.

Ooze Control
I have not actually played with those settings a lot. They are likely the stock settings from the MakerGear M2 profile for Simplify3D
Layer Tab
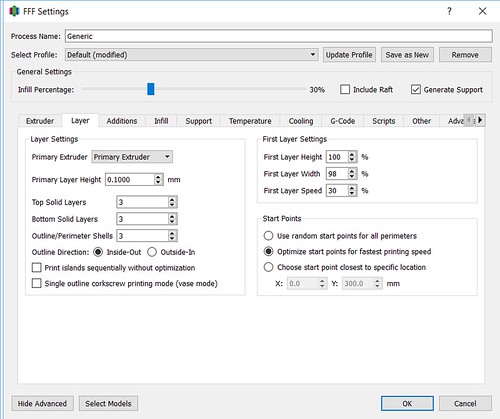
Primary Layer Height
I print anywhere from 0.10 to 0.25. It depends on the projects. Stuff like Cork Kitties, I’m good at 0.25. My multi-colored birds, I want the details to be as close to the base bird as I can, so I print those at 0.10.
Top Solid Layers
I usually keep this at 3.
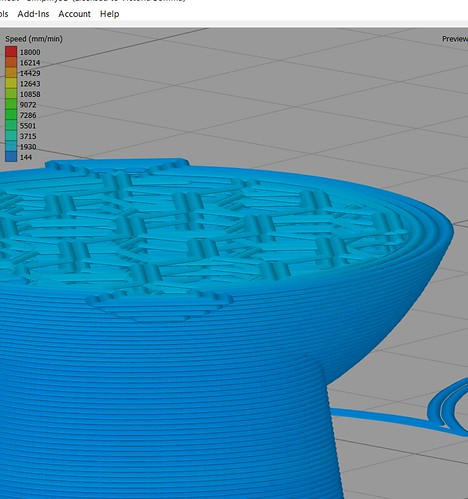
Exception- If I’m working on a piece where the primary focus of it is going to be on the very top (such as the Les Paul Slash Guitar), I will up the Top Solid Layers, sometimes up to 10 (so 1mm at 0.10mm layer heights). This is particularly important if I am using low or no infill. An overkill example is below, but you can see how the combination of Top Solid Layers and Infill can have an impact.
Bottom Solid Layers
I usually keep this at 3
Exception – I have Standing Cancer Ribbon that I print with extra solid layers at the bottom in an attempt to weigh the legs down more. (I have no evidence that is necessary- it worked the first time so I kept doing it)
Outline Perimeter Shells
Typically I keep this at 3.
Exception – If I’m doing something with bronzeFill that I expect to do extra sanding, I up this to 5. (Hat Tip, Barnacles Nerdgasm)
Exception – If I have engraved Text at the top of my piece, I will sometimes lower the perimeters to 1 as it makes the text more crisp.
Outline Direction
Inside-Out – I believe this is the default and it helps with overhangs quite a bit. Because it is starting from the inside, you are more likely to have something underneath it from the layer before to support your new layer. So if it prints inside out, it has a good base before getting to the overhang areas. An example is the 3D Hubs Marvin. If you look at the curvature on his butt. If the first perimeter is printing on the inside, there is definitely something there for it to print on top of.
First Layer Height
With right now how my bed and Z-End Stop is setup, I am having great results with a First Layer Height of 0.10. So this percentage is all determined by my Primary Layer Height.
If I’m printing at 0.10 layers, I use 100%
If I’m printing at 0.20 layers, I use 50%
If I’m printing at 0.25 layers, I use 40%, etc.
First Layer Width
Converting Ed Nisley’s Settings from Slic3r, I came up with 93%.
First Layer Speed
This I keep at 30%. I believe that also stemmed from my Slic3r settings.
Start Points
I use Optimize Starting Points for Fastest Printing Speed. This I stumbled upon trying to get rid of some pimples and oozing on some prints. Once I checked this, my problems disappeared. I suspect this could also be addressed with Retraction Settings but right now, this solution is working great for me.
Temperatures
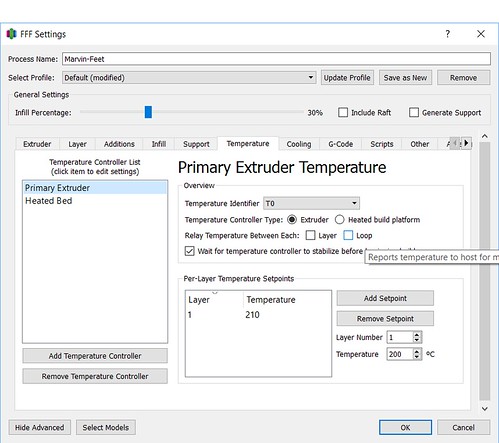
Primary Extruder
I use 210 for all my ColorFabb PLA/PHA
For my MakerGear PLA (my White, Orange, Silver, Black, Purple), I will often use 215, but will sometimes drop that down to 210 if I’m doing something with a lot of overhangs.
BronzeFill and GlowFill I typically use 210.
Heated Bed
Get this. I’m in love with printing on a cool bed on painters tape (And I have that luxury with the materials I have been working with). So I have that set to 0.
Cooling
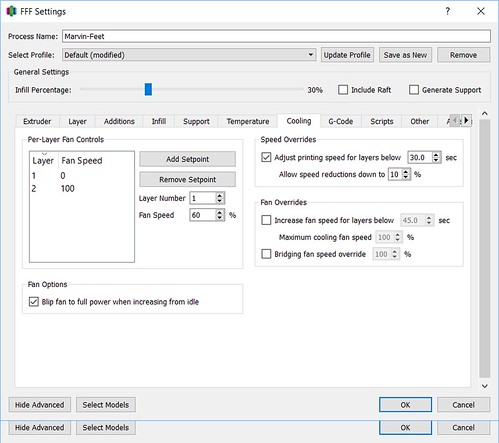
Speed Overrides
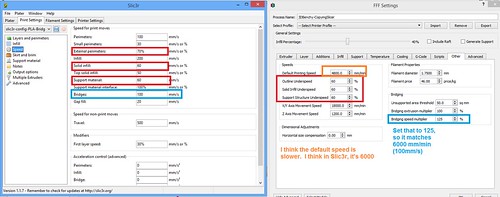
When I was trying to print 3D Benchy, I noted my results in Simplify3D were not as good as my original prints in Slic3r. I went back and reviewed my Slic3r settings and found a whole section I had skipped over because it looked waaay too intimidating.
Now if I am working with a print with lots of overhangs or small details that will need to cool, I will check “Adjust printing speed for layers below” and I set it to 30 (down from 60). I also give it way more leeway with how slow it can go– I set that to 10%.
I often will uncheck this setting if my printer is really flat and straight forward and really doesn’t need extra time to cool before starting the next layer.
Other
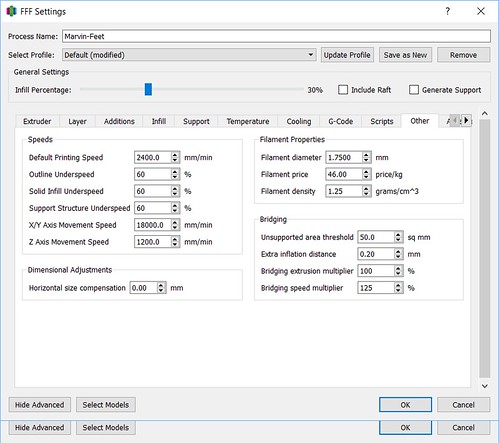
For my printing speeds, it is all my calculations of my old Slic3r settings that I based off of Ed Nisley.
Default Printing Speed
4800.00 mm/min (which is 80mm/sec)
Bridge Speed Multiplier
I set to 125% to get it up to 100mm/sec.
Conclusion
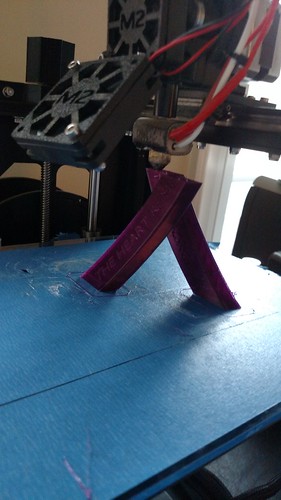
And there you have it. A tour of my settings. Areas where I think there can be some improvement– I do have a model that is subject to some stringing, so I may want to play with lower printing speeds.
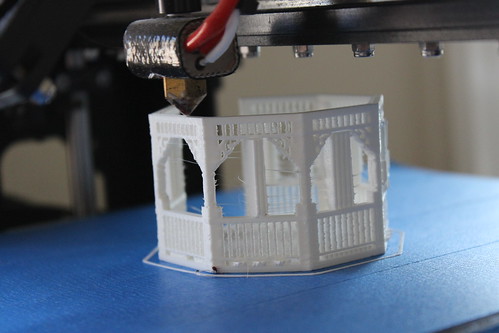
Stringing In the Gazebo
And it is possible I can improve my retraction settings, but like I said above, with my Starting Point settings, that issue has not been bothering me.